Contact support@vantage.sh or your dedicated Customer Success Manager to enable this feature.
- Creating a billing profile with your organization’s billing details
- Adding managed account billing information for each customer
- Generating and distributing invoices
All MSP users can view invoices, while only Organization Owners have write access to invoices. See the MSP RBAC documentation for details on user roles. Customers in managed accounts can view only their approved invoices within their account, on the Invoices screen.
For MSPs who use currency management, if you change the currency for a month that has had an invoice generated, you will have to regenerate the invoice for the new exchange rate to be applied.
Step 1 - Create a Billing Profile
A billing profile contains your MSP’s information that appears on the invoices generated for managed accounts. At least one billing profile is required before you can generate invoices. To create a billing profile:1
Navigate to Partner Settings > Billing Profiles.
2
Click New Billing Profile.
3
Enter a Nickname to identify this billing profile.
4
To add the logo you want displayed on invoices, click Select File and select your logo image file. You can also check the box below this field if you want this logo to apply to all billing profiles so that you have to upload it only once.
5
Enter your organization’s Billing Information, including Company Name and Address.
6
For Business Information, click +Add Field to add key-value pairs for fields like Tax ID, VAT, etc. These fields will appear on invoices below your billing address.
7
Under Taxes and Additional Charges, click Add Charge to add taxes and additional charges based on the subtotal to a customer’s invoice. These charges will be calculated at the time of invoice creation based on the subtotal cost after credits, discounts, and billing rules. They will appear after the subtotal on an invoice.
8
Add your Banking Information.
9
At the top, click Save.
Step 2 - Add Managed Account Billing Information
Each customer managed account has a section in account settings where you can enter account billing information. To add billing information for a customer:1
Navigate to the Managed Accounts screen.
2
Select a managed account or create a new one.
3
On the General tab, in the Account Details section, the account name and contact email address are displayed.
4
In the Invoice Settings section, select a Billing Profile you want associated with invoices for this account. Optionally, set Payment Terms (e.g., Net 30, Net 60) to specify the number of days customers have to pay the invoice. Payment terms are displayed on generated invoices.Optionally select Include managed account integrations. When enabled, invoice cost calculations will include integrations added directly by the managed account in addition to MSP-delegated integrations.
5
In the Billing Information section, enter the billing details for the managed account. The information will appear on this managed account’s invoices. Ensure you enter the official company name used for billing purposes. In addition, you can add one or more email addresses, separated by commas, for which you will send invoices.
Email addresses do not have to be existing Vantage users.
6
In the Business Information section, you can optionally add key-value pairs for details such as Tax ID or VAT. These values will appear on invoices beneath your billing address.
7
At the top, click Save.
Step 3 - Generate an Invoice
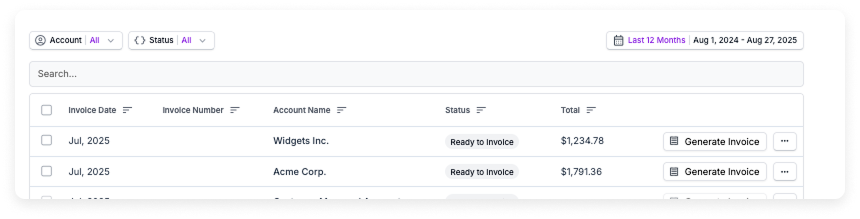
When the month closes, an invoice is generated based on the customer’s All Resources Cost Report. Navigate to the Invoices screen. All invoices are displayed. At the top of the page, you can filter by Account and Status.You can also view all invoices for a customer’s managed account on the Invoices tab of the Managed Accounts screen.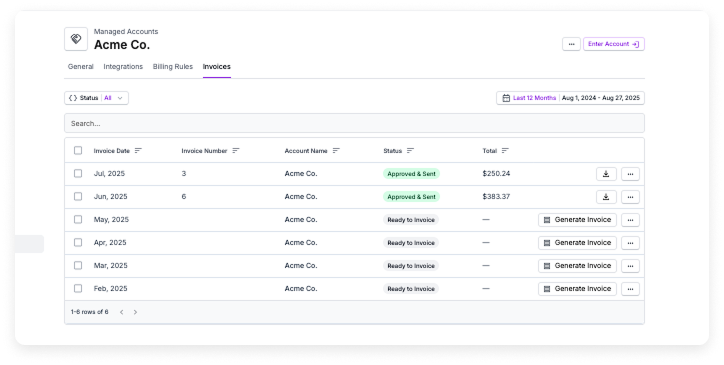
Process Flowchart
Process Flowchart
1
Ready to Invoice
On the first of the month, once the previous period closes (or after the third of the month if AWS Data Ingestion Delay is enabled), a new invoice is displayed for each managed account with the status Ready to Invoice.Click Generate Invoice to invoice the customer.
Click to view example image
Click to view example image
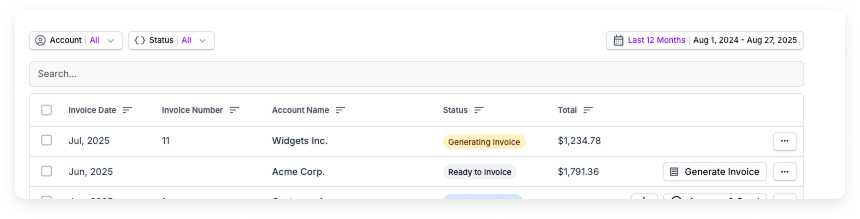
2
Generating Invoice
Vantage generates a new invoice. The invoice status is displayed as Generating Invoice.This process may take a few minutes.
Click to view example image
Click to view example image
3
Error
If an error occurs during invoice generation, the invoice status is displayed as Error. Review the invoice details to identify the issue, make any necessary corrections, and then regenerate the invoice.
4
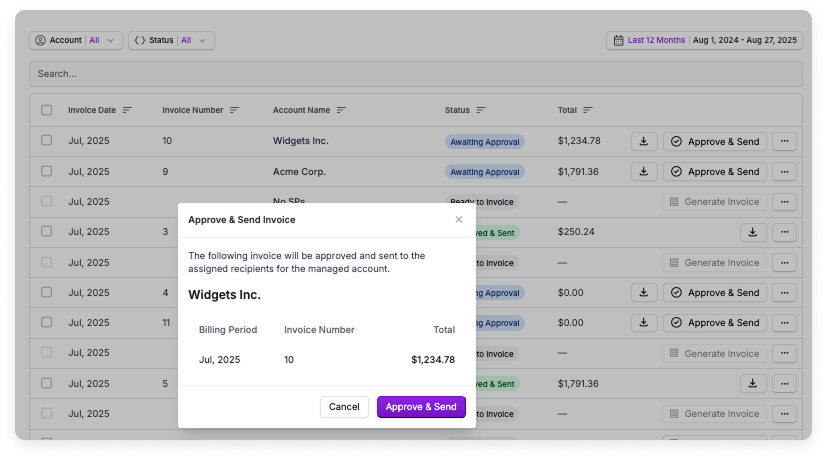
Awaiting Approval
The Awaiting Approval status is displayed when the invoice is ready.Click the download icon (looks like an arrow pointing down) next to the invoice to review a PDF copy of the current invoice.Review the PDF invoice to ensure accuracy of costs, payment information, and customer data. If you find any issues, make the appropriate adjustments.
- If you needed to make updates, click the ellipses (…) on the right, and select Regenerate Invoice.
Regenerated invoices use the same Invoice Number as the first time the invoice was generated. This number is displayed in the second column of the table.
- If you did not need to make any updates, click Approve & Send. A confirmation message is displayed. Click Approve & Send again.
Click to view example image
Click to view example image
5
Approved & Sent
Once an invoice is approved, the invoice will be emailed as a PDF attachment to the assigned recipients for the managed account. The email will come from
no-reply@vantage.sh.PDF and CSV versions remain available for download.To resend an invoice, click the ellipses (…) at the end of the invoice row and select Email PDF.Bulk Actions
You can perform bulk actions to generate, approve/send, regenerate, and download copies of multiple invoices at once. Select the checkbox next to an invoice, then select an option at the top of the screen. Confirmation messages are displayed so that you can confirm any bulk actions.Troubleshooting
Invoice not available after billing period closes
Invoice not available after billing period closes
Invoices appear on the first of the month when the previous billing period has closed. If AWS Data Ingestion Delay is enabled, invoices will appear after the third of the month. If other upstream providers experience delays, billing periods may not be immediately ready for invoicing.
Unable to generate an invoice
Unable to generate an invoice
You need an associated billing profile to generate an invoice.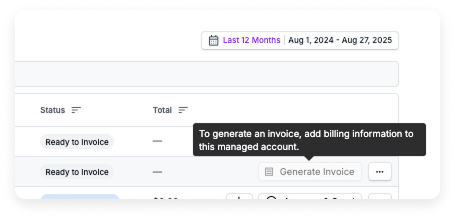
Metadata missing from invoice
Metadata missing from invoice
Verify that provider billing information is set under Partner Settings > Billing Profile and that customer billing information is configured on the Managed Accounts page. Only fields entered in these locations appear on invoices.
Incorrect or missing tax values
Incorrect or missing tax values
Ensure that a billing rule with the Charge Category: Tax has been created and applied before generating the invoice. Regenerate the invoice after updating billing rules.
Invoice emails not received by customer
Invoice emails not received by customer
Confirm that the correct billing contact email addresses are set on the Managed Accounts page. Invoices are automatically sent to these contacts once approved. You can also manually resend invoices from the Invoices tab.
Unable to regenerate invoice
Unable to regenerate invoice
Invoices can be regenerated while in Awaiting Approval status. Once an invoice is approved, it cannot be regenerated.