How Temporal Cloud Costs Are Calculated
During the Temporal Cloud integration, Vantage prompts you to enter custom rates for Actions, Active Storage, and Retained Storage. By default, Vantage applies public pricing and the base rate for Actions (under 5M per month). If you exceed 5M Actions and don’t have a private rate card, you can calculate your blended rates by dividing your total costs by the usage on your bill.Actions rates are measured in millions of Actions; Active and Retained Storage rates are measured in Gigabyte-Hours. At this time, this integration does not account for any Actions included in the plan.
Connect Your Temporal Cloud Account
Prerequisites
- You need the Account Owner role in Temporal Cloud to create a dedicated service account for the Vantage integration, assign it the Finance Admin role, and create the associated API key.
The Finance Admin role has the same permissions as Account Read-only users, with additional permissions to view billing information and update payment information. Vantage will never perform any actions to change your payment method. It’s recommended that you submit a feature request to Temporal Cloud for improved permission scoping, and Vantage will adopt fine-grained permissions if this becomes available.
- Create a free Vantage account, then follow the steps below to integrate Temporal Cloud costs.
Create the Connection
To create an integration with Temporal Cloud and Vantage, you need to create a service account and an API key for that service account.Step 1 - Create a Service Account
The below instructions are based on the Temporal Cloud documentation.
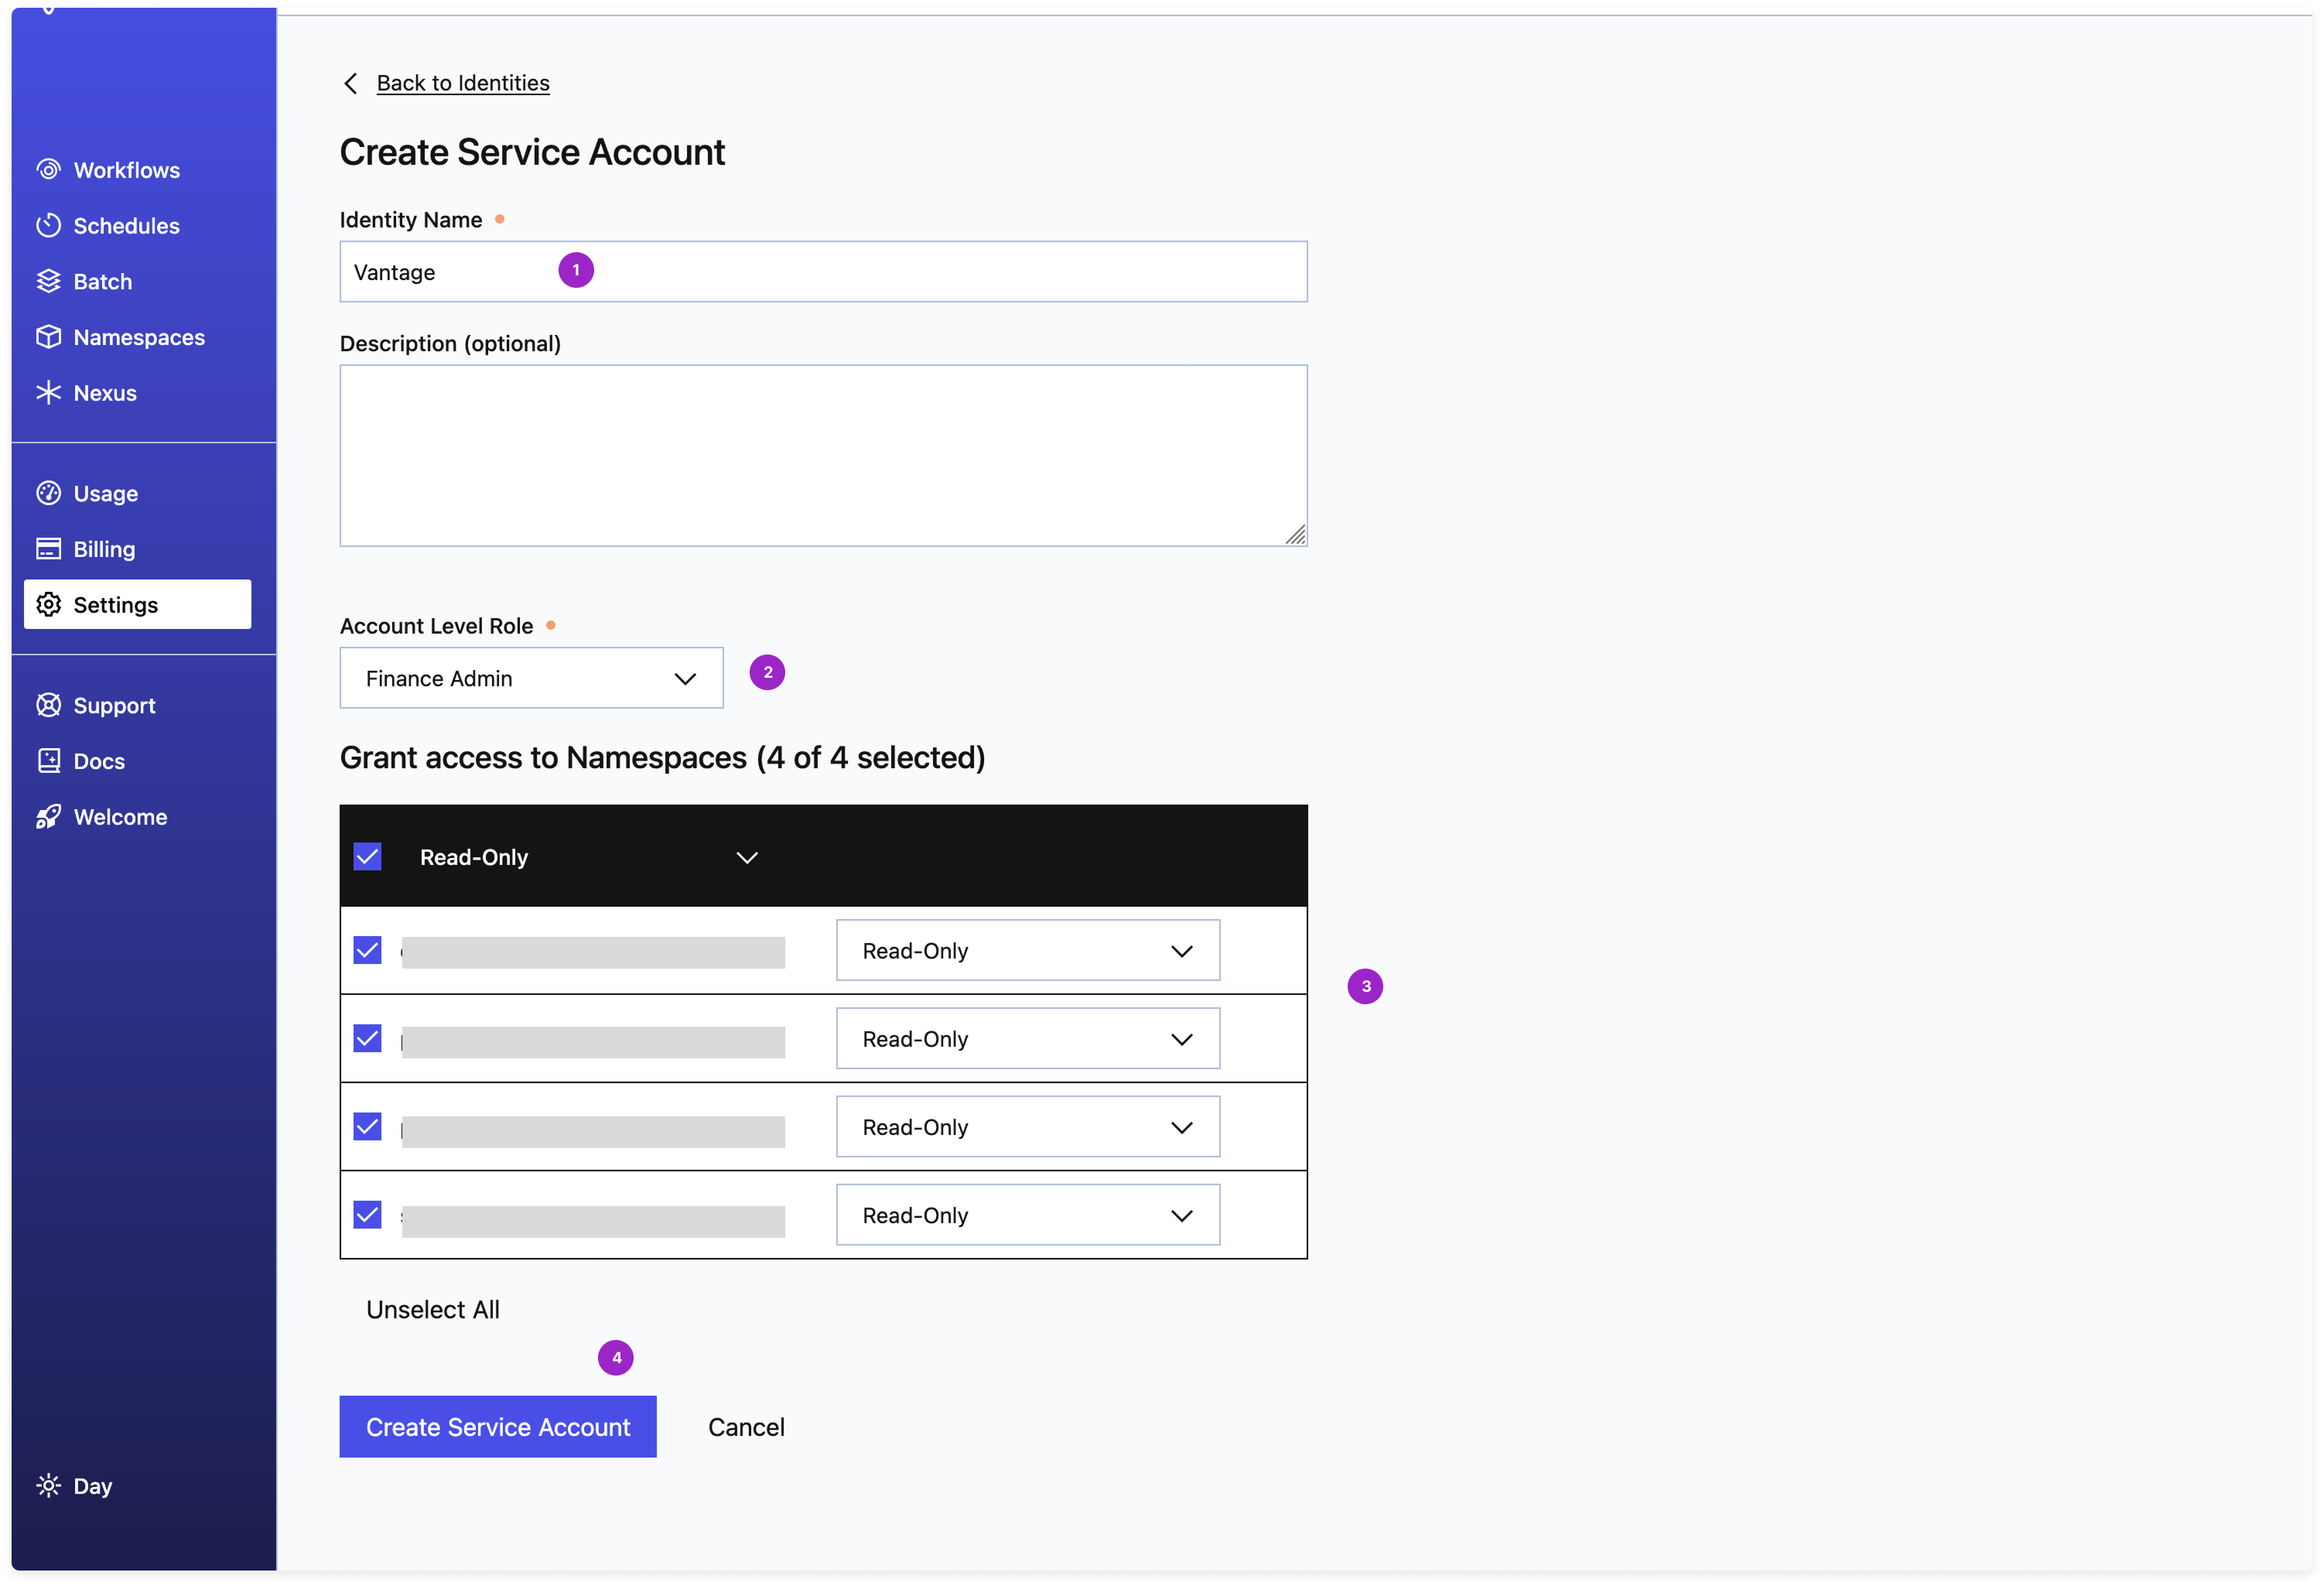
In Temporal Cloud, navigate to Settings > Identities.
For Namespace Permissions, set the access for each namespace to Read-Only.

Click to view example image
Click to view example image

If additional namespaces are added after you create this service account, and you want them included in your integration, you will need to go back and update the permissions to account for these new namespaces.
Step 2 - Create an API Key for the Service Account
The below instructions are based on the Temporal Cloud documentation.
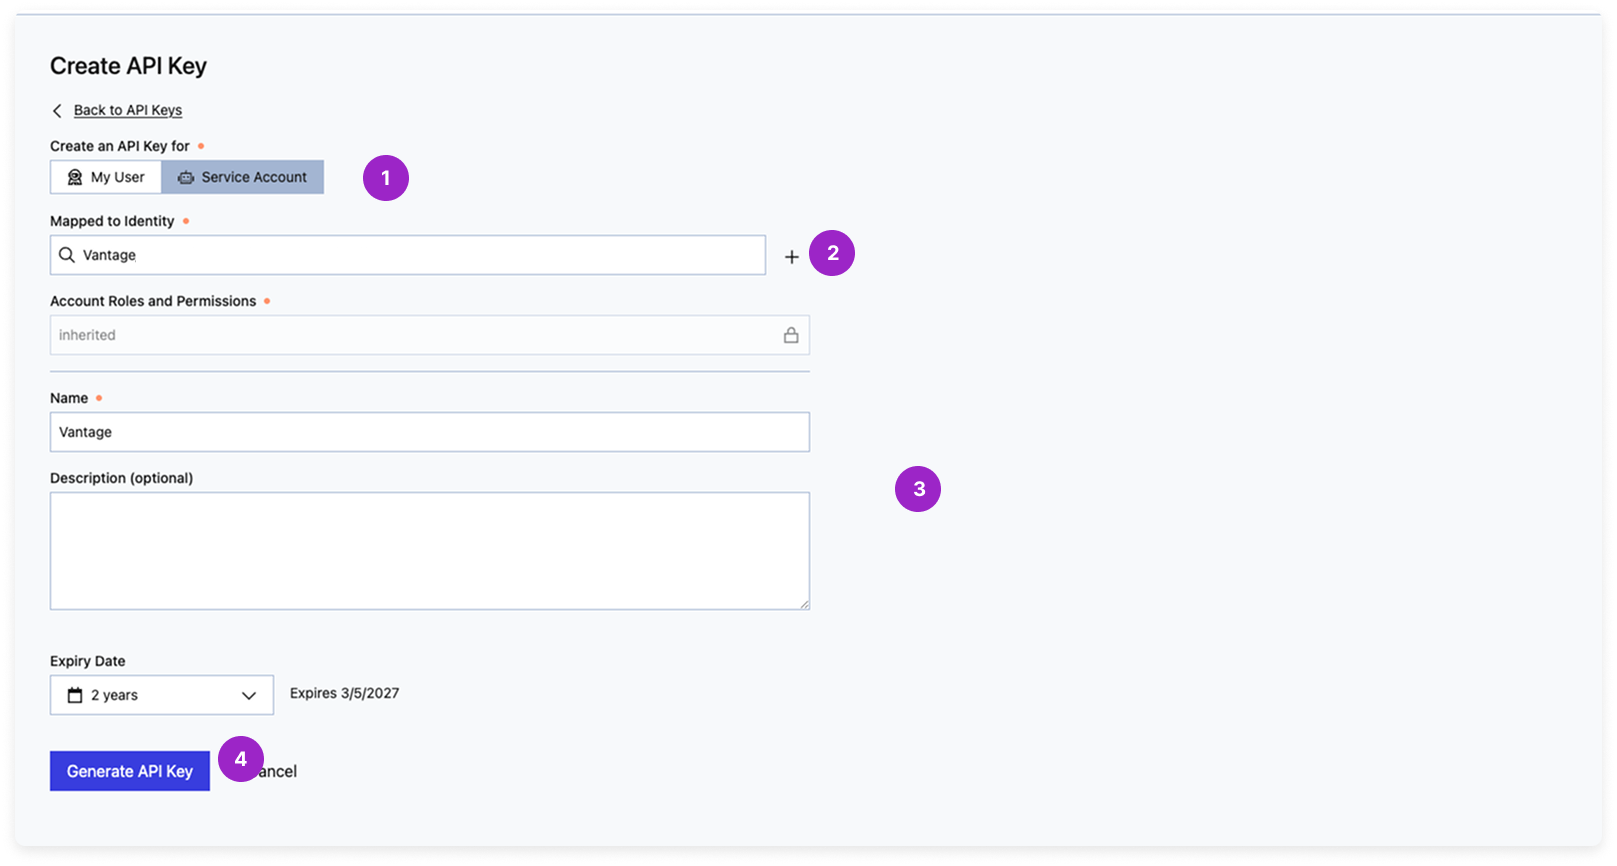
After you create the service account, you will be prompted to create an API key. You can also create an API key for the service account at any time. Navigate to Settings > API keys.
For Expiry Date, select a date for when the key should expire.

At this time, Temporal Cloud API keys can be configured to be valid for up to 2 years, after which you’ll need to rotate your Temporal Cloud API key in the Vantage console.
Click to view example image
Click to view example image

Step 3 - Add Your API Key and Pricing Details to Vantage
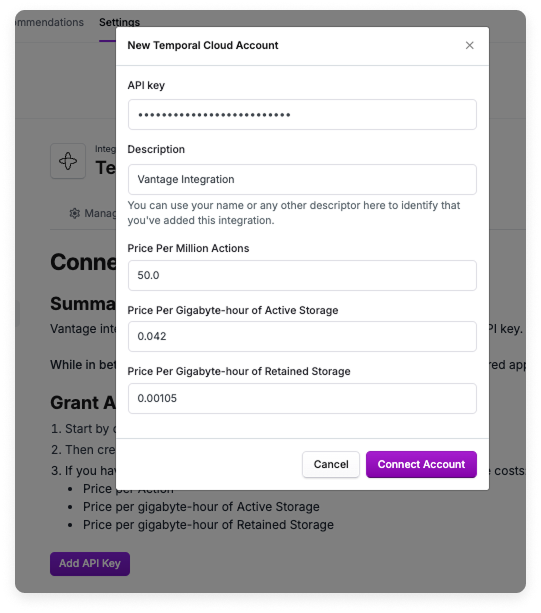
At the bottom of the page, click Add API Key and paste your newly generated API key. Optionally, add a Description to identify this integration.
If you use over 5M Actions or have custom rates, you can enter your blended rates on the form. By default, these fields are pre-filled with Temporal Cloud’s public pricing. If you don’t have a private rate card or use under 5M Actions, you can leave these fields as-is. See the How Temporal Cloud Costs Are Calculated section for details.

- Price Per Action
- Price Per Gigabyte-hour of Active Storage
- Price Per Gigabyte-hour of Retained Storage
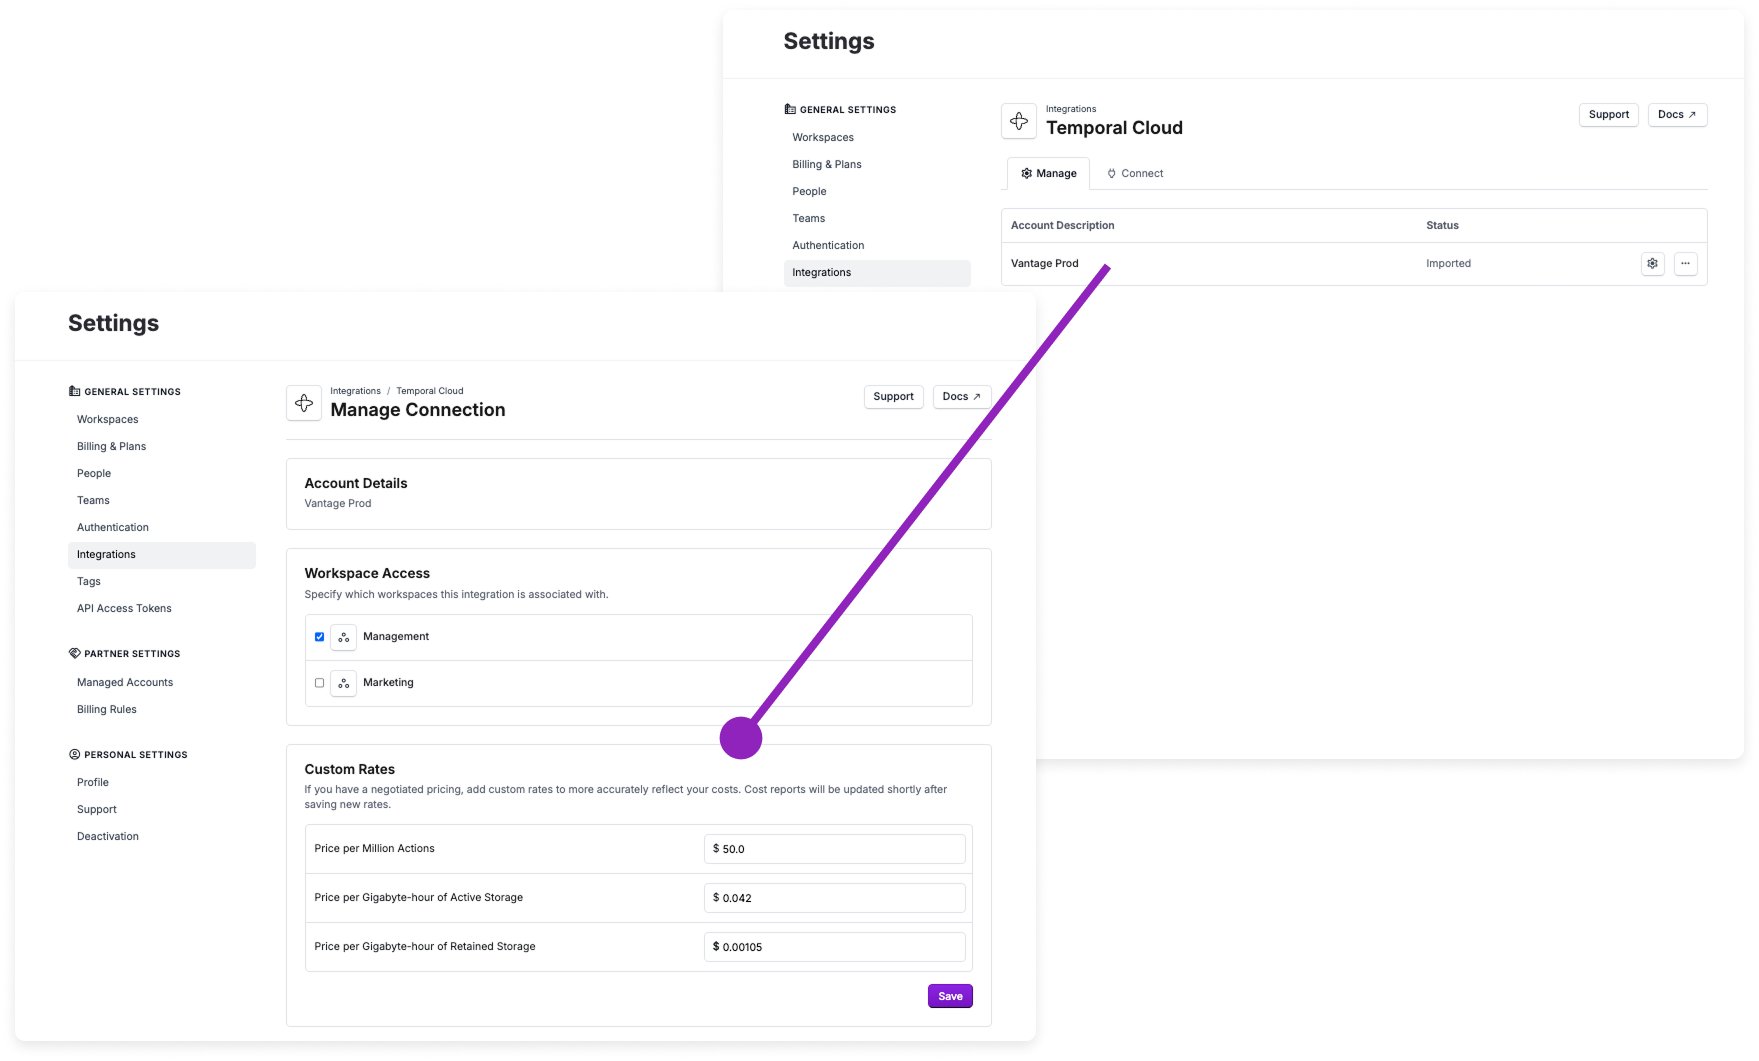
You can also update these rates after you complete the integration. See the Update Custom Rates section for details.
Click to view example image
Click to view example image

After the integration is complete, two full months plus the current month to date of historical cost data will be imported from Temporal Cloud. Historical data will be priced at the custom rates provided in the integration settings. Vantage will retain cost and usage data to match your retention period for all providers. As soon as costs are processed, they will be available on your All Resources Cost Report. If you decide to remove your Temporal Cloud integration from Vantage, all costs associated with your Temporal Cloud API key will be removed from the Vantage console.
Next Steps - Manage Workspace Access
Once the import is complete and the integration status changes to Stable, you can select which workspaces this integration is associated with. See the Workspaces documentation for information.Temporal Cloud Discounts and Other Fees
The Temporal Cloud Usage API returns only usage information, which Vantage uses to calculate spend, and does not include separate line items for taxes, discounts, or credits. You can choose whether these line items are included in your calculated cost based on the blended rates you input in the integration settings. In addition, Vantage does not have insights into what is covered by committed spend; all costs are shown based on the blended rate provided in the integration settings. Vantage also does not include Plan Costs as a part of Temporal Cloud costs. You can use the Custom Providers integration to represent your costs that are outside your usage costs. You can then use cost-based, business metrics-based, or percent-based cost allocation to allocate these costs across teams.Update Custom Rates
After you complete the integration, you can update your custom rates if they ever change. To update your rates:Navigate to the Temporal Cloud settings page.
Use Case: Associate Temporal Cloud Namespaces with Infrastructure Costs Using Virtual Tags
If your teams are running workloads across Temporal Cloud and other infrastructure providers, you can use Virtual Tags in Vantage to group and analyze total application costs. For example, you may want to track the total costs for the Payments team, which operates multiple workloads in Temporal Cloud. By creating a Virtual Tag with the keyTeam and the value Payments, you can apply a filter to group together things like Temporal Cloud costs filtered by the payments-prod and payments-staging namespaces.
You can view all namespaces using the Resource filter/grouping criteria on a Cost Report.
Data Refresh
See the provider data refresh documentation for information on when data for each provider refreshes in Vantage.Temporal Cloud Reporting Dimensions
On Temporal Cloud Cost Reports, you can filter across several dimensions:- Organization (i.e., Temporal Cloud organization name)
- Service (e.g., Temporal Cloud)
- Charge Type (e.g., Usage)
- Category (e.g., Actions)
- Subcategory (e.g., Retained Storage)
- Resource ID (e.g., Namespace)
- Tags (Virtual Tags created in Vantage)


