Databricks
Vantage integrates with your Databricks account through the use of Billable Usage Logs. Vantage provides an S3 bucket for Databricks to periodically deliver usage logs. Databricks delivers cost-only data to the bucket, outlining the Databricks service used, usage in Databricks Units (DBU), and metadata related to workspace, cluster, and any related tags.
Connect Your Databricks Account
Prerequisites
- You need account admin privileges in Databricks.
- Create a free Vantage account, then follow the steps below to integrate Databricks costs.
Create the Connection
- From the Vantage console, navigate to the Databricks Settings page.
- Click Setup Account.
- Enter your Databricks Account ID.tip
You can find your Databricks Account ID in the user profile dropdown of the Databricks account console.
- Click Connect Account.
- On the Databricks Settings page, you will see your account listed with a Status of
Pending. ClickPendingto complete the connection. Additional steps will be displayed on the Finalize Your Databricks Account Setup page. Keep this page open.
Finalize Your Databricks Account Setup
Vantage will prepare an S3 bucket to store your Databricks billable usage logs. You will need to configure Databricks to deliver your usage logs to that bucket.
Install or update the Databricks CLI.
Configure authentication for the Databricks CLI:
infoThe below steps are based on the OAuth user-to-machine (U2M) authentication Databricks documentation.
Create
~/.databrickscfg. Replace<ACCOUNT_ID>with the value of your Databricks account. (See the Databricks documentation for how to locate your account ID.) Replace the<ADMIN_USERNAME>and<ADMIN_PASSWORD>with your account administrator user's credentials.[production]
host = accounts.cloud.databricks.com
account_id = <ACCOUNT_ID>
username = <ADMIN_USERNAME>
password = <ADMIN_PASSWORD>Initiate OAuth token management with the following command, replacing
ACCOUNT_IDwith the account ID you used in the last step:databricks auth login --host https://accounts.cloud.databricks.com/ --account-id <ACCOUNT_ID>Follow the remaining instructions provided on the Finalize Your Databricks Account Setup page in Vantage. These instructions will walk you step by step through creating a storage configuration, creating a credential configuration, and creating a log delivery configuration to finalize the integration.
After completing all the steps above, your Databricks integration status should automatically update from Pending to Importing. Once fully imported, the status will update to Imported. You can view your connection status on the Databricks Settings page.
Databricks generally delivers usage logs once per day.
Next Steps: Manage Workspace Access
Once your costs are imported, select which workspaces this integration is associated with. See the Workspaces documentation for information.
Custom Pricing in Databricks
From the Databricks integration page, you can set custom discounts on Databricks SKU groups. Once the discounts are saved, the discounted rate is applied, and Cost Reports are automatically updated to reflect the newly discounted prices. Currently, only AWS is supported. If you are using Databricks on Azure, these discounts are reflected in your Azure billing data, and a Databricks integration is not required.
The following Databricks SKU groups are supported:
- AWS Jobs Compute
- AWS Jobs Compute Photon
- AWS All-Purpose Compute
- AWS All-Purpose Compute Photon
- AWS SQL Compute
- AWS DLT Compute
- AWS DLT Compute Photon
- AWS Serverless SQL Compute
- AWS Serverless Inference
At this time, the AWS Security and Compliance SKU group is not supported.
To add custom pricing for SKU groups:
- From the top navigation, click Settings.
- From the side navigation, click Integrations.
- The Connected Providers page is displayed. Select the Databricks integration.
- On the Manage tab, select a connected account.
- In the Custom Discounts section, click + Add a Discount.
- For Service Name, select a SKU group from the list.
- For Your Discount, enter a discount as a percentage.
Click to view example image
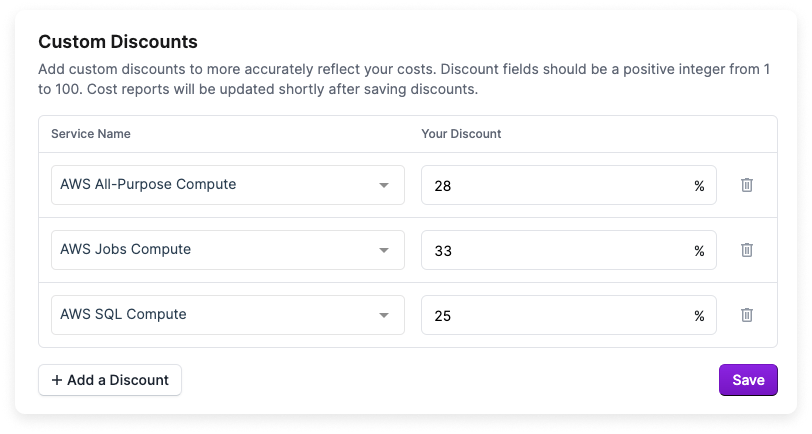
- To add another SKU group discount, click + Add a Discount. When you are finished, click Save.
Once the discounts are saved, all existing cost data for the integration is re-processed. The status of each billing period is displayed on the integration page. Once the data is processed, any corresponding reports are automatically refreshed. The refresh process may take up to an hour until they are displayed on all reports.
Databricks Reporting Dimensions
On Databricks Cost Reports, you can filter across several dimensions:
- Account (account name)
- Category (e.g., Jobs Compute - Photon)
- Tag/Not Tagged (includes Databricks tags and virtual tags created in Vantage for this provider)
- Cluster (e.g., Jobs Computer -
<CLUSTER_ID>) - Charge Type (e.g., Usage)
- Service (e.g., All Purpose Compute)
The Tag filter contains values like JobID, which can be used to view costs for specific Databricks jobs.