Google Cloud
Vantage uses a service account to integrate with your GCP account. The service account is generated on a per-customer basis. Vantage requests extremely basic and limited permissions for GCP. During the integration process, you will grant the service account access only to the specific BigQuery dataset that contains your billing data.
Prerequisites
Before you start the integration process, you will need to complete the following prerequisites:
- Create a project to store your Cloud Billing export data.
- Create a BigQuery dataset to store your Cloud Billing export data.
- Enable Cloud Billing export.
See the GCP Cloud Billing export instructions for details on how to complete the above steps. Then, return to this page to complete the rest of the integration process.
If your organization enforces domain restrictions, you can add the following Google Cloud organization ID to allow Vantage access: 421856710303. If you instead need the customer ID, use C03l99qsz.
If you have a pre-existing Cloud Billing export set up, ensure your configuration adheres to the requirements below before moving further.
- Your project is linked to the same Cloud Billing account that the Cloud Billing export is enabled on.tip
We recommend you create a dedicated project to store all Cloud Billing data, rather than using an existing project.
- Detailed Billing Export is enabled, not Standard Billing Export.
- The BigQuery dataset and table are deployed to either US (multiple regions in United States) or EU (multiple regions in European Union).
- If you have multiple Cloud Billing accounts, you will need to enable Cloud Billing exports on each account.
If your GCP billing data is typically displayed in a currency other than USD, Vantage will convert it to USD using the currency_conversion_rate field in the Cloud Billing export data.
Create a Connection
Open a new browser tab, and navigate to the Vantage GCP Settings page. You should see your customer-specific service account displayed at the top of the integration page. Keep this page open.
Step 1: Grant the Vantage Service Account Permission to Access BigQuery
Back in GCP, navigate to the IAM console, and complete the steps below to grant the Vantage service account permission to access BigQuery.
- At the top of the IAM console, select the project that hosts the BigQuery dataset with your Cloud Billing export data.
- Configure the following permission:
- In the center of the page, under Permissions for project "My Project ABCD", click + GRANT ACCESS.
Expand to view example image
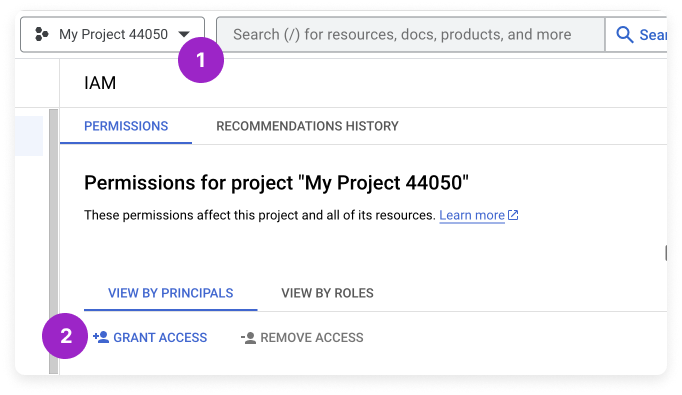
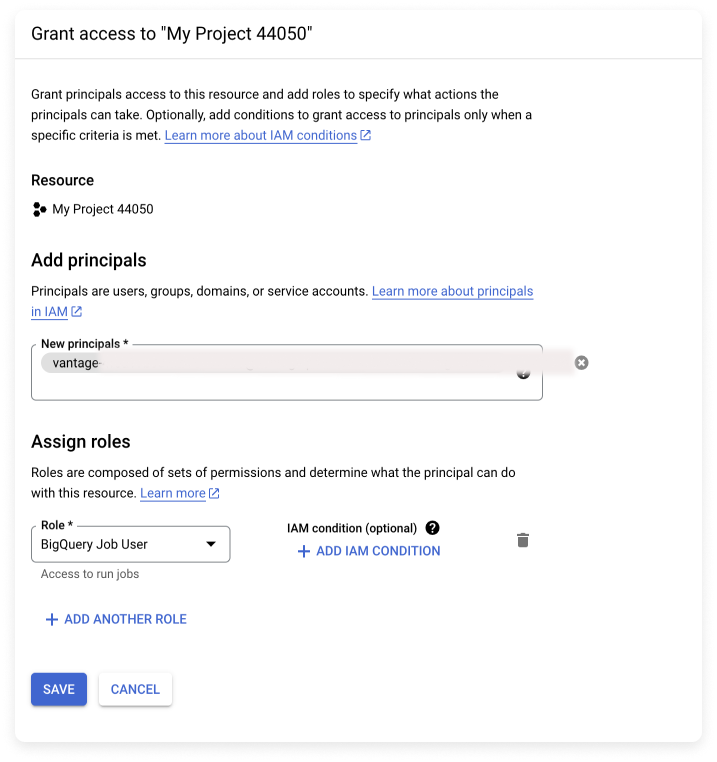
- In the New principals field, under Add principals, paste the value for your Vantage service account. This value is the one displayed on the Vantage GCP Integration page you opened earlier.
- In the Role field, under Assign roles, search for and select BigQuery Job User.
Expand to view example image
- In the center of the page, under Permissions for project "My Project ABCD", click + GRANT ACCESS.
- Click SAVE.
Step 2: Grant the Vantage Service Account Permission to Access the BigQuery Dataset
Go back to BigQuery, and complete the steps below to grant the Vantage service account permission to access the BigQuery dataset.
- At the top of the BigQuery console, ensure the project that you set up to contain your billing data is selected.
- In the Explorer panel, select your project to expand it.
- Select the three vertical dots next to the dataset name, then click Open. The Dataset info will be displayed on the right. Keep this screen open to later obtain your project ID and dataset name.
- Select the three vertical dots next to the dataset name again, then click Share.
Expand to view example image

In this example, project-id-123456 is the project and all_billing_data is the dataset.
- On the Share permissions panel that appears on the right, click + ADD PRINCIPAL.
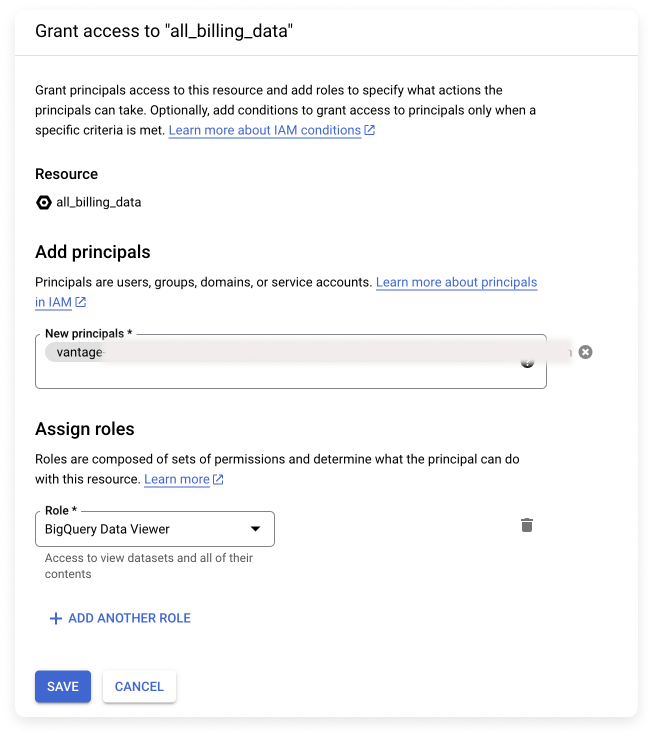
- In the New principals field, under Add principals, search for and select the Vantage service account.tip
Copy the full name of your service account from the Vantage console into the search field to search for it.
- In the Role field, under Assign roles, search for and select BigQuery Data Viewer.
Expand to view example image
- Click SAVE.
Step 3: Add Your GCP Configuration Information to the Vantage Console
Keep BigQuery open in one of your browser tabs. Go back to the Vantage GCP Integration page to complete the integration process.
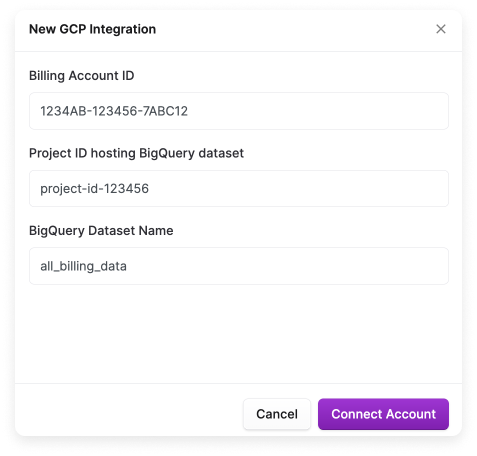
- At the bottom of the Vantage GCP Integration page, click Add Project Info. A pop-up is displayed, which requires your Billing account ID, the project ID for the project that hosts the BigQuery dataset, and the BigQuery dataset name.
- To obtain your Billing Account ID:
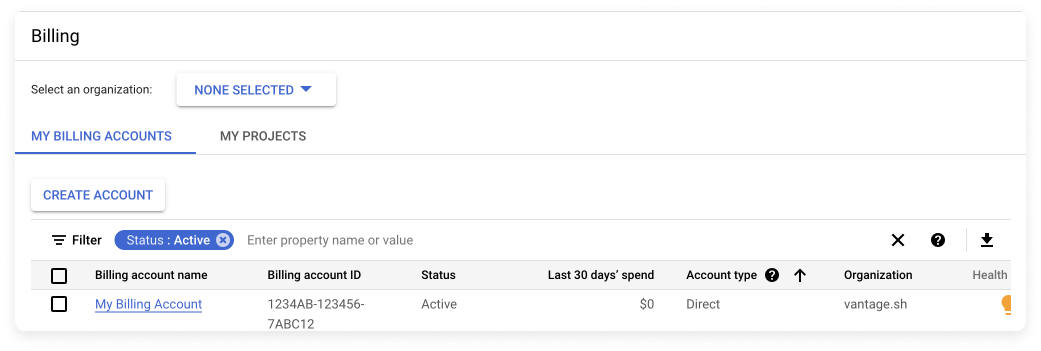
- Go to GCP Billing.
- Copy the value for your billing account, displayed in the Billing account ID column. It will look something like
1234AB-123456-7ABC12.Expand to view example image
- To obtain your Project ID hosting BigQuery dataset and BigQuery Dataset Name:
- In the Dataset info screen of BigQuery (previously opened in step 3 of the last section), observe the value on the Dataset ID line.
Expand to view example image
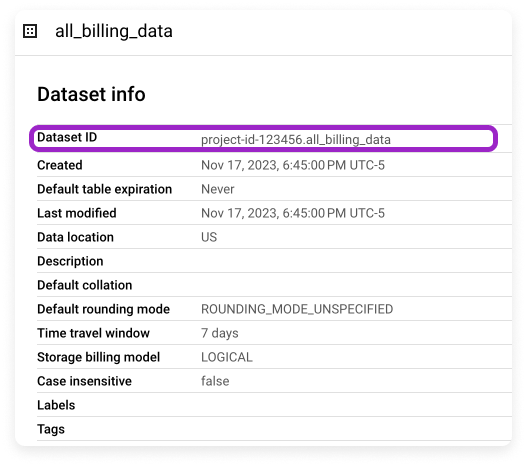
- Copy everything before the period. For example, in project-id-123456.all_billing_data, copy only project-id-123456. Paste this in the Project ID hosting BigQuery dataset field in Vantage.
- Copy everything after the period and paste it in the BigQuery Dataset Name field in Vantage. (For example, in project-id-123456.all_billing_data, copy all_billing_data.)
Expand to view example image
- In the Dataset info screen of BigQuery (previously opened in step 3 of the last section), observe the value on the Dataset ID line.
- Click Connect Account.
It typically takes a few hours for data to start appearing. Cloud Billing data is added retroactively for the current and previous month when detailed usage cost data is configured. Full data for the current and previous month can take 24–48 hours to fully propagate.
Step 4: Add Support for Active Resources
To enable active resources, you must grant the Viewer role to the Vantage GCP service account. This role allows read-only access to all resources in the project, enabling Vantage to gather data on active resources.
For a list of all supported GCP active resources, see the GCP Supported Services documentation.
- Open the IAM Console.
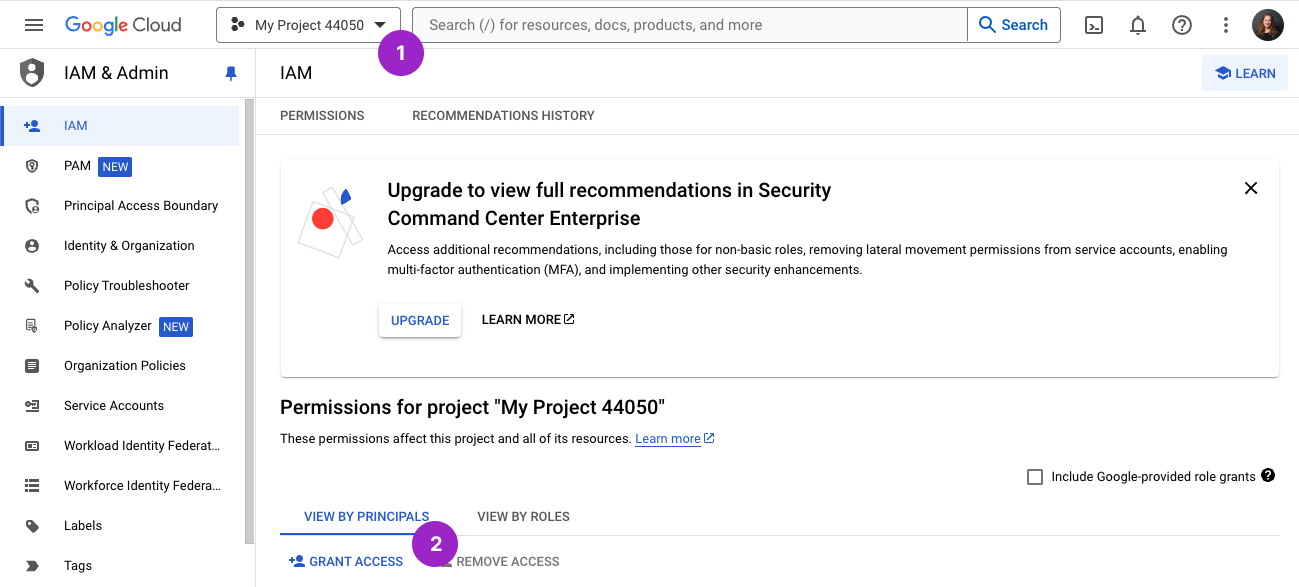
- At the top, select the project where you want to enable active resources. You will need to enable active resources on a per-project basis.
- In the center of the page, under Permissions for project "Your Project Name", click + GRANT ACCESS.
Expand to view example image
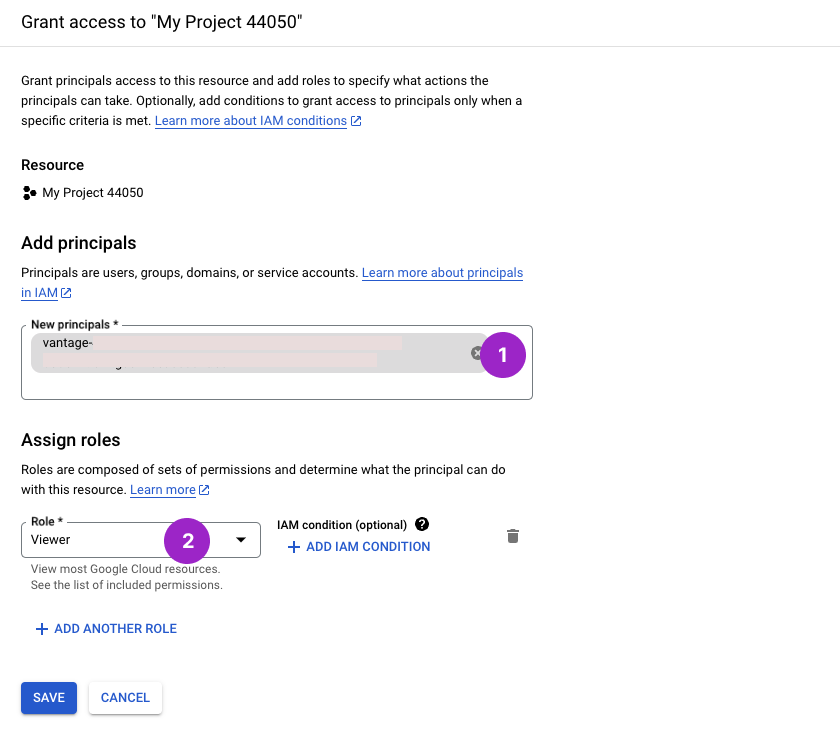
- Under Add principals, add the Vantage GCP service account displayed on the Vantage console integration page.
- Under Assign roles, click Basic and select the Viewer role from the Role list.
Expand to view example image
- Click SAVE.
Repeat these steps for each project where you want to enable active resources, and ensure the Vantage GCP service account is added to all relevant projects.
Next Steps: Manage Workspace Access
Once your costs are imported, select which workspaces this integration is associated with. See the Workspaces documentation for information.
Feature Availability and Resource Costs
The following GCP services are available with resource-level costs in Cost Reports:
- Compute Engine
- Cloud Functions
- Cloud Run
- Cloud SQL
- Cloud Spanner
- App Engine
Google Cloud is not currently available in the following features: