> ## Documentation Index
> Fetch the complete documentation index at: https://docs.vantage.sh/llms.txt
> Use this file to discover all available pages before exploring further.
# Workspaces
> Organize cloud cost data with Vantage workspaces.
In Vantage, a *workspace* is a way to separate your provider integrations into distinct cost views. Teams can use workspaces to create focused views of costs and even restrict access to costs within each workspace using [Role-Based Access Controls (RBAC)](/rbac) (Enterprise customers). You can specify which [integrations](/workspaces#manage-workspace-provider-integrations) are available in which workspaces. Some use cases for workspaces are listed below.
* You may have multiple accounts within the same cloud provider, such as Azure or AWS. You can use a single Vantage workspace to ingest costs for all these accounts into the same view.
* Create a distinct Vantage workspace for each of your environments, such as *Production*, *Staging*, and *Development*. Then, specify which provider accounts are associated with which workspace. For example, a particular Datadog account may be associated with only your *Development* workspace.
* If you manage multiple customers, you can create individual workspaces for each customer account (Customer A, Customer B, etc.). This allows you to separate and manage cost data for each customer independently. Then, you can connect only the corresponding integrations to each customer's workspace, ensuring that they have access only to their data and reports.
To get started with workspaces and workspace integrations, you can also view a video demo on [Vantage University](/vantage_university_account_management) .
## Navigate between Workspaces
If you have more than one workspace in your Vantage account, the **Workspaces** menu is displayed on the top left of the console. You can select any of the listed workspaces to move between each workspace.
## Create a Workspace
When your Vantage account is created, you are assigned a **Default** workspace. You can create other workspaces in addition to the default workspace. To create a new workspace, complete the following steps:
From the top navigation menu, click **Settings**.
On the left navigation, under **General Settings**, click **Workspaces**.
Click **Create a Workspace**.
Enter a **Name** for your new workspace (e.g., *Management*), then click **Create**.
## Manage Workspaces
All your existing workspaces are displayed on the [**Workspaces**](https://console.vantage.sh/settings/workspaces) Settings screen. Select a listed workspace to view additional details, such as:
* Turn off **Active Resource Syncing**. Turn off automatic syncing if you do not want Vantage to be automatically pulling active resource details from your account. This option is useful if you find Vantage is making too many API calls to your AWS endpoints.
* View team workspace access. See the [Role-Based Access Control](/rbac) documentation for more information about teams.
* View configuration details for the workspace, including the workspace token, which is used as the workspace identifier in [API calls](/api).
* Delete the workspace.
Note that this action is not reversible.
## Manage Workspace Provider Integrations
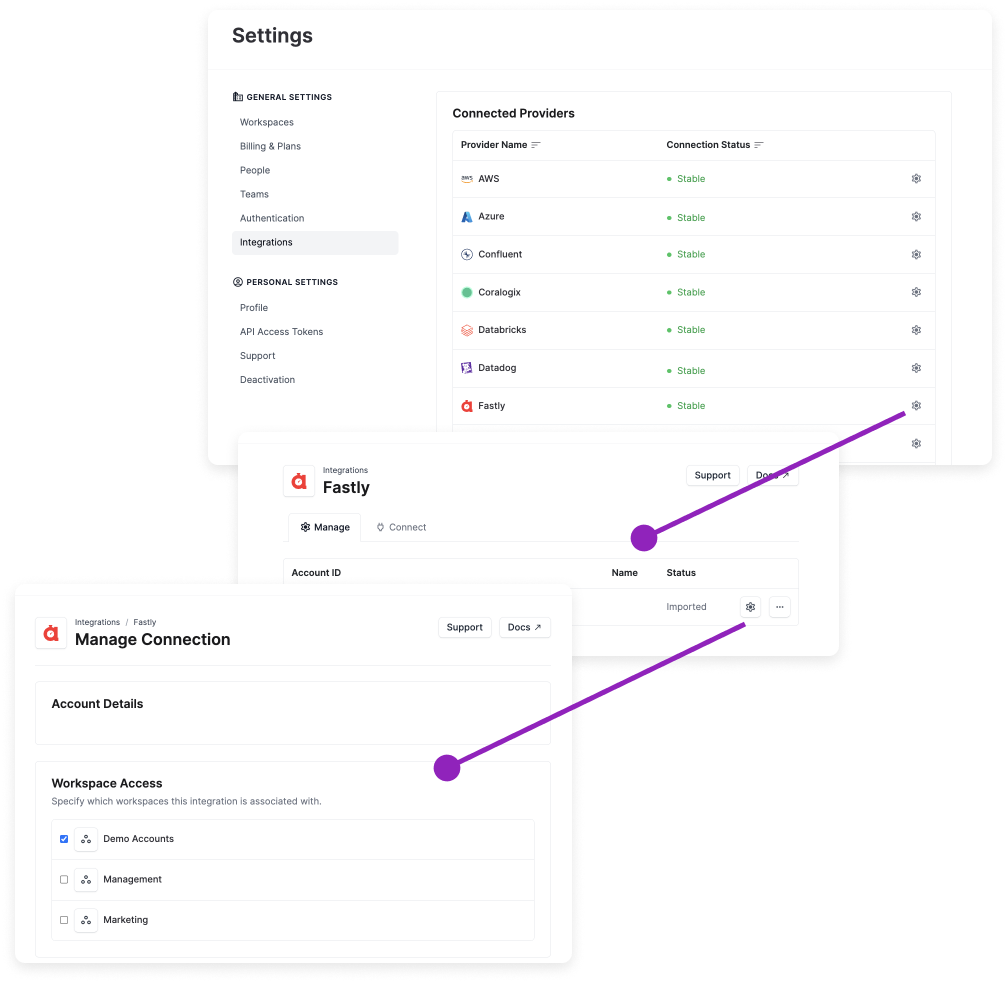
Once you connect a cloud provider to Vantage, and the integration status is **Stable** with costs fully imported, you'll need to specify the workspaces where this integration should be accessible for creating reports and viewing costs. To manage the workspaces associated with an integration:
From the top navigation, click **Settings**.
From the left navigation, click **Integrations**.
All your provider integrations are displayed. Select an integration from the list.
The provider's integration page is displayed. Click the settings icon next to a listed account.
The **Manage Connection** page is displayed. Under **Workspace Access**, select or deselect the checkbox next to a listed workspace to specify which workspaces the integration is associated with.
An integration can be fully healthy and still not appear in Cost Reports, Dashboards, or other features until both of the following are true:
* The integration is assigned to the workspace you are currently viewing.
* Your user or team can access that workspace.
If an integration looks **Stable** on the Integrations page but you still cannot see its costs, first verify workspace assignment and workspace access before troubleshooting the provider connection itself.
Workspaces are the boundary for cost data visibility. Sharing a Cost Report, Dashboard, or other Cost Reporting item lets recipients view that item, but it does not lock the item's filters as a security boundary. If a team should only see a subset of provider data, assign only the corresponding provider integrations to a separate workspace and grant that team access to that workspace.
**AWS Management Account and Member Accounts**
When you connect an AWS management account (root account) to Vantage, all member accounts in your AWS organization are automatically linked to the management account. Member accounts inherit the workspace assignments from the management account and cannot be assigned to different workspaces while they remain linked.
If you want to assign a member account to a separate workspace from the management account, you must first unlink it from the management account. When viewing a linked member account's integration settings, you'll see a message stating: "To assign this account to separate workspaces, you must first unlink it from the management account." The workspace checkboxes will be disabled until you click the **Unlink from Management Account** button. Once unlinked, you can then assign the member account to different workspaces independently.
Note that unlinking member accounts has its own implications. See the [Unlinking Member Accounts](/connecting_aws#unlinking-member-accounts) documentation for details.
In the below example, the Fastly integration is only available in the *Demo Accounts* workspace. If you navigate to the *Management* or *Marketing* workspace, you'll be unable to view Fastly cost data in Cost Reports or other Vantage features.