> ## Documentation Index
> Fetch the complete documentation index at: https://docs.vantage.sh/llms.txt
> Use this file to discover all available pages before exploring further.
# Single Sign-On (SSO)
> Use Vantage SSO to connect your identity provider for secure, streamlined access with Just in Time user provisioning and group mapping capabilities.
Vantage supports single sign-on (SSO) via self-service single sign-on as well as several other supported IdPs. You can use self-service SSO to connect your SAML (Security Assertion Markup Language) Identity Provider (IdP) to your Vantage account. With self-service SSO, you can use your existing credentials to authenticate and access your Vantage account. SSO streamlines the login process since users don't need to create a new account or remember another set of login credentials for Vantage.
Vantage uses Just in Time (JIT) provisioning for user provisioning. As long as a user is granted access to your IdP, the user will be provisioned an account in Vantage when they first log in.
## Self-Service SSO via SAML
Currently, Vantage supports self-service connection for SAML. If you'd like to
connect one of the other supported IdPs (e.g., Google Workspace or Windows
Active Directory), view the instructions below. If you do not see your IdP
listed, contact [Vantage Support](mailto:support@vantage.sh).
### What Is SAML SSO?
SAML is an XML-based open standard for exchanging authentication and authorization data between parties. It enables secure and standardized communication between identity providers, service providers, and users. SAML allows for seamless and secure access to web applications and services.
Before you can connect your IdP to Vantage, you will need the following:
* A valid account with a SAML IdP
* Organization Owner role access to Vantage
* Your IdP's signing certificate and sign-on URL
### Connect Your SAML IdP
From the Vantage console, navigate to the [Authentication page](https://console.vantage.sh/settings/account_identity_providers).
Click **New Connection**.
Select the **SAML** connection type.
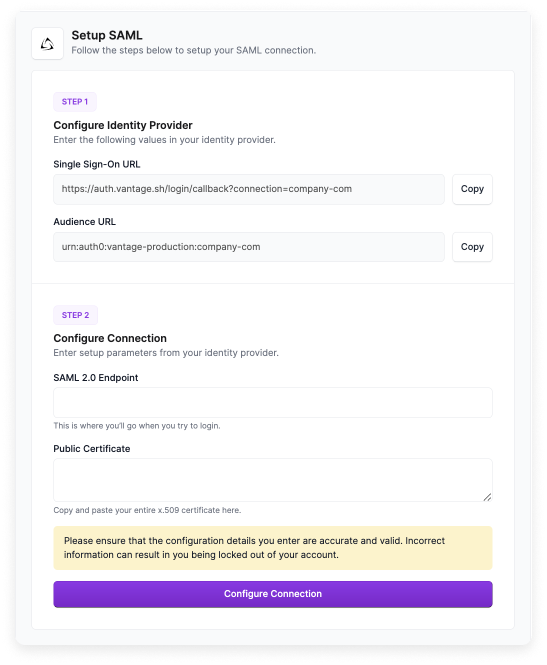
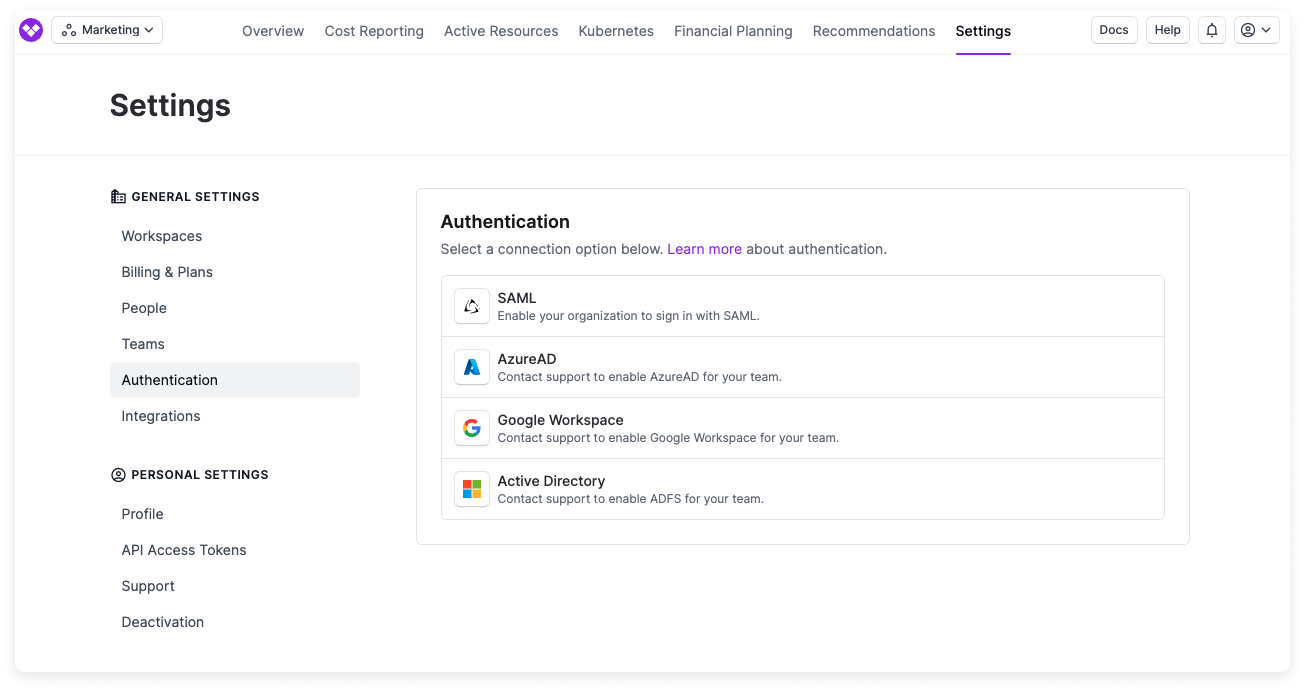 Copy the **Single Sign-On URL** and **Audience URL** that are provided on screen. You will need both of these URLs for your IdP's configuration.
 To add a logo to your connection's thumbnail, use the provided [Vantage Logo](https://s3.amazonaws.com/assets.vantage.sh/www/vantage_avatar-social.jpg).
Once you create the Vantage application within your IdP, copy the following information:
* Copy the SAML Sign-On URL provided by your IdP, then paste it into the **SAML 2.0 Endpoint** field of the Vantage SAML page.
* Copy the Signing Certificate provided by your IdP, then paste it into the **Public Certificate** field of the Vantage SAML page.
Ensure you've entered the correct credentials, then click **Create Connection**. You'll be redirected back to the [Authentication page](https://console.vantage.sh/settings/account_identity_providers), where you will be able to see your connection.
To enable the connection, switch the Active toggle to **on**. You will remain logged in to Vantage, but the next time you attempt to log in, you will be redirected to your IdP's sign-on page.
**Optional:** If you would like to set up SSO group mappings based on your existing Vantage teams, [see the SSO Group Mappings](/sso#set-up-sso-group-mapping-for-teams) instructions below.
### View Connection Details
Once your identity provider is connected, you can view connection details on the [Authentication page](https://console.vantage.sh/settings/account_identity_providers).
#### Associated Domains
The connection details include a **Domains** section that displays all domains associated with your identity provider. This section shows the email domains that are configured to use this SSO connection for authentication. When users with email addresses from these domains attempt to log in to Vantage, they will be redirected to your configured identity provider.
#### Example: Create a SAML SSO Connection with Okta
For detailed instructions, see the [Okta support
documentation](https://help.okta.com/oie/en-us/content/topics/apps/apps_app_integration_wizard_saml.htm).
Create an app integration on Okta.
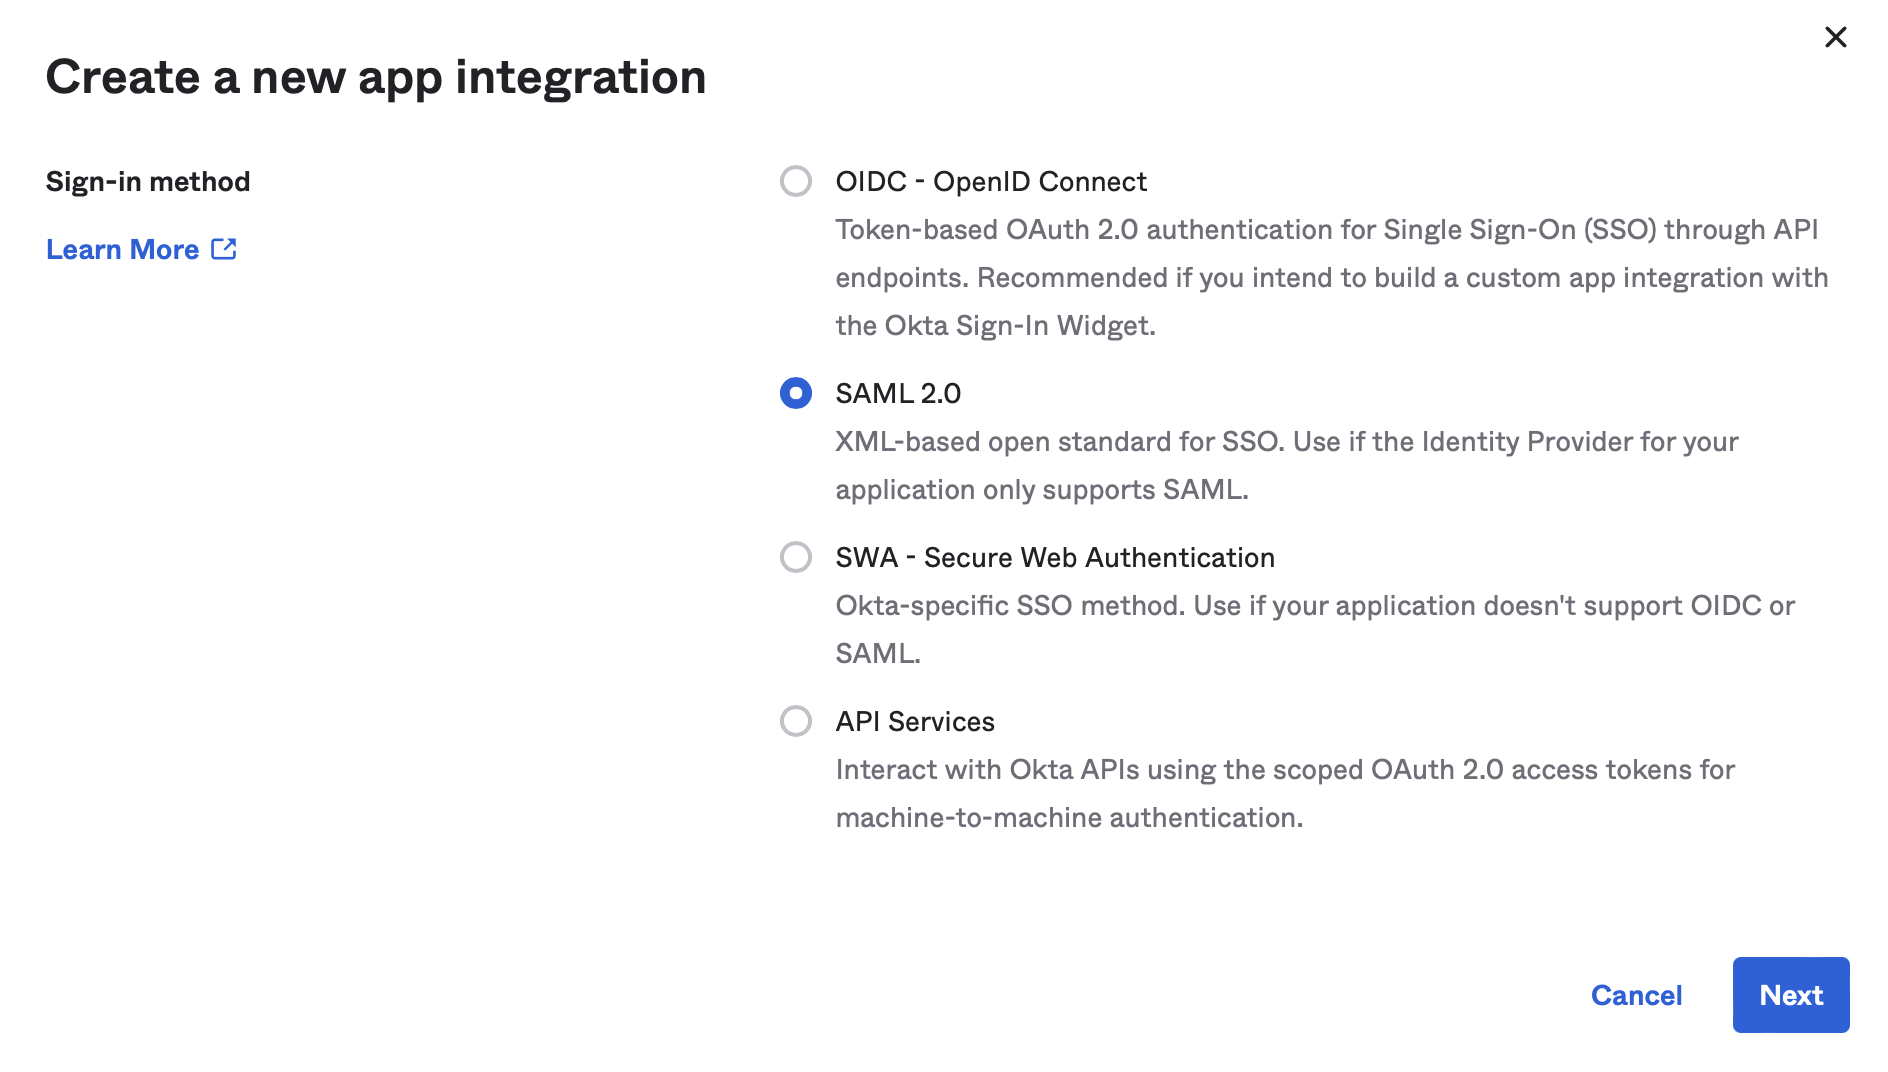
For **Sign-in method**, select **SAML 2.0**. Click **Next**.
To add a logo to your connection's thumbnail, use the provided [Vantage Logo](https://s3.amazonaws.com/assets.vantage.sh/www/vantage_avatar-social.jpg).
Once you create the Vantage application within your IdP, copy the following information:
* Copy the SAML Sign-On URL provided by your IdP, then paste it into the **SAML 2.0 Endpoint** field of the Vantage SAML page.
* Copy the Signing Certificate provided by your IdP, then paste it into the **Public Certificate** field of the Vantage SAML page.
Ensure you've entered the correct credentials, then click **Create Connection**. You'll be redirected back to the [Authentication page](https://console.vantage.sh/settings/account_identity_providers), where you will be able to see your connection.
To enable the connection, switch the Active toggle to **on**. You will remain logged in to Vantage, but the next time you attempt to log in, you will be redirected to your IdP's sign-on page.
**Optional:** If you would like to set up SSO group mappings based on your existing Vantage teams, [see the SSO Group Mappings](/sso#set-up-sso-group-mapping-for-teams) instructions below.
### View Connection Details
Once your identity provider is connected, you can view connection details on the [Authentication page](https://console.vantage.sh/settings/account_identity_providers).
#### Associated Domains
The connection details include a **Domains** section that displays all domains associated with your identity provider. This section shows the email domains that are configured to use this SSO connection for authentication. When users with email addresses from these domains attempt to log in to Vantage, they will be redirected to your configured identity provider.
#### Example: Create a SAML SSO Connection with Okta
For detailed instructions, see the [Okta support
documentation](https://help.okta.com/oie/en-us/content/topics/apps/apps_app_integration_wizard_saml.htm).
Create an app integration on Okta.
For **Sign-in method**, select **SAML 2.0**. Click **Next**.
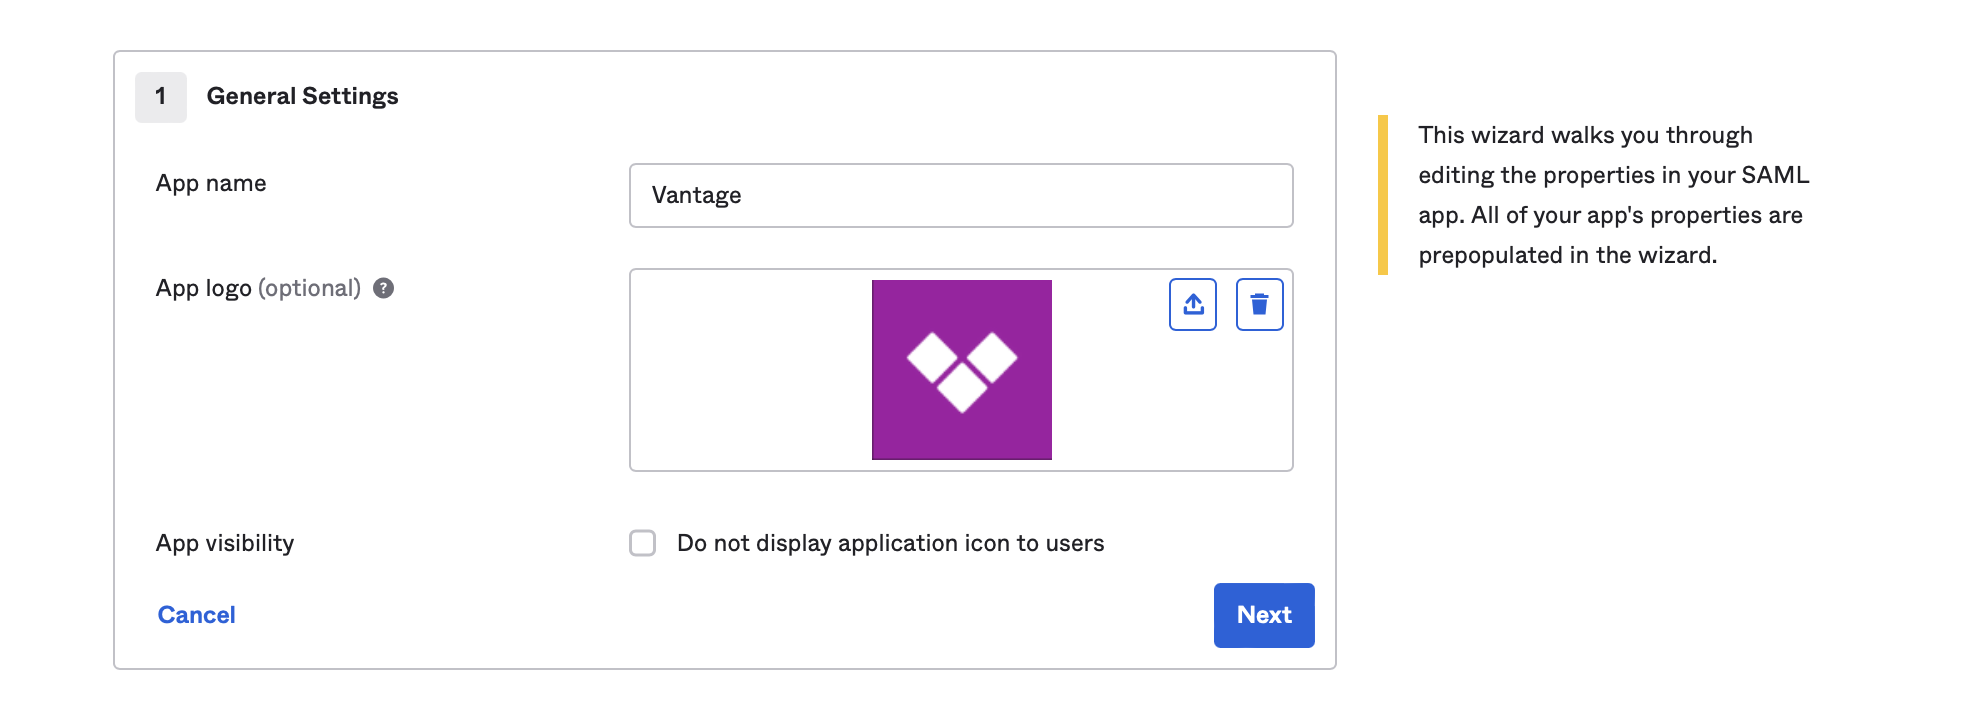
 For **App Name**, enter *Vantage*.
For **App Logo**, upload the [Vantage Logo](https://s3.amazonaws.com/assets.vantage.sh/www/vantage_avatar-social.jpg), then click **Next**.
For **App Name**, enter *Vantage*.
For **App Logo**, upload the [Vantage Logo](https://s3.amazonaws.com/assets.vantage.sh/www/vantage_avatar-social.jpg), then click **Next**.
 Enter the requested **Single sign on URL** (for example, `https://auth.vantage.sh/login/callback?connection=company-com`) and **Audience URI (SP Entity ID)** (for example, `urn:auth0:vantage-production:company-com`), provided on the Vantage Authentication setup page.
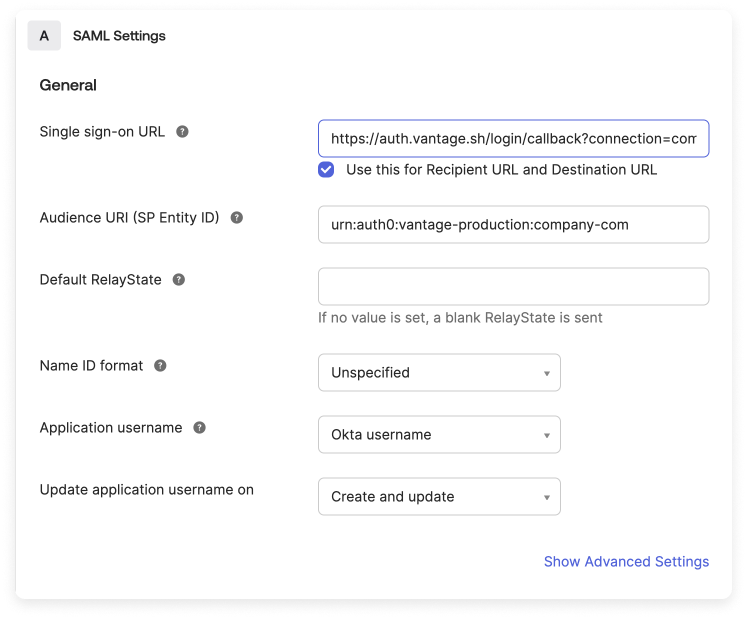 Set the **Application username** to **Email**.
Once the app integration is set up, copy the Okta-provided **Identity Provider Single Sign On URL** and **X.509 Certificate** back into Vantage.
To enable the connection, switch the Active toggle to on. You will remain logged in to Vantage, but the next time you attempt to log in, you will be redirected to the Okta sign-on page.
### Test Your SSO Configuration
The recommended steps for testing your SSO configuration are as follows:
Once your connection is enabled, do not close or log out of your current Vantage application session.
Open a private browser or incognito window, and visit [https://console.vantage.sh](https://console.vantage.sh).
Enter your email address. If your SSO connection is configured correctly, you will be redirected to your IdP.
Enter your login credentials. If you can complete the login, your configuration is correct.
If you experience any issues with logging in after you've enabled your connection, [contact Vantage Support](mailto:support@vantage.sh).
### Rotate Your SAML Signing Certificate
SAML signing certificates issued by your IdP have an expiration date. When a certificate is approaching expiration, you need to update the certificate in Vantage before it expires to avoid SSO login disruptions.
In your IdP, generate or obtain the new X.509 signing certificate. The certificate can be in PEM (`.pem`) or CER (`.cer`) format.
Send the updated certificate to [Vantage Support](mailto:support@vantage.sh) using a secure file transfer method.
Vantage will update the signing certificate on your connection. Once Vantage confirms the update, test the connection in a private or incognito browser window before ending your current session. See [Test Your SSO Configuration](/sso#test-your-sso-configuration) for the recommended testing steps.
SAML signing certificates are currently updated by Vantage Support rather than directly in the Vantage console. Plan your rotation before the certificate expires so there is time to update the connection and test it.
Set a calendar reminder before your IdP signing certificate's expiration date to avoid SSO login disruptions.
### Disconnect Your IdP
If you ever need to disconnect your IdP from Vantage:
Navigate to the [Authentication page](https://console.vantage.sh/settings/account_identity_providers).
To *disable* your connection, switch the **Active** toggle off. To *permanently remove* your IdP, click the **Delete** button.
After disabling/removing the connection, you will be able to log in to the app with your original Vantage login credentials.
## Set Up Other IdPs
If you do not see your IdP listed, please contact [Vantage
Support](mailto:support@vantage.sh).
### Authenticate with Azure AD
The following instructions are based on the [Microsoft
documentation](https://learn.microsoft.com/en-us/azure/active-directory/develop/quickstart-register-app).
#### Step 1 - Obtain Your Primary Domain from Microsoft Entra ID
Set the **Application username** to **Email**.
Once the app integration is set up, copy the Okta-provided **Identity Provider Single Sign On URL** and **X.509 Certificate** back into Vantage.
To enable the connection, switch the Active toggle to on. You will remain logged in to Vantage, but the next time you attempt to log in, you will be redirected to the Okta sign-on page.
### Test Your SSO Configuration
The recommended steps for testing your SSO configuration are as follows:
Once your connection is enabled, do not close or log out of your current Vantage application session.
Open a private browser or incognito window, and visit [https://console.vantage.sh](https://console.vantage.sh).
Enter your email address. If your SSO connection is configured correctly, you will be redirected to your IdP.
Enter your login credentials. If you can complete the login, your configuration is correct.
If you experience any issues with logging in after you've enabled your connection, [contact Vantage Support](mailto:support@vantage.sh).
### Rotate Your SAML Signing Certificate
SAML signing certificates issued by your IdP have an expiration date. When a certificate is approaching expiration, you need to update the certificate in Vantage before it expires to avoid SSO login disruptions.
In your IdP, generate or obtain the new X.509 signing certificate. The certificate can be in PEM (`.pem`) or CER (`.cer`) format.
Send the updated certificate to [Vantage Support](mailto:support@vantage.sh) using a secure file transfer method.
Vantage will update the signing certificate on your connection. Once Vantage confirms the update, test the connection in a private or incognito browser window before ending your current session. See [Test Your SSO Configuration](/sso#test-your-sso-configuration) for the recommended testing steps.
SAML signing certificates are currently updated by Vantage Support rather than directly in the Vantage console. Plan your rotation before the certificate expires so there is time to update the connection and test it.
Set a calendar reminder before your IdP signing certificate's expiration date to avoid SSO login disruptions.
### Disconnect Your IdP
If you ever need to disconnect your IdP from Vantage:
Navigate to the [Authentication page](https://console.vantage.sh/settings/account_identity_providers).
To *disable* your connection, switch the **Active** toggle off. To *permanently remove* your IdP, click the **Delete** button.
After disabling/removing the connection, you will be able to log in to the app with your original Vantage login credentials.
## Set Up Other IdPs
If you do not see your IdP listed, please contact [Vantage
Support](mailto:support@vantage.sh).
### Authenticate with Azure AD
The following instructions are based on the [Microsoft
documentation](https://learn.microsoft.com/en-us/azure/active-directory/develop/quickstart-register-app).
#### Step 1 - Obtain Your Primary Domain from Microsoft Entra ID
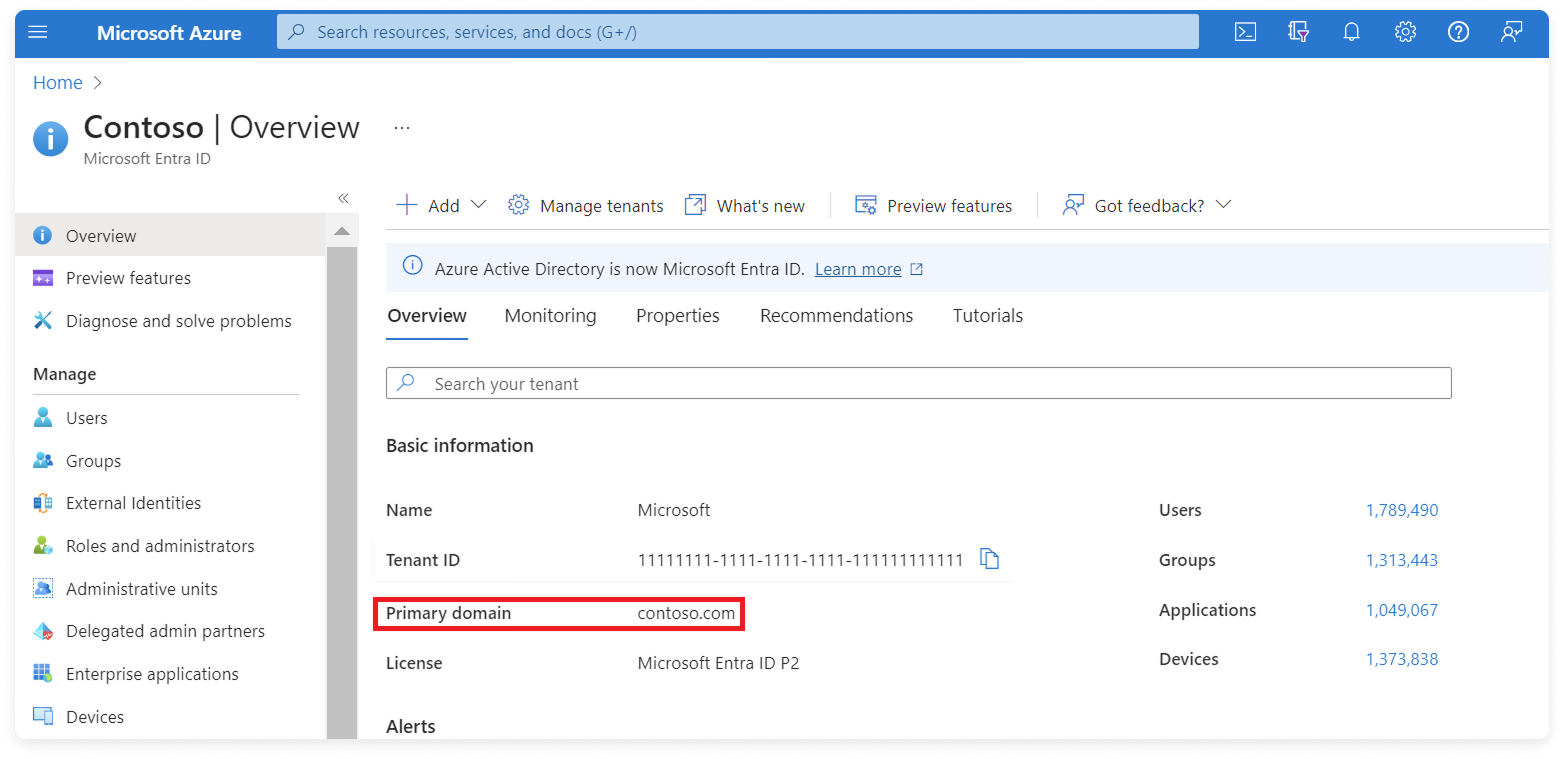 Log in to the Azure portal.
Navigate to **Microsoft Entra ID**.
On the **Overview** screen, copy the **Primary domain** to use in the last step.
#### Step 2 - Register an OAuth Application with Azure
Log in to the Azure portal.
Navigate to **Microsoft Entra ID**.
On the **Overview** screen, copy the **Primary domain** to use in the last step.
#### Step 2 - Register an OAuth Application with Azure
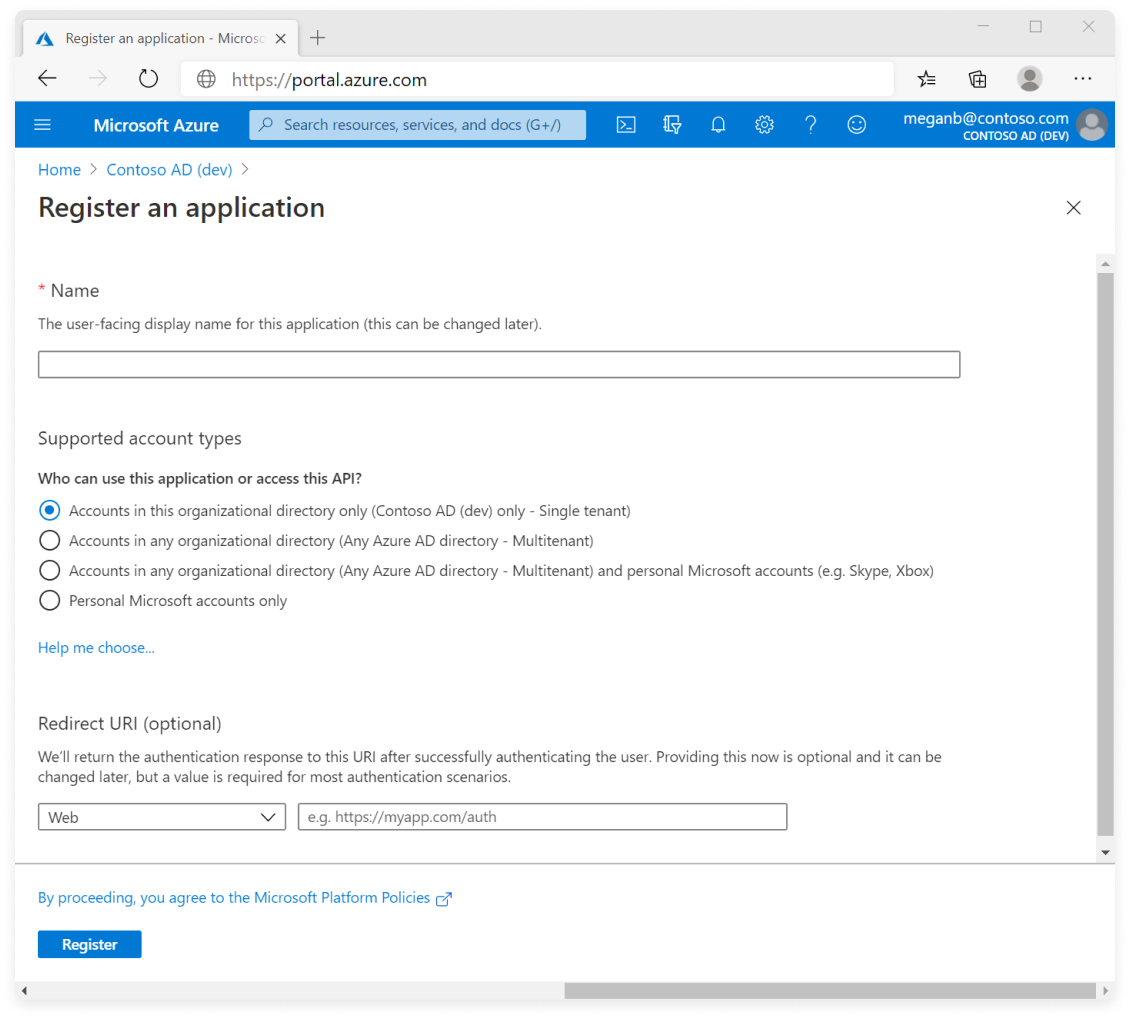 From the Azure portal, navigate to **App registrations**, then click **New registration**.
Enter a name for your app (e.g., *Vantage*).
Set the **Supported account types** option to the appropriate setting for your organization.
For **Redirect URI**, select **Web** and enter `https://auth.vantage.sh/login/callback`.
Click **Register**.
Once the app registration is complete, copy the **Application (client) ID** displayed on the app's **Overview** page to send to Vantage.
#### Step 3 - Generate a Client Secret
From the Azure portal, navigate to **App registrations**, then click **New registration**.
Enter a name for your app (e.g., *Vantage*).
Set the **Supported account types** option to the appropriate setting for your organization.
For **Redirect URI**, select **Web** and enter `https://auth.vantage.sh/login/callback`.
Click **Register**.
Once the app registration is complete, copy the **Application (client) ID** displayed on the app's **Overview** page to send to Vantage.
#### Step 3 - Generate a Client Secret
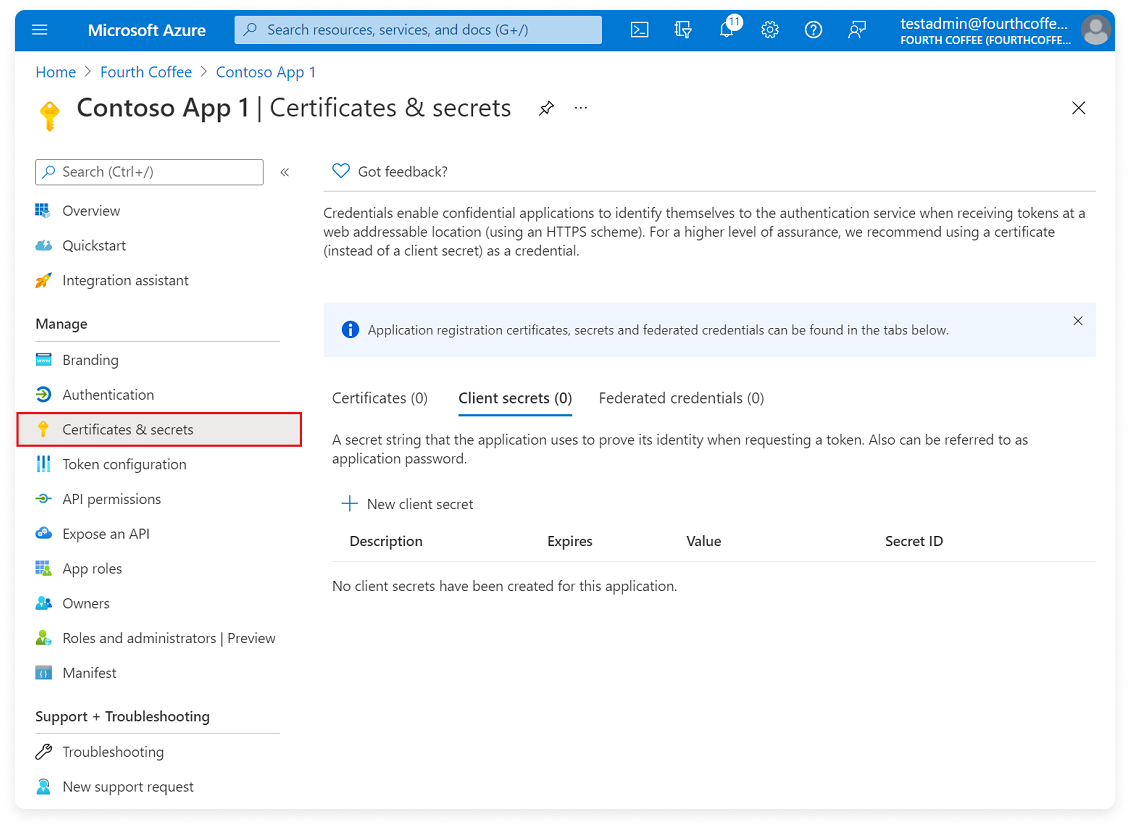 On the left navigation, select **Certificates & secrets**.
Under the **Client secrets** tab, click **New client secret**.
Enter a description and select an expiration for the secret.
Azure client secrets have a set expiration date. If your secret expires, your SSO connection will stop working. Generate a new secret in Azure *before* the expiration date and contact [Vantage Support](mailto:support@vantage.sh) with the new secret value so the connection can be updated. See [Update Your Client Secret](/sso#update-your-azure-ad-client-secret) below.
Click **Add**.
Copy the secret's **Value**.
#### Step 4 - Add API Permissions
On the left navigation, select **Certificates & secrets**.
Under the **Client secrets** tab, click **New client secret**.
Enter a description and select an expiration for the secret.
Azure client secrets have a set expiration date. If your secret expires, your SSO connection will stop working. Generate a new secret in Azure *before* the expiration date and contact [Vantage Support](mailto:support@vantage.sh) with the new secret value so the connection can be updated. See [Update Your Client Secret](/sso#update-your-azure-ad-client-secret) below.
Click **Add**.
Copy the secret's **Value**.
#### Step 4 - Add API Permissions
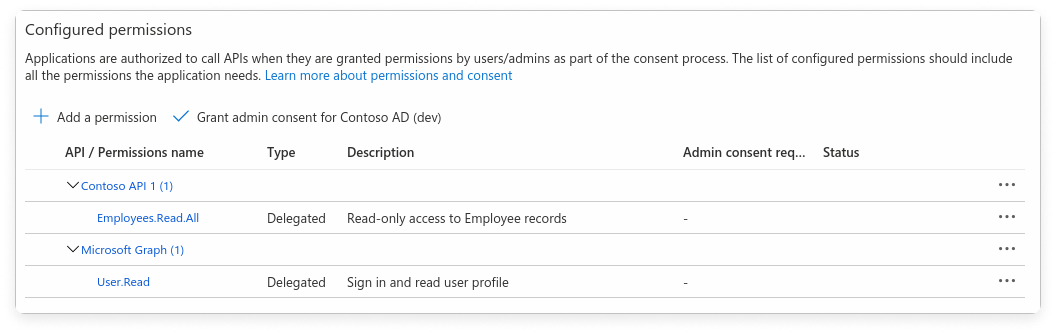 On the left navigation, select **API permissions**.
Select **Add a permission**.
Under the **Microsoft APIs** tab, find and select the appropriate permissions required by Vantage (e.g., `Directory.Read.All`, `User.Read`).
At the bottom, click **Add permissions**.
#### Step 5 - Grant Admin Consent (If Required)
On the left navigation, select **API permissions**.
Select **Add a permission**.
Under the **Microsoft APIs** tab, find and select the appropriate permissions required by Vantage (e.g., `Directory.Read.All`, `User.Read`).
At the bottom, click **Add permissions**.
#### Step 5 - Grant Admin Consent (If Required)
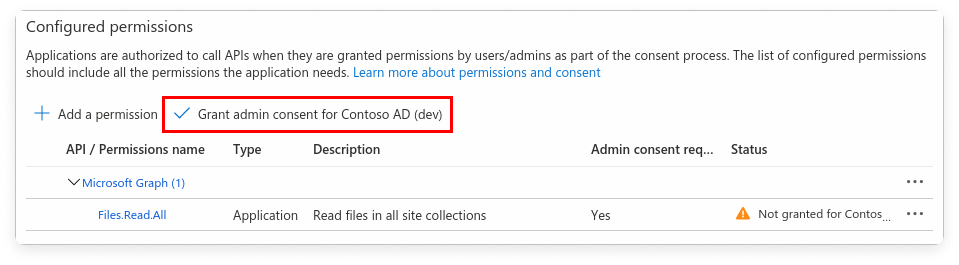 Still under **API permissions**, you may see a section for **Grant admin consent for \{your domain}**.
Click **Grant admin consent**, and follow the prompts.
#### Step 6 - Add Credentials to Vantage
Navigate to the [**Authentication screen**](https://console.vantage.sh/settings/account_identity_providers) in Vantage.
Select **AzureAD**.
Under **Step 2**, enter the following information:
* **Primary Domain**: The value you obtained in step 1. *Ensure you enter only the domain name (e.g., `yourcompany.com`). Do not include `http://www`.*
* **Client ID**: The client ID you obtained in step 2.
* **Client Secret**: The secret you obtained in step 3.
Click **Configure Connection**.
After your connection is complete, if you would like to set up SSO group mappings based on your existing Vantage teams, [see the SSO Group Mappings](/sso#set-up-sso-group-mapping-for-teams) instructions below.
#### Update Your Azure AD Client Secret
The client secret you created in [Step 3](/sso#step-3---generate-a-client-secret) has an expiration date set in Azure. Unlike the Azure cost integration, SSO connection credentials are not editable through the Vantage console. To rotate your client secret:
In the Azure portal, navigate to your Vantage app registration, then go to **Certificates & secrets**.
Under the **Client secrets** tab, click **New client secret** to generate a new secret. Copy the secret **Value**.
Contact [Vantage Support](mailto:support@vantage.sh) with your new client secret value. Vantage will update the connection on their end.
Once Vantage confirms the update, you can delete the old secret from your Azure app registration.
Azure AD client secrets are currently updated through Vantage Support rather than directly in the Vantage console. Generate the replacement secret before the existing one expires so you can update the connection without interrupting sign-in.
Set a calendar reminder before your client secret's expiration date to avoid SSO login disruptions.
#### Azure Government Cloud (GCC High)
The Azure AD OAuth connection uses the standard Microsoft identity endpoint (`login.microsoftonline.com`) and does not support Azure Government Cloud (GCC High) tenants. If your organization uses a GCC High tenant (`login.microsoftonline.us`), use [SAML-based SSO](/sso#self-service-sso-via-saml) instead. Configure your GCC High Microsoft Entra ID tenant as a SAML Identity Provider by creating an Enterprise Application for Vantage in your GCC High tenant.
### Authenticate with Google Workspace
The following instructions are based on the [Google
documentation](https://support.google.com/googleapi/answer/6158849).
#### Step 1 - Register an OAuth Application with Google
From the [Google API Console](https://console.developers.google.com/), select an existing project or click **CREATE PROJECT**.
From the left navigation menu, click **Credentials**.
At the top, click **CREATE CREDENTIALS** > **OAuth client ID**.
If this is your first time working with this Google project, you will have to configure your consent screen. Follow the Google documentation linked
above.
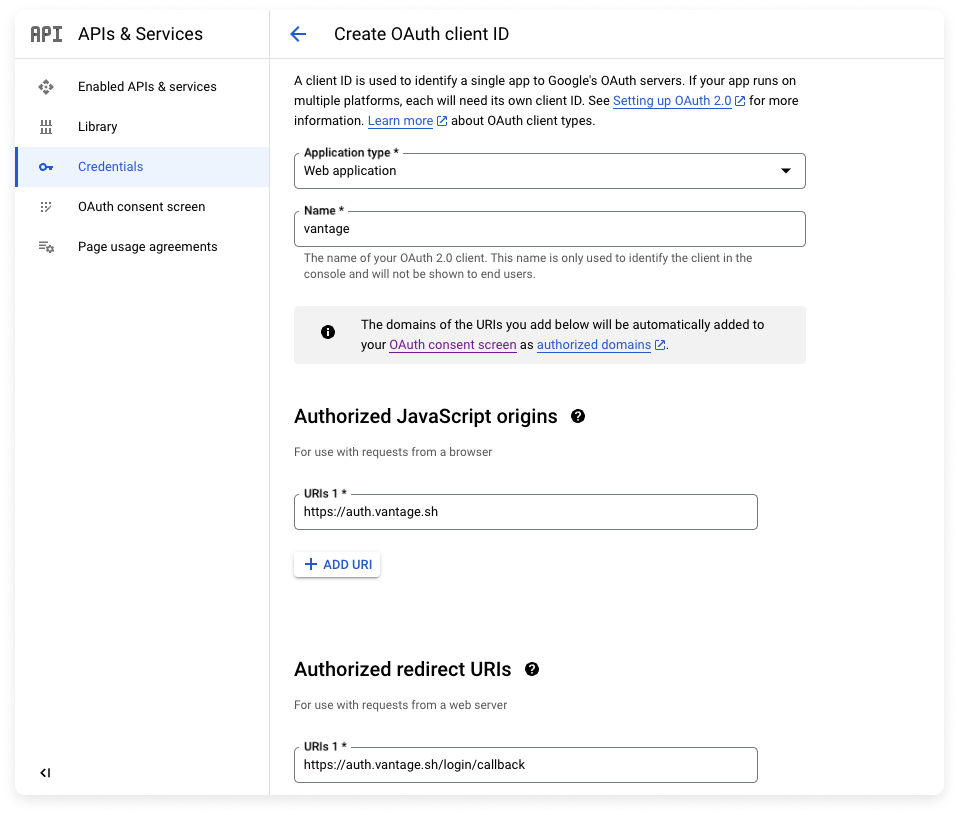
For **Application type**, select **Web application**.
Enter a **Name** for your application (e.g., *Vantage*).
For **Authorized JavaScript origins**, click **ADD URI** and enter `https://auth.vantage.sh`.
For **Authorized redirect URIs**, click **ADD URI** and enter `https://auth.vantage.sh/login/callback`.
Click **CREATE**.
#### Step 2 - Obtain Application Credentials and Contact Vantage Support
* Copy your app's **CLIENT ID** and **CLIENT SECRET**.
* Contact [Vantage Support](mailto:support@vantage.sh) for information on how to send these credentials to finish connecting with the Vantage app.
After your connection is complete, if you would like to set up SSO group mappings based on your existing Vantage teams, [see the SSO Group Mappings](/sso#set-up-sso-group-mapping-for-teams) instructions below.
### Authenticate with Rippling
Vantage is available in the [Rippling App Shop](https://www.rippling.com/app-shop/app/vntg-inc-vantage), where you can find instructions for connecting your Vantage account to Rippling.
## Set Up SSO Group Mapping for Teams
With the SSO Team Assignment feature, you can automatically assign users to Vantage teams that match the name of a corresponding SSO group.
### Prerequisites
To use the SSO Team Assignment feature, you will need to have teams already set up in Vantage. See the [Role-Based Access Control: Create Teams](/rbac#create-or-delete-teams) documentation for information on how to create teams in Vantage.
### Enable SSO Team Assignment
From the top menu of the Vantage console, click **Settings**.
On the left navigation menu, select **Authentication**. You will see your SSO connection listed.
In the **SSO Team Assignment** section of the connection, click the toggle button to enable the feature.
Vantage will match SSO groups to Vantage teams based on the case-sensitive name of the SSO group. If a team name in Vantage matches an SSO group name, the user will be placed into that team in Vantage. Users will be mapped into the appropriate teams during their next login.
After the SSO Team Assignment setting is enabled, users will be removed from
Vantage teams that are not present in the SSO groups. If you want to modify
this behavior, contact [support@vantage.sh](mailto:support@vantage.sh). The
Everyone team will remain unchanged.
### Create Custom Mappings
If your team names in Vantage *do not match* your identity provider, or you want multiple groups to be added to the same team, you can create **custom mappings**.
To create custom mappings, click the **Show** dropdown menu next to **Custom Mappings**.
In the **SSO Group Name** column, enter the group names from your SSO provider. The SSO Group Name you enter should match the corresponding name in your identity provider. Note that the mapping is case-sensitive.
From the **Vantage Team** dropdown, select the corresponding Vantage team.
Click **Add** to add additional mappings.
Still under **API permissions**, you may see a section for **Grant admin consent for \{your domain}**.
Click **Grant admin consent**, and follow the prompts.
#### Step 6 - Add Credentials to Vantage
Navigate to the [**Authentication screen**](https://console.vantage.sh/settings/account_identity_providers) in Vantage.
Select **AzureAD**.
Under **Step 2**, enter the following information:
* **Primary Domain**: The value you obtained in step 1. *Ensure you enter only the domain name (e.g., `yourcompany.com`). Do not include `http://www`.*
* **Client ID**: The client ID you obtained in step 2.
* **Client Secret**: The secret you obtained in step 3.
Click **Configure Connection**.
After your connection is complete, if you would like to set up SSO group mappings based on your existing Vantage teams, [see the SSO Group Mappings](/sso#set-up-sso-group-mapping-for-teams) instructions below.
#### Update Your Azure AD Client Secret
The client secret you created in [Step 3](/sso#step-3---generate-a-client-secret) has an expiration date set in Azure. Unlike the Azure cost integration, SSO connection credentials are not editable through the Vantage console. To rotate your client secret:
In the Azure portal, navigate to your Vantage app registration, then go to **Certificates & secrets**.
Under the **Client secrets** tab, click **New client secret** to generate a new secret. Copy the secret **Value**.
Contact [Vantage Support](mailto:support@vantage.sh) with your new client secret value. Vantage will update the connection on their end.
Once Vantage confirms the update, you can delete the old secret from your Azure app registration.
Azure AD client secrets are currently updated through Vantage Support rather than directly in the Vantage console. Generate the replacement secret before the existing one expires so you can update the connection without interrupting sign-in.
Set a calendar reminder before your client secret's expiration date to avoid SSO login disruptions.
#### Azure Government Cloud (GCC High)
The Azure AD OAuth connection uses the standard Microsoft identity endpoint (`login.microsoftonline.com`) and does not support Azure Government Cloud (GCC High) tenants. If your organization uses a GCC High tenant (`login.microsoftonline.us`), use [SAML-based SSO](/sso#self-service-sso-via-saml) instead. Configure your GCC High Microsoft Entra ID tenant as a SAML Identity Provider by creating an Enterprise Application for Vantage in your GCC High tenant.
### Authenticate with Google Workspace
The following instructions are based on the [Google
documentation](https://support.google.com/googleapi/answer/6158849).
#### Step 1 - Register an OAuth Application with Google
From the [Google API Console](https://console.developers.google.com/), select an existing project or click **CREATE PROJECT**.
From the left navigation menu, click **Credentials**.
At the top, click **CREATE CREDENTIALS** > **OAuth client ID**.
If this is your first time working with this Google project, you will have to configure your consent screen. Follow the Google documentation linked
above.
For **Application type**, select **Web application**.
Enter a **Name** for your application (e.g., *Vantage*).
For **Authorized JavaScript origins**, click **ADD URI** and enter `https://auth.vantage.sh`.
For **Authorized redirect URIs**, click **ADD URI** and enter `https://auth.vantage.sh/login/callback`.
Click **CREATE**.

#### Step 2 - Obtain Application Credentials and Contact Vantage Support
* Copy your app's **CLIENT ID** and **CLIENT SECRET**.
* Contact [Vantage Support](mailto:support@vantage.sh) for information on how to send these credentials to finish connecting with the Vantage app.
After your connection is complete, if you would like to set up SSO group mappings based on your existing Vantage teams, [see the SSO Group Mappings](/sso#set-up-sso-group-mapping-for-teams) instructions below.
### Authenticate with Rippling
Vantage is available in the [Rippling App Shop](https://www.rippling.com/app-shop/app/vntg-inc-vantage), where you can find instructions for connecting your Vantage account to Rippling.
## Set Up SSO Group Mapping for Teams
With the SSO Team Assignment feature, you can automatically assign users to Vantage teams that match the name of a corresponding SSO group.
### Prerequisites
To use the SSO Team Assignment feature, you will need to have teams already set up in Vantage. See the [Role-Based Access Control: Create Teams](/rbac#create-or-delete-teams) documentation for information on how to create teams in Vantage.
### Enable SSO Team Assignment
From the top menu of the Vantage console, click **Settings**.
On the left navigation menu, select **Authentication**. You will see your SSO connection listed.
In the **SSO Team Assignment** section of the connection, click the toggle button to enable the feature.
Vantage will match SSO groups to Vantage teams based on the case-sensitive name of the SSO group. If a team name in Vantage matches an SSO group name, the user will be placed into that team in Vantage. Users will be mapped into the appropriate teams during their next login.
After the SSO Team Assignment setting is enabled, users will be removed from
Vantage teams that are not present in the SSO groups. If you want to modify
this behavior, contact [support@vantage.sh](mailto:support@vantage.sh). The
Everyone team will remain unchanged.
### Create Custom Mappings
If your team names in Vantage *do not match* your identity provider, or you want multiple groups to be added to the same team, you can create **custom mappings**.
To create custom mappings, click the **Show** dropdown menu next to **Custom Mappings**.
In the **SSO Group Name** column, enter the group names from your SSO provider. The SSO Group Name you enter should match the corresponding name in your identity provider. Note that the mapping is case-sensitive.
From the **Vantage Team** dropdown, select the corresponding Vantage team.
Click **Add** to add additional mappings.
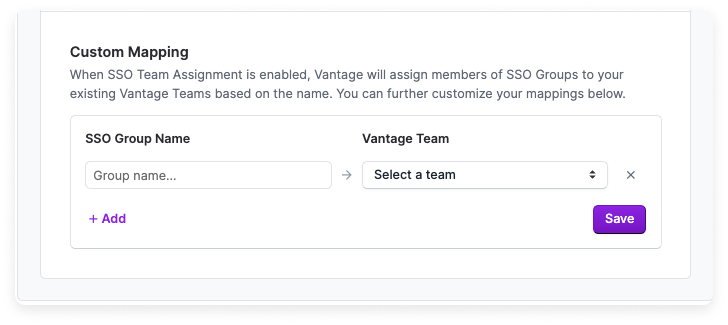 When you are finished, click **Save**.
A user's teams are updated on every login. Vantage will also automatically
remove users from teams that are no longer present in the SSO groups list.
### Group Mapping in Okta - Enabling `groups` Attribute
Vantage uses the `groups` field in the SSO payload for matching SSO groups to Vantage teams. As long as your identity provider can pass a `groups` attribute in the payload, you can use SSO group mapping. For some providers, like Okta, you may need to enable group mapping.
To enable group mapping in Okta:
Navigate to the Vantage SAML application in Okta.
Edit your **SAML Settings**.
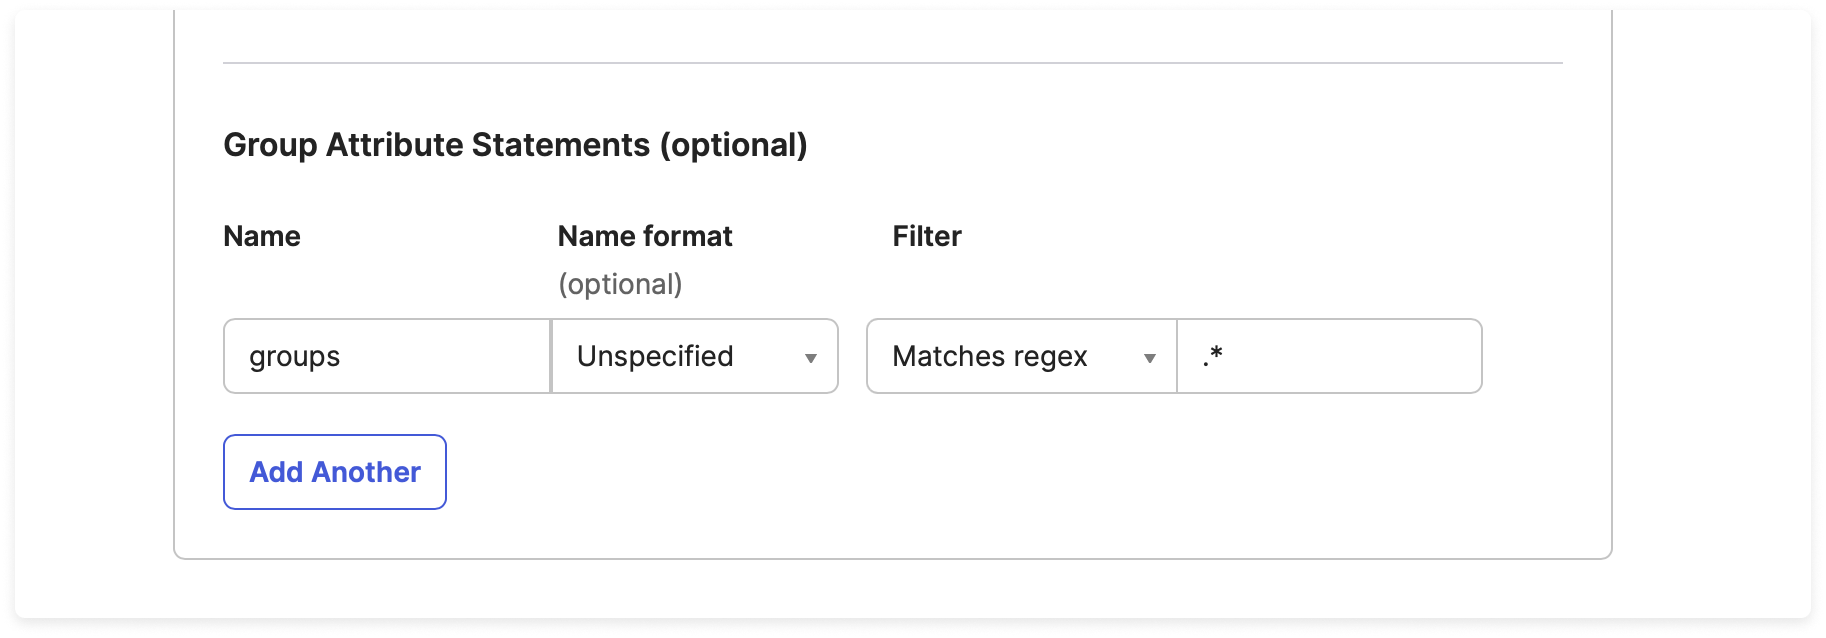
For **Name**, enter `groups`.
If you would like to pass through all groups, set the **Filter** to **Matches regex** with a value of `.*`.
When you are finished, click **Save**.
A user's teams are updated on every login. Vantage will also automatically
remove users from teams that are no longer present in the SSO groups list.
### Group Mapping in Okta - Enabling `groups` Attribute
Vantage uses the `groups` field in the SSO payload for matching SSO groups to Vantage teams. As long as your identity provider can pass a `groups` attribute in the payload, you can use SSO group mapping. For some providers, like Okta, you may need to enable group mapping.
To enable group mapping in Okta:
Navigate to the Vantage SAML application in Okta.
Edit your **SAML Settings**.
For **Name**, enter `groups`.
If you would like to pass through all groups, set the **Filter** to **Matches regex** with a value of `.*`.
 If you need help with your specific identity provider, contact
[support@vantage.sh](mailto:support@vantage.sh).
## Troubleshooting
### SSO Group Mapping Not Working
If users are not being placed into the expected Vantage teams after logging in:
| Symptom | Possible Cause | Resolution |
| ------------------------------------------- | --------------------------------------- | --------------------------------------------------------------------------------------------------------------------------------------------------------------------------------------------------------------------------------------------------------------------------------------------------------------------------- |
| Users remain in the **Everyone** team only | IdP is not sending a `groups` attribute | Verify that your IdP is configured to pass a `groups` field in the SAML assertion or OAuth payload. For Okta, see the [Enabling `groups` Attribute](/sso#group-mapping-in-okta-enabling-groups-attribute) section above. |
| Some groups map correctly but others do not | Team name mismatch | Group mapping is **case-sensitive**. Ensure the group name in your IdP exactly matches the team name in Vantage, or create a [Custom Mapping](/sso#create-custom-mappings). |
| Users are removed from teams unexpectedly | SSO Team Assignment override | When SSO Team Assignment is enabled, users are removed from Vantage teams that are not present in their SSO groups on each login. If you need users to belong to teams that don't exist in your IdP, create matching groups in your IdP or contact [support@vantage.sh](mailto:support@vantage.sh) to adjust this behavior. |
### Login Redirects to Wrong Page or Fails
If users encounter errors when attempting to log in via SSO:
* Verify the **Single Sign-On URL** and **Audience URL** in your IdP match the values shown on the Vantage [Authentication page](https://console.vantage.sh/settings/account_identity_providers).
* For Azure AD, ensure the **Redirect URI** is set to `https://auth.vantage.sh/login/callback`.
* For Azure AD, ensure the **Client Secret** in Vantage is the secret **Value**, not the secret ID.
* If Azure AD returns a public client flow error, such as `Proof Key for Code Exchange is required for cross-origin authorization code redemption`, confirm the redirect URI is configured under **Web**, not **Single-page application** or **Mobile and desktop applications**. In **Authentication** > **Advanced settings**, ensure **Allow public client flows** is set to **No**.
* Check that the signing certificate has not expired. If it has, follow the steps in [Rotate Your SAML Signing Certificate](/sso#rotate-your-saml-signing-certificate) to update the certificate.
* If the connection was recently set up, test in a private/incognito window before logging out of your existing session. See [Test Your SSO Configuration](/sso#test-your-sso-configuration) for the recommended testing steps.
If you need help with your specific identity provider, contact
[support@vantage.sh](mailto:support@vantage.sh).
## Troubleshooting
### SSO Group Mapping Not Working
If users are not being placed into the expected Vantage teams after logging in:
| Symptom | Possible Cause | Resolution |
| ------------------------------------------- | --------------------------------------- | --------------------------------------------------------------------------------------------------------------------------------------------------------------------------------------------------------------------------------------------------------------------------------------------------------------------------- |
| Users remain in the **Everyone** team only | IdP is not sending a `groups` attribute | Verify that your IdP is configured to pass a `groups` field in the SAML assertion or OAuth payload. For Okta, see the [Enabling `groups` Attribute](/sso#group-mapping-in-okta-enabling-groups-attribute) section above. |
| Some groups map correctly but others do not | Team name mismatch | Group mapping is **case-sensitive**. Ensure the group name in your IdP exactly matches the team name in Vantage, or create a [Custom Mapping](/sso#create-custom-mappings). |
| Users are removed from teams unexpectedly | SSO Team Assignment override | When SSO Team Assignment is enabled, users are removed from Vantage teams that are not present in their SSO groups on each login. If you need users to belong to teams that don't exist in your IdP, create matching groups in your IdP or contact [support@vantage.sh](mailto:support@vantage.sh) to adjust this behavior. |
### Login Redirects to Wrong Page or Fails
If users encounter errors when attempting to log in via SSO:
* Verify the **Single Sign-On URL** and **Audience URL** in your IdP match the values shown on the Vantage [Authentication page](https://console.vantage.sh/settings/account_identity_providers).
* For Azure AD, ensure the **Redirect URI** is set to `https://auth.vantage.sh/login/callback`.
* For Azure AD, ensure the **Client Secret** in Vantage is the secret **Value**, not the secret ID.
* If Azure AD returns a public client flow error, such as `Proof Key for Code Exchange is required for cross-origin authorization code redemption`, confirm the redirect URI is configured under **Web**, not **Single-page application** or **Mobile and desktop applications**. In **Authentication** > **Advanced settings**, ensure **Allow public client flows** is set to **No**.
* Check that the signing certificate has not expired. If it has, follow the steps in [Rotate Your SAML Signing Certificate](/sso#rotate-your-saml-signing-certificate) to update the certificate.
* If the connection was recently set up, test in a private/incognito window before logging out of your existing session. See [Test Your SSO Configuration](/sso#test-your-sso-configuration) for the recommended testing steps.