> ## Documentation Index
> Fetch the complete documentation index at: https://docs.vantage.sh/llms.txt
> Use this file to discover all available pages before exploring further.
# Segments
> Create cost allocation segments in Vantage to organize cloud spending with hierarchical cost governance and showback/chargeback capabilities.
A segment is a set of filters that represents a portion of costs for your organization (e.g., costs allocated to a business unit or team). With segments, you can perform cost allocation and enforce cost governance for your organization. You can create nested hierarchies of costs that can map to teams, departments, apps, or services within your organization. Segments ensure that costs are allocated only once and not duplicated in cases of showback/chargeback scenarios.
To enable segments in your account, contact Vantage Support at [support@vantage.sh](mailto:support@vantage.sh).
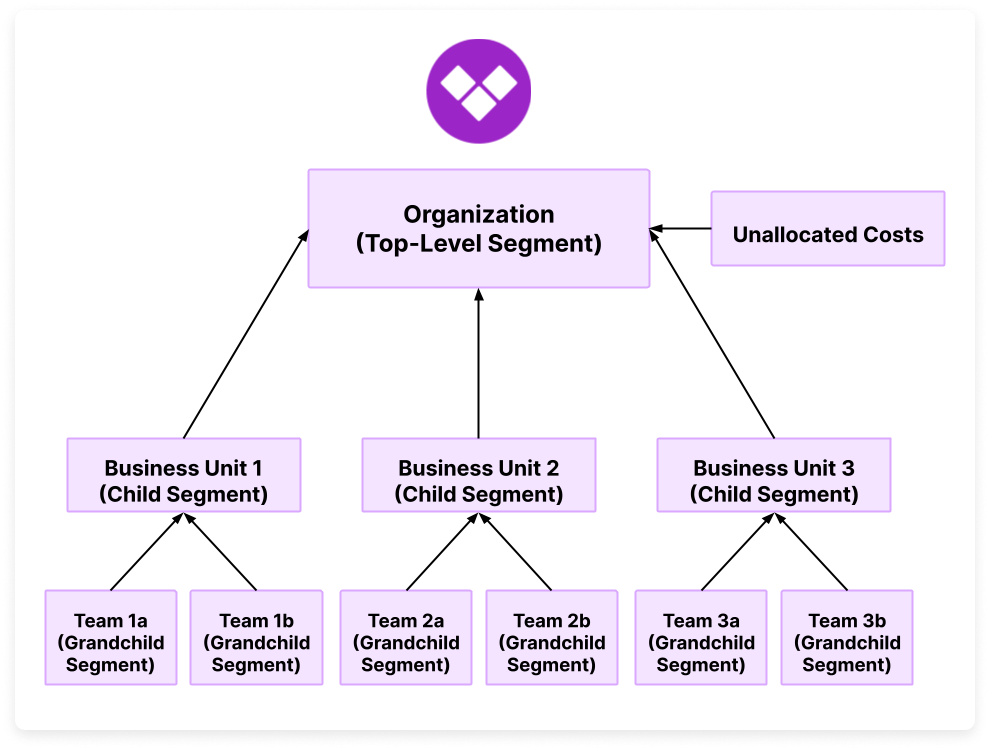
The below diagram shows an example of a segment hierarchy. Segment allocation is *bottom-up*: each child segment's filters determine which costs it claims, and those costs roll up to parent segments. A parent segment's filter does not constrain or limit which costs its child segments can capture. Any costs not claimed by a child segment are considered *unallocated costs*. By analyzing your segments, you can identify and burn down these unallocated costs to improve financial accountability and resource management.
To get started with cost allocation segments, you can also view a video demo on [Vantage University](/vantage_university_cost_allocation) .
## Segments Use Cases
You can leverage segments for many use cases, including the below examples.
* **Map costs to business units.** You can use nested hierarchies for cost allocation. For example, you can see costs grouped by an "Infrastructure Engineering" team, then drill down into all the various sub-teams, like "Infrastructure Engineering Team 1" and "Infrastructure Engineering Team 2." The costs for Team 1 and Team 2 together comprise the total cost allocation line item for Infrastructure Engineering.
* **Maintain tag governance.** You can create a segment for a particular tag key you want to enforce across your organization. Whenever there are costs in the "Unallocated" portion of the report, you can go and identify resources to assign to the proper team or service. Unallocated costs are costs that are not claimed by any child segment. For example, if you have two segments defined for **OPEX** and **R\&D**, any costs that do not match the logic associated with either of these child segments will fall into the unallocated segment. The unallocated segment report is automatically displayed at the root or parent segment level.
Because segment allocation is bottom-up, a parent segment's filter does not define the scope of what is considered unallocated. If you want to track unallocated costs for a specific scope—such as only unallocated AWS costs—add a child segment that acts as a catch-all. Give it a filter for the scope you want to track (e.g., Provider = AWS), assign it a low priority (a high number, like `999`) so it runs last, and disable the **Track unallocated** option on the parent. This catch-all segment will capture any costs within that scope that were not already claimed by a higher-priority sibling segment.
## Create a Segment
Follow the steps below to create a segment.
From the top navigation, click **Reporting**.
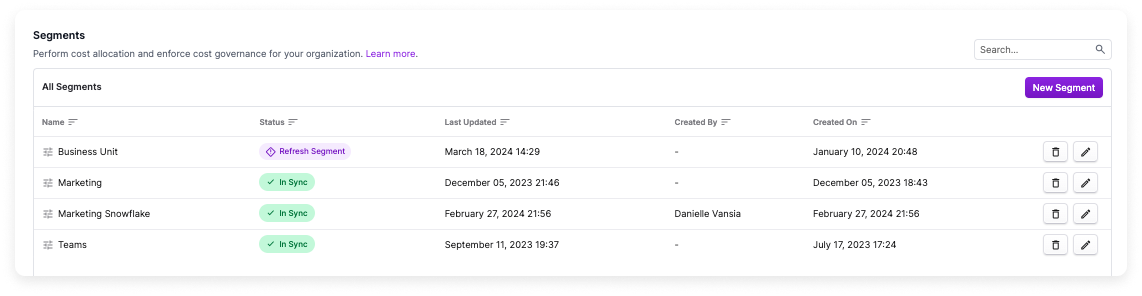
On the left navigation, select **Segments**. If you have segments present in your account, a full list of top-level segments is displayed in the view on the right, sorted alphabetically.
To create a new segment, click **New Segment**.
Set the following parameters for the new segment:
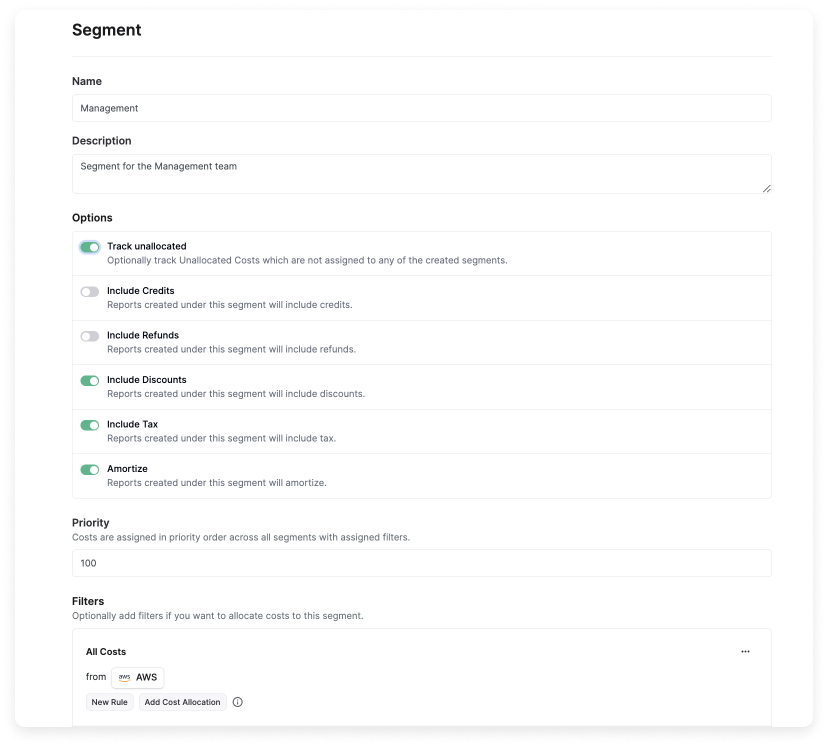
* For **Name**, enter a unique string (e.g., *OPEX*). This field is required.
* For **Description**, optionally enter a text description for the segment.
* For options, you can select whether you want to include or exclude credits, refunds, discounts, taxes, and amortization. You can also optionally track unallocated costs.
These options are displayed only for the root or parent segment, and the selections you make will apply to child segments. Track unallocated applies only to the parent segment. Note that the parent segment's filter does not constrain child segments or define the scope of unallocated costs.
* For **Priority**, enter a numeric value (e.g., *100*). Costs are allocated in order of priority, with 0 as the highest priority. This field is required if filters are specified (as described in the next step). If you do not specify filters, this field is optional.
Once a cost is allocated to a segment, it will not appear in a segment with a higher priority; however, you likely will not need to worry about priority unless your organization has deep scrutiny on cost allocation collision.
Filters allocate costs to the segment and are optional. To create a filter, click **+ Add a Filter** and configure the following values:
* Select a **Provider**.
* Click **New Rule** to add additional logic, such as **Region** or **Category** filters. Segment filters are like filters in Cost Reports. See [Filter Cost Reports](/cost_reports#filter-cost-reports) for a more detailed explanation of filters. Note that you cannot use *saved filters* from Cost Reports in segments.
This example shows a root- or parent-level segment called "Management." Child segment parameters will be the same—except for the **Track unallocated** option, which is not displayed for child segments.
At the bottom, click **Save**. You will see a message indicating **"A Segment Report will appear here when the segment is finished refreshing"** while the report for the segment is generated. Depending on the filter's complexity, it can take some time for the segment report to generate (up to 24 hours).
### Edit a Segment
If you make additional changes to a filter or segment metadata, like title, it can take up to 24 hours after you regenerate the segment to see those changes reflected in the console.
You can edit a segment's title, description, priority, and filters within the console. On parent-level segments, you can also edit the settings, such as discounts and taxes.
To edit these criteria, click the pencil icon next to the segment name.

Update and save the new criteria.
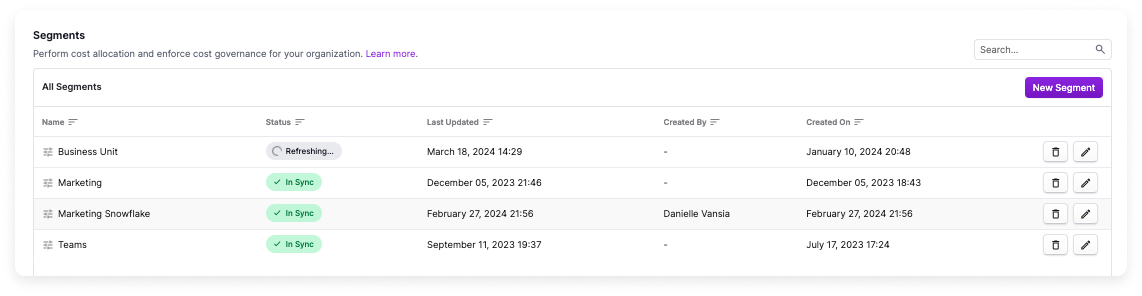
On the main **Segments** screen, the segment's **Status** column indicates if a segment needs to be regenerated. Click **Refresh Segment**.
The **Status** will be displayed as **Refreshing** while the segment is being updated. This process may take up to 24 hours.
### View and Create Child Segments
You can create child segments and nest segments within one another. Costs associated with nested segments/filters will be rolled up to any parent segments. To add a child segment to a parent segment, navigate to the parent segment, and click **New Segment Dimension**. The image below shows an example of a group of nested segments.
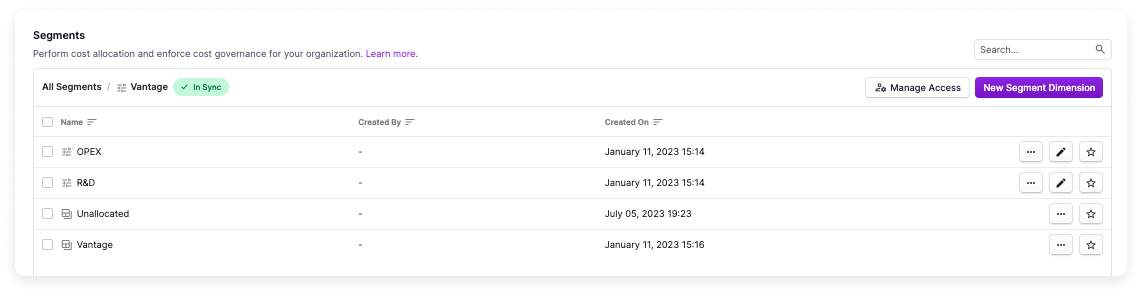
* In the above example, **Vantage** is the top-level segment (as displayed in the breadcrumbs at the top of the screen).
* The **Vantage** segment report is displayed at the bottom of the list.
* In this example, we selected the option to show **Unallocated costs** when creating this parent segment. The corresponding **Unallocated** segment report is displayed in the list.
* The **Vantage** parent segment has two child segments: **OPEX** and **R\&D**.
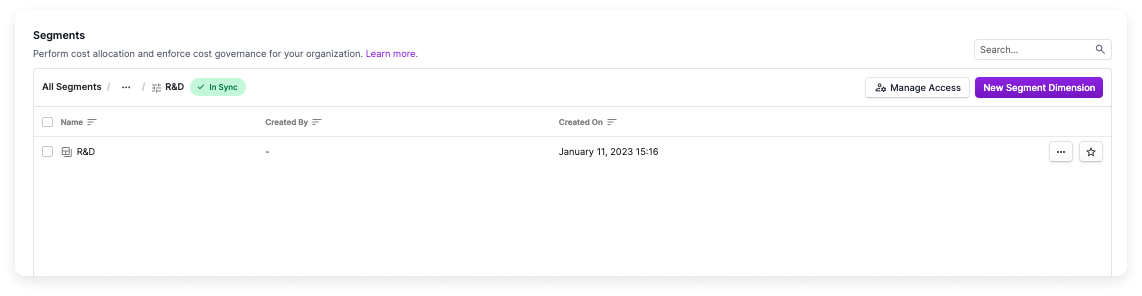
Select a child segment. You will see additional third-level child segments as well as the associated child segment report. In the below image, the **R\&D** child segment report is displayed. R\&D contains no additional child segments; however, you can add them if you want. Observe the breadcrumbs at the top, which also indicate **R\&D** is a child segment of **Vantage**.
## View Segment Reports
Select a segment report to view the associated costs. On the report, costs are displayed for all associated child segments.
* The report is filtered to **Group By: Segment** to show costs broken out by the child segments within that segment. In the below example, costs are grouped by **OPEX** and **R\&D** within the **Vantage** parent segment. The parent segment is also tracking unallocated costs.
* Change the filter to view the data by another grouping, such as **Account**.
* From the resource list at the bottom, click the icons next to each resource to isolate costs displayed within the chart.
* From the top right of the chart, you can change the date range and date bin (e.g., daily, weekly, monthly).
* Click **Settings** to view the currently enabled settings, like discounts and taxes. From the **Settings** menu, click the **Manage settings** link to update the segment's settings. Settings are updated at the parent-level segment. In this example, settings are updated for the **Vantage** segment and also apply to the **OPEX** and **R\&D** child segments.
If you would like to transition existing Cost Report filters to segments, you must manually re-create them. For assistance, contact Support at [support@vantage.sh](mailto:support@vantage.sh).
## Segments in Overview
A segment widget is displayed for each top-level segment on the [Overview](/overview/) screen. This segment widget shows a table of second-level segments and a comparison of costs for this month vs. last. You can select any of these segments to view the corresponding Cost Report.