> ## Documentation Index
> Fetch the complete documentation index at: https://docs.vantage.sh/llms.txt
> Use this file to discover all available pages before exploring further.
# Vantage for MSPs
> Manage multiple customer accounts with Vantage for MSPs.
Vantage provides an administrative portal for Managed Service Providers, or MSPs (also sometimes referred to as Resellers), to provision and centrally manage Vantage accounts on behalf of their end customers. MSPs can access this portal from their Management Account and move between each of their customers' Managed Accounts.
**GETTING STARTED**
If you are interested in this functionality, contact [partnerships@vantage.sh](mailto:partnerships@vantage.sh). Your Vantage account will be set up to include a Vantage for MSPs administrative portal.
If you already have separate accounts for your customers in Vantage and want to consolidate them to this model, contact [support@vantage.sh](mailto:support@vantage.sh).
## Terms to Know
The following terms are used throughout this documentation.
| Term | Definition |
| ---------------------- | ------------------------------------------------------------------------------------------------------------------------------------------------------------------------------------------------------------------------------------------------------------------------------------------ |
| **Managed Account** | A customer account that is provisioned and administered by an MSP. Managed Accounts have full access to Vantage features but cannot manage their own subscription. |
| **Management Account** | The MSP’s central administrative account used to create and oversee customers' Managed Accounts, manage billing rules, and configure integrations. |
| **Manager User** | A user from the MSP’s organization who accesses a customer's Managed Account. This user will inherit their role from their user in the Management Account. When logged in to a Managed Account, the Manager User sees visual indicators showing they are acting on behalf of the customer. |
## Partner Settings
The **Partner Settings** section in the Vantage console contains the following pages:
The central administrative portal for MSPs to perform the following actions:
* Create new customer Managed Accounts and update their name/contact email
* Delete existing customer Managed Accounts
* Log in to a customer's Managed Account
* Add integrations on behalf of a customer's Managed Account
* Assign billing rules to a customer's Managed Account
See the [Managed Accounts](/partners#create-a-new-customer-managed-account) section for additional information.
Create custom billing adjustments, one-time charges, re-rating, and MSP-level discounts. See the [Billing Rules](/partners#billing-rules) section for additional information.
Define custom exchange rates and set the display currency for Managed Accounts. See the [Currency Management](/partners#configure-currency-management) section for additional information.
View all integrated accounts across providers, see which Managed Accounts each integration is assigned to, and assign or remove integrations in bulk. See the [Partner Integrations](/partners#manage-partner-integrations) section for additional information.
## Create a New Customer Managed Account
A customer Managed Account functions just like a regular Vantage account; however, customers cannot view or manage subscriptions to Vantage. All Vantage features, like reports, SSO, and Slack/MS Teams integrations, are available and scoped to each customer Managed Account.
To provision a new customer Managed Account:
Log in to your Vantage for MSPs Management Account.
From the top navigation, click **Settings**.
From the left navigation, under **Partner Settings**, select **Managed Accounts.**
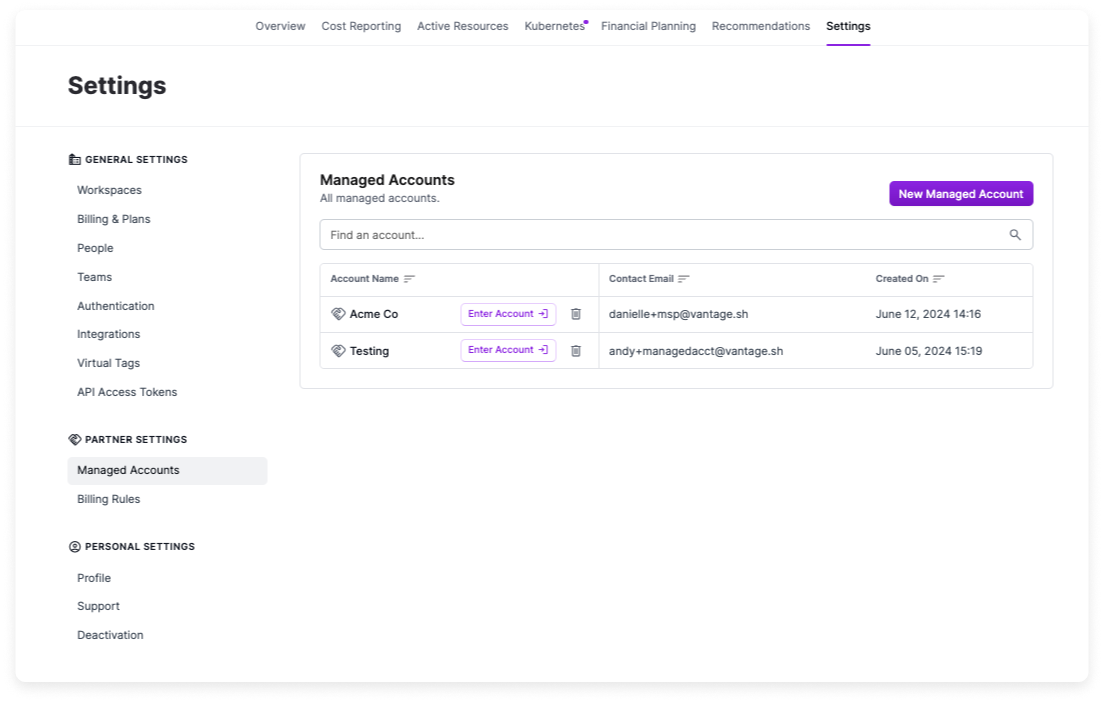
The **Managed Accounts** administrative portal is displayed. All existing customer accounts are displayed along with the **Account Name**, **Contact Email**, and the date when the account was created. At the top, click **New Managed Account**.
Enter an **Account Name** and a **Contact Email Address**. The email address is your administrator ID for this account and therefore must match your company's email domain. The email address cannot exist for another customer's Managed Account; however, an alias is acceptable, like `admin+customer@yourdomain.com`.
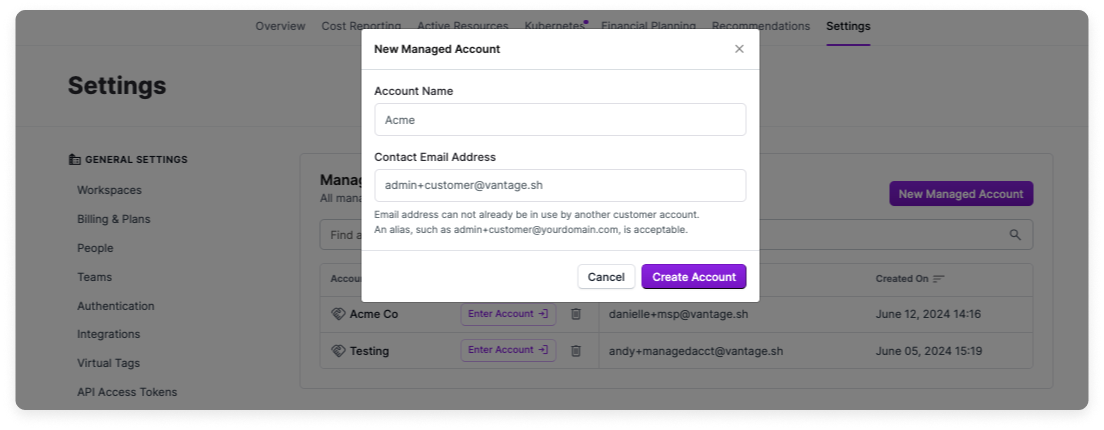
Click **Create Account**.
When you create a Managed Account, Vantage creates a default **All Resources** Cost Report for that account. The report inherits display settings from the oldest default Cost Report in the Management Account, including chart type, date binning, date interval, and cost settings. The Managed Account keeps its own report title and filters.
## Role-Based Access Control
Access to Customer Managed Accounts is managed through [Role-Based Access Control (RBAC)](/rbac). Users in the Management Account with the **Organization Owner** role can set access to Managed Accounts, based on a user's team, following the steps below:
From the top navigation, select **Settings**.
Under **General Settings**, select **Teams**.
Select the team you want to manage access for.
Select the **Access** tab.
In the **Managed Account Access** section, you can view a list of all Managed accounts. You can adjust a team's access accordingly based on the following options:
* **Can Access**: Members of the team will be granted explicit access to the Managed Account.
* **Cannot Access**: Members of the team will be explicitly denied access to this Managed Account.
* **Inherit Access**: Access to the Managed Account will be determined by the Everyone Team.
If a user is a part of a Team that **Cannot Access** a Managed Account, they will be unable to access that Managed Account, even if they are granted **Can Access** permission via a different team. Users will maintain the same role that they have in the Management Account when they enter a Managed Account.
### Access Examples
Team A is assigned **Can Access** to the **Customer A** Managed Account.
Result: Any user that belongs to Team A can access the **Customer A** account with their existing role (e.g., Editor).
A user belongs to Team A with **Can Access** to the **Customer A** Managed Account.
The same user also belongs to Team B, which has **Cannot Access** to the **Customer A** account.
Result: The user cannot access the **Customer A** account because the explicit denial overrides all other access.
The Everyone Team has **Can Access** to the **Customer A** Managed Account.
A new user is added to Team A, which has **Inherit Access** to the **Customer A** account.
Result: The user can access **Customer A** as it inherits access from Everyone Team.
### User Permissions
The following permissions apply based on a user's role.
| | Organization Owner | Integration Owner | Organization Editor | Organization Viewer |
| --------------------------------------------------------------------------------------------------------------------------------------------------------------------------------------------------------------------------------------------------------- | ------------------------------------------------------------- | ------------------------------------------------------------- | ------------------------------------------------------------- | ------------------------------------------------------------- |
| View Management Account | | | | |
| Create resources in Management Account | | | | |
| Add and remove Managed Accounts | | | | |
| Add and remove provider integrations | | | | |
| View Managed Accounts (if access is granted) | | | | |
| Create resources in Managed Accounts (if access is granted) | | | | |
| Perform additional administrative capabilities in Managed Accounts, like create new users, create new workspaces, manage teams, modify billing options, manage authentication, manage currency conversion, and manage Virtual Tags (if access is granted) | | | | |
## Configure Currency Management
Currency management lets MSP Owners define custom exchange rates and set the display currency for managed accounts. Currency management is available for any currency that is present in incoming cloud provider data.
Currency management has two main functions:
* **Custom Exchange Rates:** Override Vantage's default conversion rates with your own values.
* **Display Currency:** Choose the currency that's displayed on reports for managed accounts.
* If you set a currency at the MSP level, managed accounts cannot change it.
* If you do not set one, the managed account can choose its own display currency and exchange rate configuration following the [currency conversion documentation](/vantage_account#currency-conversion).
Setting a display currency does not require custom rates; if no custom rate exists, Vantage defaults to its own rates. Currencies set by a management account apply to all workspaces within a managed account.
Converted currency is currently available on Cost Reports (including forecasts), Provider Resources, Kubernetes Efficiency Reports, Financial Commitment Reports, Budgets, and any invoices generated for a Managed Account.
### Upload Exchange Rates
If you want to override Vantage's default currency conversion rates, you can upload your own custom exchange rates in bulk using a CSV file.
From the top navigation, click **Settings**.
On the left navigation under **Partner Settings**, select **Currency Management**.
Select the **Currency Rates** tab.
On this page, the original and display currency are displayed along with the conversion rate and effective date for the rate. Use the filters at the top of the page to filter the table by original or display currency.
Click **Upload CSV**.
Create a CSV file that uses the following format:
Currency From,Currency To,Exchange Rate,Date
USD,PHP,57.19,2025-01-01
USD,PHP,56.21,2025-02-01
USD,PHP,57.09,2025-03-01
USD,PHP,56.01,2025-04-01
* **Currency From**: The source currency code (e.g., `USD`).
* **Currency To**: The target currency code (e.g., `PHP`).
* **Exchange Rate**: The conversion rate as a number (e.g., `57.19`). Supports up to 10 decimal places; values with more decimal places are rounded.
* **Date**: The effective start date for the exchange rate in `YYYY-MM-DD` format (e.g., `2025-01-01`). Each rate applies only for that month. At the start of the following month, Vantage reverts to its default exchange rates unless another custom rate is provided.
Click **Select CSV File**, then select your file.
Click **Upload CSV**.
Any file format or validation errors are displayed at the top of the page. Correct the error(s) and reupload the file. See the [Troubleshooting section](/partners#troubleshooting-currency-upload-errors) for details.
Once the file is uploaded, data must be reprocessed to display costs in your updated currency. While some updates will be shown immediately, updates to all parts of the Vantage console may take up to 15 minutes.
### Set Display Currency for Managed Accounts
You can set a display currency for managed accounts at any time. If a custom exchange rate exists, the account will use that rate; otherwise, Vantage defaults to its own conversion rates.
On the **Currency Management** page, select the **Managed Accounts** tab. A list of your managed accounts is displayed along with the **Currency Status**:
* An **Enabled** status indicates that you've selected the display currency that's shown to the right of the status column.
* A **Disabled** status indicates the account displays costs in the default currency (USD).
Select one or more accounts to update:
* Click **Set Display Currency**.
* Select a currency code.
* Click **Update Currency**.
### Troubleshooting Currency Upload Errors
If you encounter errors when uploading your CSV file, refer to the following common issues and solutions:
**Error:** `Row must be 4 items, found X items.`
**Cause:** A row in your CSV file does not have data for one or more columns.
**Solution:** Ensure each row has data for each column.
Missing data
Currency From,Currency To,Exchange Rate,Date
USD,PHP,57.19
All data present
Currency From,Currency To,Exchange Rate,Date
USD,PHP,57.19,2025-01-01
**Error:** `Must not have an empty row`
**Cause:** One or more rows in your CSV file is empty.
**Solution:** Remove any rows that are empty.
Empty row
Currency From,Currency To,Exchange Rate,Date
USD,PHP,57.19,2025-01-01
,,,,
USD,EUR,0.92,2025-01-01
No empty rows
Currency From,Currency To,Exchange Rate,Date
USD,PHP,57.19,2025-01-01
USD,EUR,0.92,2025-01-01
**Error:** `Base currency code [CODE] is not valid.`
**Cause:** The currency code in the `Currency From` column is not recognized by Vantage.
**Solution:** Use a valid ISO 4217 currency code. Common codes include `USD`, `EUR`, `GBP`, `JPY`, `CAD`, `AUD`, etc.
Invalid currency code
Currency From,Currency To,Exchange Rate,Date
USDOLLAR,PHP,57.19,2025-01-01
Valid currency code
Currency From,Currency To,Exchange Rate,Date
USD,PHP,57.19,2025-01-01
**Error:** `Currency code [CODE] is not valid.`
**Cause:** The currency code in the `Currency To` column is not recognized by Vantage.
**Solution:** Use a valid ISO 4217 currency code for the target currency.
Invalid currency code
Currency From,Currency To,Exchange Rate,Date
USD,PESO,57.19,2025-01-01
Valid currency code
Currency From,Currency To,Exchange Rate,Date
USD,PHP,57.19,2025-01-01
**Error:** `Rate [VALUE] is not valid, must be a number.`
**Cause:** The exchange rate contains non-numeric characters or formatting.
**Solution:** Use only numeric values for exchange rates. Do not include currency symbols, commas, or text.
Non-numeric rate
Currency From,Currency To,Exchange Rate,Date
USD,PHP,\$57.19,2025-01-01
USD,PHP,57.19 USD,2025-01-01
USD,PHP,fifty-seven,2025-01-01
Numeric rate only
Currency From,Currency To,Exchange Rate,Date
USD,PHP,57.19,2025-01-01
USD,PHP,0.92,2025-01-01
**Error:** `Date [DATE] is not valid, must be YYYY-MM-DD`
**Cause:** The date format is incorrect or the date is invalid.
**Solution:** Use the exact format `YYYY-MM-DD` with valid dates.
Wrong date format
Currency From,Currency To,Exchange Rate,Date
USD,PHP,57.19,01/01/2025
USD,PHP,57.19,2025-1-1
USD,PHP,57.19,Jan 1 2025
USD,PHP,57.19,2025-13-01
Proper YYYY-MM-DD format
Currency From,Currency To,Exchange Rate,Date
USD,PHP,57.19,2025-01-01
USD,PHP,57.19,2025-02-01
* Dates are normalized to the first day of the month (e.g., 2025-01-15 becomes 2025-01-01). Each custom rate is valid only for that month; after that, Vantage defaults back to its own exchange rates unless another custom rate is defined.
* Exchange rates should reflect how much of the target currency equals 1 unit of the source currency.
* All currency codes must be valid ISO 4217 codes that are present in your cloud provider data.
## Access a Customer's Managed Account
From the **Managed Accounts** screen, you can move between each of your customers' Managed Accounts.
Next to any Managed Account's name, click **Enter Account →**.
The Managed Account is displayed. When you enter a customer's account, you are considered the **Manager User** for that account.
* A yellow bar is displayed around the border of the screen to indicate you are logged in to the Managed Account.
* On the bottom left, a pop-up is displayed to indicate which Managed Account you are logged in to.
Perform one of the following actions to return to your Management Account:
* On the top right, click your user icon. Then, click **Return to MSP account**.
* On the bottom left of the screen, click the **X** in the **Logged in as** pop-up.
Once you are back in the Management Account, a confirmation message is displayed at the top.

### Single Sign-On for Managed Accounts
After a Managed Account is created, you can enable Single Sign-On (SSO) for each Managed Account. Enter the Managed Account, then follow the instructions provided in the [SSO documentation](/sso) to enable SSO directly within the customer's Managed Account. Customers can also enable SSO directly from their own account. SSO is scoped to the Managed Account.
## Add Integrations to a Managed Account
The way you add integrations to a Managed Account depends on how your MSP is set up. There are two available workflows:
* **Workflow 1 - Unconsolidated Organizations:** An example MSP structure for this workflow might be where you have completely separate AWS Organizations set up for each customer. As an MSP, you have access to the payer account, and the customer has access to a member account. In this case, follow the steps below to ***Configure Integrations in the Managed Account***.
* **Workflow 2 - Consolidated Organizations:** In this setup, the MSP uses a single AWS Organization that includes multiple linked accounts under a centralized Management Account. In this case, follow the steps below to ***Configure Integrations in the Management Account***.
For Azure CSP partners, you can connect the [Azure Partner Billing (CSP) integration](/connecting_azure_csp) in your Management Account to ingest costs across all your customers. Once connected, you can delegate these costs to managed accounts and create customer-specific Cost Reports and Dashboards using Azure CSP data. Follow Workflow 2 below for this setup.
### Configure Integrations in the Managed Account (Unconsolidated Organization Workflow)
If this is the first time you are adding an integration:
From the **Managed Accounts** screen, enter a customer’s account. If this is the first time you are connecting integrations for a customer, the **Connect Accounts** screen is displayed.
Select an integration and follow the steps provided in the console.
If you are adding another integration:
From the top navigation, select **Settings**.
On the left navigation, click **Integrations**. All available integrations are displayed. Select an integration to get started.
See the [Quickstart](/getting_started) for a list of all other existing Vantage provider integrations, with links to each provider integration walkthrough.
### Configure Integrations in the Management Account (Consolidated Organization Workflow)
This workflow requires that you first set up an integration in your MSP account. From the **Managed Accounts** screen, you can add any of your connected integrations to a Managed Account.
To get started, ensure that you have connected a provider integration to your Management Account.
For AWS integrations, see the [AWS multiple accounts documentation](/connecting_aws#connecting-multiple-aws-accounts) for information on how to connect a Management Account with multiple linked accounts. When you assign an AWS payer account integration to a Managed Account, all linked member accounts under that payer are automatically delegated as well. If new member accounts are later added to the AWS Organization, they are also automatically delegated to any Managed Accounts that already have the payer integration assigned. Note that provider integrations passed down to customer Managed Accounts from an MSP's provider integrations will only be available in the first workspace of that customer.
After you have connected an integration to your MSP account, follow the steps below to associate them with customer Managed Accounts.
From the **Managed Accounts** screen, select a customer's account.
Select the **Integrations** tab. All connected provider integrations for that customer are displayed. The account status, such as **Stable**, **Importing**, or **Error**, is also displayed.
To add a new connection, click **Connect** next to any listed provider.
Select any of the listed provider accounts that you want to import data from.
Click **Save**.
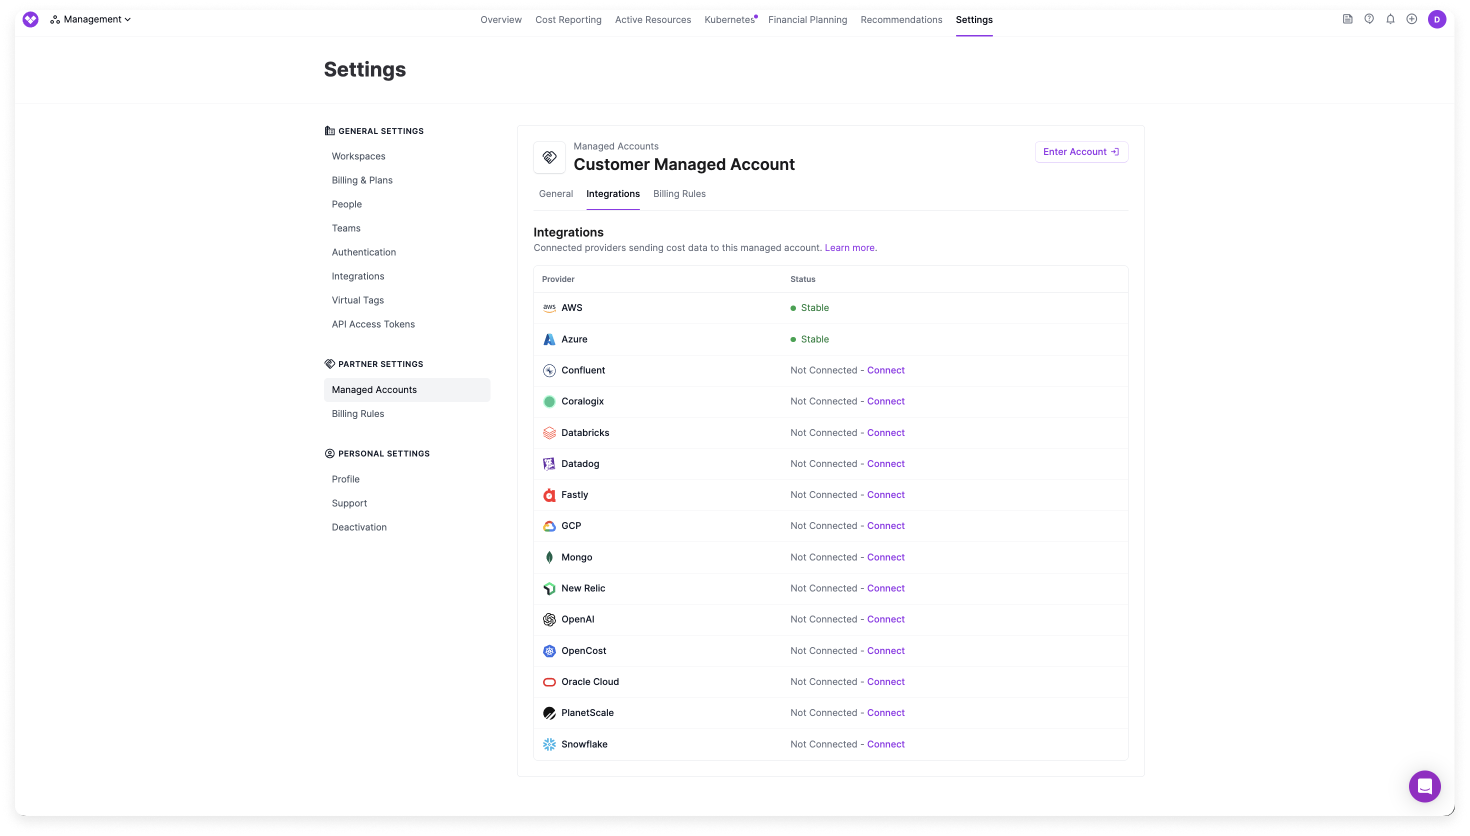
Once you have connected integrations in your Management Account, you can use the [Partner Integrations](/partners#manage-partner-integrations) page to view all integrations across providers and assign or remove them from Managed Accounts in bulk.
#### Customer Managed Account Integration View
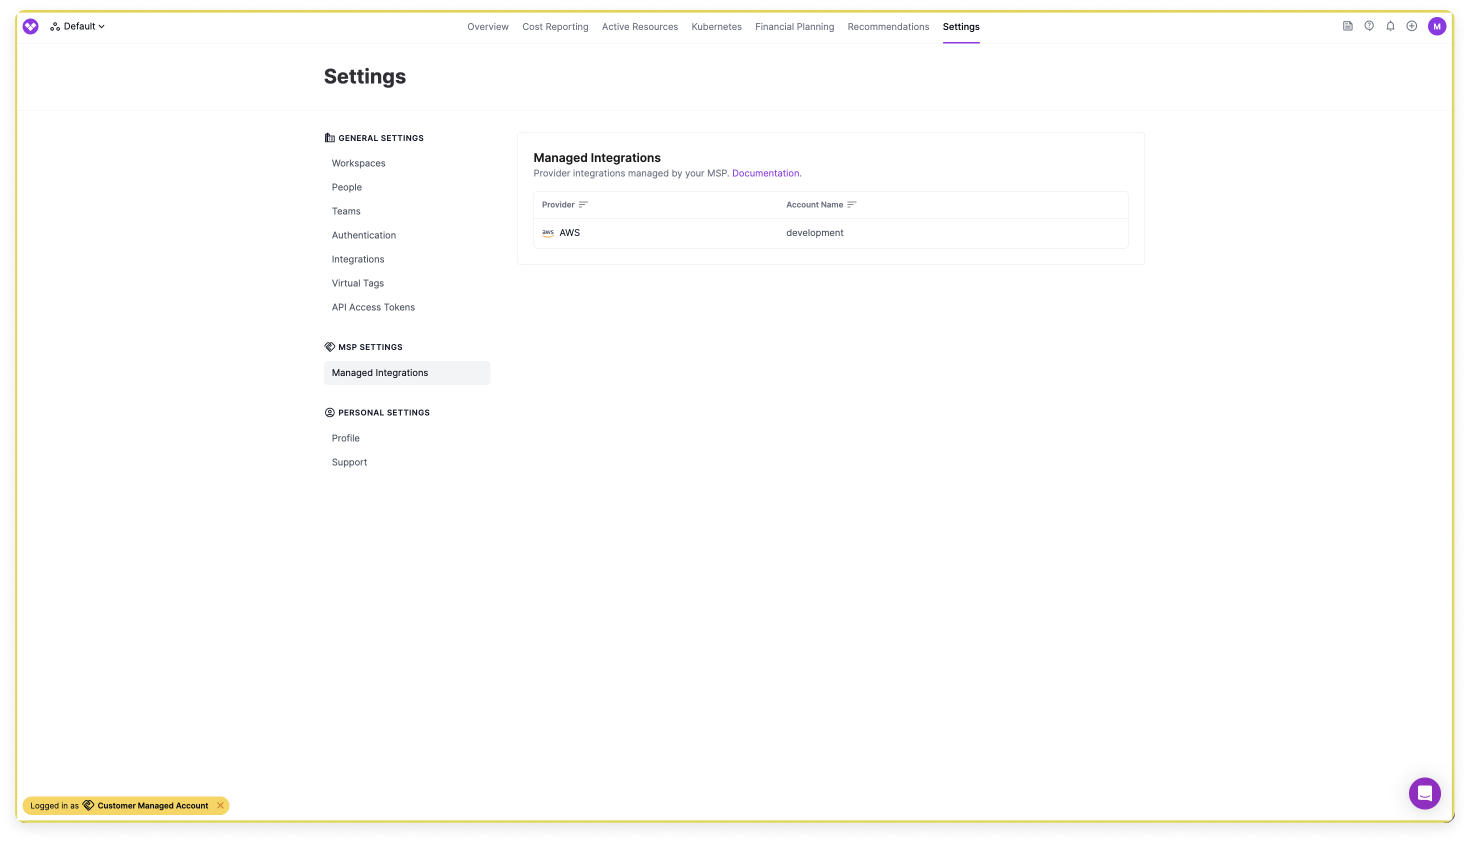
When an MSP manages an integration in their MSP Management Account, a customer can view the managed integration's status. The customer cannot remove this type of integration.
From a customer's account, click **Settings** in the top navigation.
On the left navigation, under **MSP Settings**, click **Managed Integrations**.
Any connected integrations managed by the MSP are displayed.
## Manage Partner Integrations
After you have [connected integrations](/partners#add-integrations-to-a-managed-account) to your Management Account, the **Partner Integrations** page provides a centralized view of all your integrated accounts across providers. From this page, you can see which Managed Accounts each integration is assigned to and assign or remove integrations in bulk, without navigating into individual Managed Account profiles.
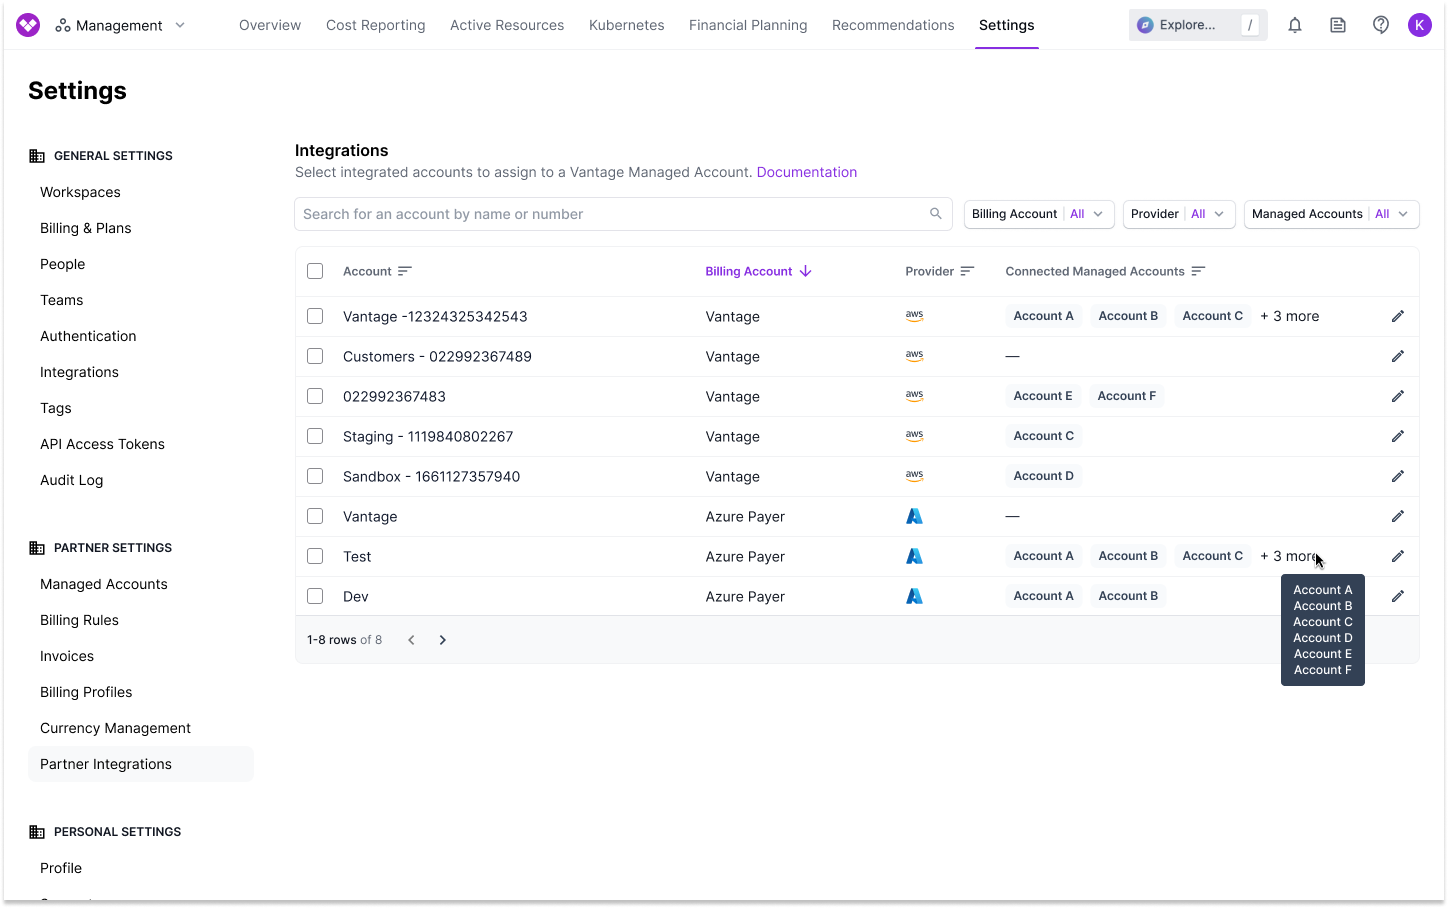
You must have the **Organization Owner** or **Integration Owner** role to access and manage Partner Integrations. Accessing this page does not affect any existing integration assignments.
To access the Partner Integrations page:
From the top navigation, click **Settings**.
On the left navigation, under **Partner Settings**, click **Partner Integrations**.
The Partner Integrations table is displayed. The table contains the following columns:
| Column | Description |
| ------------------------------ | ------------------------------------------------------------------------------------------------------------------------------------------------------------ |
| **Account** | The name of the integrated account. A **Root** badge is displayed for root/payer accounts. |
| **Billing Account** | The parent billing or payer account that the integration belongs to. A dash (**—**) is displayed for integrations that do not have a parent billing account. |
| **Provider** | The cloud provider for the integration (e.g., AWS, Azure, GCP). |
| **Connected Managed Accounts** | The Managed Accounts that the integration is currently assigned to. If no Managed Accounts are assigned, a dash (**—**) is displayed. |
### Filter Integrations
Use the filter bar at the top of the Partner Integrations table to narrow down the list of displayed integrations. The following filters are available:
* **Billing Account**: Filter by one or more parent billing accounts.
* **Provider**: Filter by one or more cloud providers.
* **Managed Accounts**: Filter by connected Managed Accounts. Select **None** to display integrations that are not assigned to any Managed Account.
You can also use the search bar to search across integration account names, billing accounts, providers, and connected Managed Account names.
### Assign Integrations to Managed Accounts
You can assign one or more integrations to Managed Accounts. When you assign an integration, the associated costs become available in the Managed Account.
To assign a single integration:
On the Partner Integrations table, find the integration you want to assign. Click the edit icon () on the right side of the row.
The **Edit Connected Managed Accounts** modal is displayed. Use the **Managed Accounts** dropdown to select one or more Managed Accounts.
Click **Save**. The integration is assigned to the selected Managed Accounts.
To assign multiple integrations at once:
On the Partner Integrations table, use the checkboxes on the left side of each row to select the integrations you want to assign. You can also use the checkbox in the table header to select all visible integrations.
A toolbar is displayed at the top of the table showing the number of selected integrations. Click **Edit Connected Managed Accounts**.
The **Edit Connected Managed Accounts** modal is displayed. Use the **Managed Accounts** dropdown to select one or more Managed Accounts.
Click **Save**. All selected integrations are assigned to the selected Managed Accounts.
### Remove Integrations from Managed Accounts
To remove an integration from a Managed Account, follow the same steps as [assigning an integration](/partners#assign-integrations-to-managed-accounts). In the **Edit Connected Managed Accounts** modal, click the **X** on any Managed Account badge to remove it. Click **Save** to apply the changes.
Use the **Managed Accounts** filter with the **None** option selected to quickly identify integrations that have not been assigned to any Managed Account. This is useful for ensuring all of your costs are accounted for across your customer base.
### Audit Log for Integration Delegations
All additions and removals of integration assignments to Managed Accounts are logged in the [Audit Log](/audit_logs) of the Management Account. Each audit log entry shows the integration that was modified, which Managed Accounts were added or removed, and the current list of connected Managed Accounts. You can filter audit logs by the **Integration Delegations** object type to view only delegation-related events.
## Create Resources in a Managed Account
When you are logged in to a customer’s Managed Account, you can create Vantage resources, like Cost Reports, Virtual Tags, etc. For any resources, such as a Cost Report, that a Management Account user creates in a customer’s account, the **Created By** field displays the name **Manager User**.

## Billing Rules
Custom billing rules can be created in the Management Account and optionally applied to any of your customers’ Managed Accounts. The following billing rules are available:
* **Exclusion:** Exclusion of specific line items (such as EDP discounts)
* **Credits and Charges:** Additional charges or credits (such as one-time management fees)
* **Adjustment:** Four options are available:
* **Per Service Adjustment:** Re-rating of existing services or categories (such as Amazon CloudFront data transfer charges).
* **Re-Rate to Public Price:** Remove AWS discounts and private pricing for a Managed Account (further described in the [section below](/partners#re-rate-to-public-pricing-adjustment))
* **Remove SP/RI Discounts:** Re-rate any usage for a Managed Account that is covered by AWS Reserved Instances or Savings Plans purchased in the AWS Payer account (further described in the [section below](/partners#remove-spri-discounts-adjustment))
* **Re-Rate Tiered Discounts:** Recalculate AWS tiered pricing models for applicable services for a Managed Account (further described in the [section below](/partners#re-rate-tiered-discounts)).
* **Custom**: Custom Billing Rules allow you to craft your own billing rule using SQL based on logic you choose. This can be logic against any data within Vantage, or additionally any logic from the raw billing files from providers. At this time, only AWS is supported for applying logic to raw billing files. Further information is available in the [section below](/partners#custom-billing-rules).
### Re-Rate to Public Pricing Adjustment
At this time, this billing rule only supports AWS costs.
MSPs are often able to negotiate substantially higher Enterprise Discount Plans (EDPs) or Private Pricing Agreements (PPAs) from cloud providers based on the aggregate amount of usage across all of their customer base than what those customers would get if they were to purchase directly from a cloud provider. With the ability to re-rate to public pricing, you can revert your customers’ pricing back to list price, removing any enterprise discounts or private pricing.
When you apply the Re-rating to Public Pricing Billing rule adjustment, Vantage will re-map costs from `lineItem/UnblendedCost` to `pricing/publicOnDemandCost` from the AWS Cost and Usage Report. As a result, the following will apply in Vantage:
* **When you view your parent Management Account**, you will still see the price billed by AWS reflected, and the billing rule will not be applied. This enables margin analysis and understanding of where these commitments are applied.
* **When you view a customer’s Managed Account**, usage of services that are included in the billing rule will be presented at list price, with no indication that any price change was made on that usage.
### Remove SP/RI Discounts Adjustment
At this time, this billing rule only supports AWS costs.
With discount toggling, you can decide which Reserved Instance and Savings Plan benefits your end customers receive. Use this adjustment billing rule to select whether any of your customer accounts receive discounts from commitments purchased in an AWS Payer account, or if such commitment covered usage should be reset back to list price. Any usage that is covered by a commitment purchased in an AWS Payer account will be reset to list price when you view usage in the customer’s Managed Account. This billing rule applies to any `SavingsPlanCoveredUsage` and `DiscountedUsage` usage types.
**Example Use Case**
You manage 20 customer AWS accounts and buy Savings Plans centrally. You want any of your customers to see only their own discounts. You set up and apply the **Remove SP/RI Discounts** adjustment to your customers’ Managed Accounts, ensuring any centrally purchased Savings Plans are excluded from customer billing.
* After the rule is applied, you will still see the cost that is billed by AWS in your parent Management Account to enable margin comparisons for end customers. In the visual example below, Savings Plan Covered Spend is still visible at the parent account level.
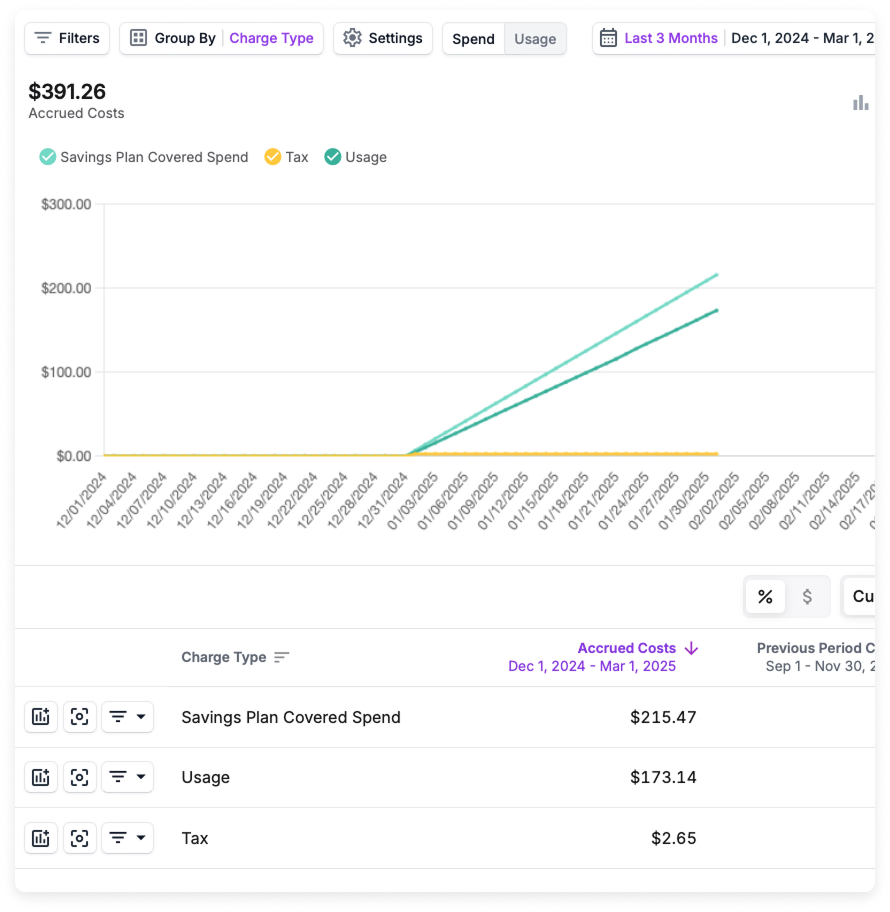
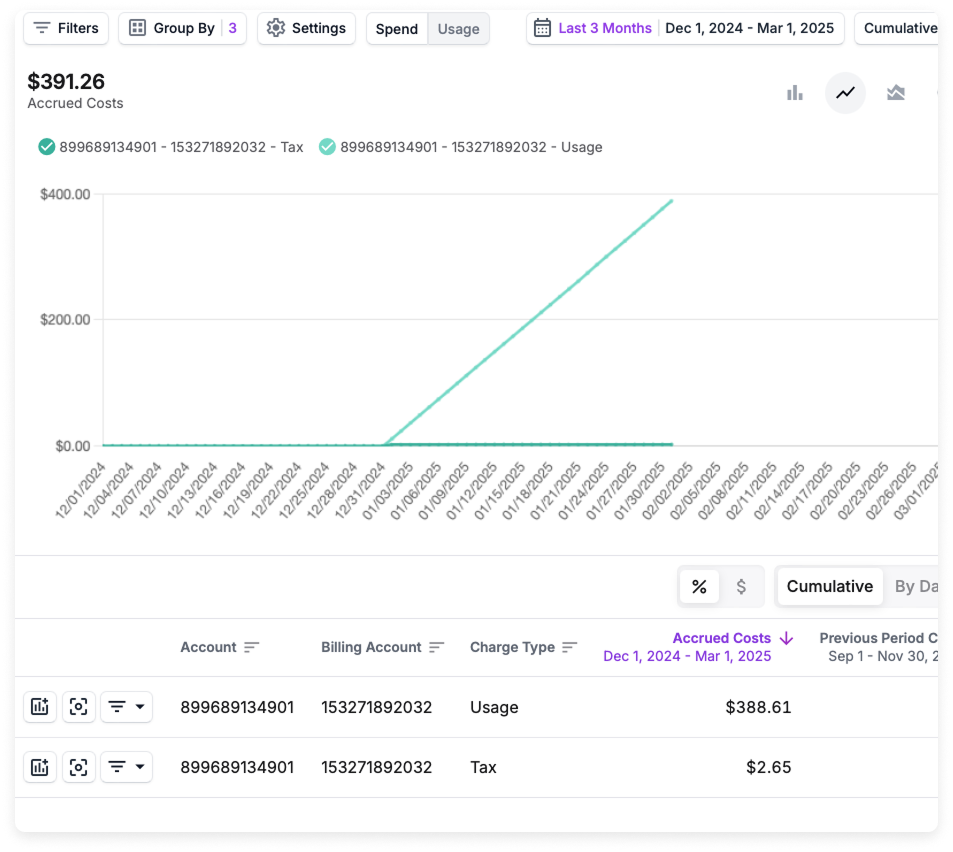
* Vantage looks up the account that purchased the Committed Spend Discount, if that account is an AWS Payer account, Vantage removes the discount on any Cost and Usage line item from any customers’ Managed Accounts where the adjustment is enabled. The below visual example shows a customer’s Managed Account. When grouped by Charge Type, only the Usage and Tax charges are shown. The Usage amount of \$388.61 reflects the total list price of the usage, calculated by adding the parent account’s original Usage (\$173.14) and the Savings Plan Covered Spend (\$215.47) that would have otherwise reduced the cost.
### Re-Rate Tiered Discounts
At this time, this billing rule only supports AWS costs.
MSPs often benefit from tiered pricing models offered by cloud providers, where unit costs decrease as usage increases. Since MSPs manage multiple customers, they can aggregate usage across all accounts to achieve lower pricing tiers that individual customers would not qualify for on their own. The **Re-Rate Tiered Discounts** billing rule allows you to re-rate customer usage back to what it would have cost without aggregated discounts to maintain more predictable pricing structures and margins.
With the **Re-Rate Tiered Discounts** Billing Rule adjustment, MSPs can ensure that each customer’s costs reflect only their own usage-based tiered pricing, rather than benefiting from the MSP’s aggregated tiered discounts. This allows MSPs to align customer pricing with what they would have paid if purchasing directly from the cloud provider. Additionally, MSPs can remove AWS free-tier benefits from newly created accounts.
When you apply the adjustment, Vantage will re-calculate pricing tiers, on a per-customer level, and effectively reconstruct the pricing model based on each customer’s individual usage. Usage of a tiered service is recalculated for each customer’s Managed Account, and tiers are reapplied based on each customer’s usage. As a result, the following will apply in Vantage:
* **When you view your parent Management Account**, you will continue to see the original price billed by AWS, and the billing rule will not be applied. This enables margin analysis and helps MSPs track where discounts and commitments are applied.
* **When you view a customer’s Managed Account**, usage of services included in the billing rule will be presented at list price, with no indication that any adjustments were made on that usage.
This rule applies to the following services:
| | |
| ------------------------------- | -------------------------------------------------------------------------------------------------------------------------------------------------------------------------------------------------------------------------------------------------------------------------------------------------------------------------------------------------------------------------------------------------------------------------------------------------------------------------------------------------------------------------------------------------------------------------------------------------------------------------------------------------------------------------------------------------------------------------------------------------------- |
| **Removal of tiered discounts** | • Amazon S3
• Amazon CloudFront |
| **Removal of free tier** | Various services that fall under AWS's free tier, such as:
• EC2 (t2.micro and t3.micro)
• RDS (750 hrs per month)
• S3 (5 GB per month)
For a full list of services, see the [AWS documentation](https://aws.amazon.com/free/?gclid=Cj0KCQiA_NC9BhCkARIsABSnSTZ0_36nI3dLY14YSvLLWTz5Bigmycp0_8D-2t1HSqHi7ZxSUVWjCBIaArLSEALw_wcB\&trk=578b2801-ffbb-4021-a1db-01a0bafb3a4a\&sc_channel=ps\&ef_id=Cj0KCQiA_NC9BhCkARIsABSnSTZ0_36nI3dLY14YSvLLWTz5Bigmycp0_8D-2t1HSqHi7ZxSUVWjCBIaArLSEALw_wcB:G:s\&s_kwcid=AL!4422!3!507162072479!p!!g!!aws!12563449882!121199905124\&all-free-tier.sort-by=item.additionalFields.SortRank\&all-free-tier.sort-order=asc\&awsf.Free%20Tier%20Types=*all\&awsf.Free%20Tier%20Categories=*all). |
### Custom Billing Rules
Custom Billing Rules let you modify cost data using SQL statements. You can apply various pricing adjustments like markups, discounts, one-time fees, credits, or exclusions to either raw provider data or processed Vantage data. For example, you can add charges for premium services, adjust costs to match negotiated rates, or remove unused resources from billing—all based on your customer agreements.
For comprehensive documentation on SQL billing rules, including detailed examples, best practices, and troubleshooting, see the dedicated [SQL Billing Rules](/sql_billing_rules) page.
### Create Billing Rules
Billing rules are evaluated in a fixed pipeline of execution stages. Within a stage, rules run in the order they are listed on a Managed Account's **Billing Rules** tab, where you can reorder them. See [Billing Rule Execution Order](#billing-rule-execution-order) for details.
On each billing rule detail page, the **Managed Accounts** section shows which Managed Accounts currently use the rule. Use this section to audit where a rule is applied before editing or deleting it.
To add new billing rules:
Log in to your Vantage for MSPs Management Account.
From the top navigation, click **Settings**.
From the left navigation, under **Partner Settings**, select **Billing Rules**.
All your existing billing rules are displayed. Click **New Billing Rule**, then select **Adjustment**, **Charge**, **Credit**, **Custom**, or **Exclusion**. Click the tabs below for instructions on each billing rule type.
With adjustments, you can select between four different re-rating options.
Enter a rule **Title**, such as *CloudFront Re-rating*.
Optionally, enter a **Start Date** and/or **End Date** to define when the billing rule should be active.
* If only a start date is set, the rule applies from that date onward, indefinitely.
* If only an end date is set, the rule applies from the beginning of your data up to that date.
Select an **Adjustment Type**:
* If you select **Per-Service Adjustment**:
* Select a **Service**, such as *Amazon CloudFront*.
* Optionally, enter a **Category**, such as *Data Transfer*.
> **Tip:** To see Category names, navigate to the Cost Reports screen and create a new Cost Report. Above the graph, expand the Group By menu and select **Category**. A list of existing category options is displayed.
* Enter a percentage value that will be shown to the customer. For example, if you enter *75.0*, then 75% of Amazon CloudFront Data Transfer costs will be shown to the customer. You can enter percentage values greater than 100% to apply markups and premium pricing scenarios where costs are shown to customers at rates above the original cost.
* Click **Save**.
* If you select **Remove RI/SP Discounts**:
* No other fields are displayed. Click **Save**.
* If you select **Re-Rate to Public Price**:
* No other fields are displayed. Click **Save**.
* If you select **Re-Rate Tiered Discounts**:
* Click the toggle to select whether to include **Free tier** costs when re-rating.
* Click **Save**.
Enter a rule **Title**, such as *CloudFront Re-rating*.
Select a **Service**, such as *Amazon CloudFront*.
Optionally, enter a **Category** or **Sub category**, such as *MSP Fee*.
Enter a positive number for the credit or charge.
Enter a rule **Title**, such as *9.5% discount unless Credit, Fee, Enterprise Support or Marketplace Purchase*.
Enter a **Start Date** and **End Date**.
Enter the SQL for the rule you are creating. For guidance on creating rules, see the [SQL Billing Rule Structure](/sql_billing_rules) documentation. Use the **Format** button above the editor to auto-format your SQL and the **Validate** button to check for syntax errors, schema mismatches, and common issues before saving.
Enter a rule **Title**, such as *Exclude RI Fees*.
Enter a **Charge Type**, such as *RIFee* or *DistributorDiscount*.
To see Charge Type names, navigate to the Cost Reports screen and create a new Cost Report. Above the graph, expand the Group By menu and select **Charge Type**. A list of existing charge type options is displayed.
*You can also select whether to automatically apply the new billing rule to all existing and new Managed Accounts from this modal.*
### Assign Billing Rules to a Managed Account
You can select which rules you want added to Managed Accounts.
From the **Managed Accounts** screen, select any of your listed Managed Accounts.
Select the **Billing Rules** tab.
Click **Assign a Billing Rule**.
Select one or more billing rules and click **Save**. The billing rule is applied to the customer's costs. A customer will only be able to see credits and charges. Exclusions and adjustments are not shown in the customer view.
After billing rules are applied to a Managed Account, re-processing of the data begins immediately. The time required depends on the scale of the data in the account and can take several hours to complete. Vantage processes the most recent data first, so the latest results are typically available before a full reprocessing finishes.
To delete a billing rule from being used on a Managed Account, from the **Billing Rules** tab, click the trashcan icon next to the rule's name.
### Billing Rule Execution Order
A Managed Account's assigned billing rules run as a fixed pipeline of execution stages. Rules are grouped by stage on the **Billing Rules** tab, and the stages always run in the order below. Within a stage, rules run top to bottom in the order they are listed, and you can [reorder them](#reorder-billing-rules-for-a-managed-account). This applies to every billing rule type (i.e., Adjustments, Charges, Credits, Exclusions, and Custom (SQL) rules).
| Stage | Rules | What runs |
| ----- | ------------------------------- | --------------------------------------------------------------------------------------------------------------------------------------------------------- |
| 1 | **AWS schema transform rules** | Rules written against the `aws` schema. They transform AWS-schema line items, including removing them. |
| 2 | **COST schema insert rules** | Charges, credits, and other `costs`-schema INSERT rules. These run before `costs` transforms so later transform rules can act on the inserted line items. |
| 3 | **COST schema transform rules** | Adjustments, exclusions, and other `costs`-schema rules that transform line items, including removing them. |
| 4 | **Monthly Insert rules** | Aggregate `costs`-schema INSERT rules, such as SQL rules that use `SUM()` to calculate a monthly management fee from the transformed cost set. |
Billing rules run before [Virtual Tags](/tagging). Virtual Tags are evaluated on the cost data that billing rules have already produced.
#### Why Order Matters
Billing rules are applied sequentially: within a stage, each rule operates on the cost data produced by the rule before it, not on the original data. The stages also feed into one another from top to bottom. Because of this, rules compound, and the order in which they run can change the final result.
This is most important when rules overlap (i.e., when a single cost line item matches more than one rule). For example, if one rule targets the Compute category and another targets the `us-east-1` region, a Compute line item in `us-east-1` is modified by both rules, in the order they are listed. It is easy to author a rule while thinking about it in isolation, but the saved result is the cumulative effect of every rule that matches a given line item.
Whether order changes the outcome depends on the operations involved:
* **Order-independent:** Stacking percentage adjustments on the same line item produces the same result regardless of order. A 10% discount followed by a 5% markup on a \$100 line item yields \$94.05, and so does the reverse (`100 × 0.90 × 1.05 = 100 × 1.05 × 0.90`).
* **Order-dependent:** Mixing a percentage adjustment with a fixed amount or an exclusion is *not* order-independent. Consider Rule A, which sets a line item to \$100, and Rule B, which applies a 90% rate:
* **A then B:** `$100 → $90`
* **B then A:** `(amount × 0.90) → $100`
The two orders produce different results, so the position of each rule matters.
* **Monthly Insert rules:** Aggregate SQL rules run after the transform stages, so they calculate from the monthly cost set produced by earlier rules. For example, if a stage 3 rule removes AWS Marketplace costs, a later Monthly Insert rule that charges 10% of AWS spend calculates the fee after those Marketplace rows have been removed. If a stage 3 rule applies a markup first, the Monthly Insert rule calculates from the marked-up amount.
As a rule of thumb, place broad, foundational adjustments earlier in a stage and narrower corrections later, then reorder to control which rule "wins" on overlapping line items. Always re-check totals after reprocessing completes.
#### Reorder Billing Rules for a Managed Account
You can change the order of rules within a stage. You cannot move a rule across stages. Each rule's stage is determined by its type and schema, and Vantage always re-buckets rules into the canonical stage order when you save.
From the **Managed Accounts** screen, select a Managed Account and open the **Billing Rules** tab.
Click **Reorder**.
Within a stage, use the up and down arrows next to a rule to move it. Rules can only be reordered relative to other rules in the same stage.
Click **Done Reordering** to save the new order.
The **Reorder** button only appears when at least one stage has two or more assigned rules. A single rule (or one rule per stage) has nothing to reorder.
Saving a new order re-triggers reprocessing of the Managed Account's data, just like assigning a rule. Reprocessing can take several hours depending on the size of the account.
## Remove a Managed Account
You can either *unlink* or *delete* a customer’s account. MSP customers cannot delete accounts.
If you are a customer with a Managed Account and want your account deleted, contact your MSP.
* If you want to only *unlink* an account, but not delete the account, contact [support@vantage.sh](mailto:support@vantage.sh). The account will still exist in Vantage.
* When an account is completely deleted, the account is unlinked from the MSP and also completely deleted from Vantage. To delete a customer's Managed Account, click the trash can icon next to the account name on the **Managed Accounts** screen.
Deleting a customer's account is a **permanent action** and will remove any connected customer integrations.
## Customers: Getting Started with Vantage
As you onboard your customers to Vantage, the following resources are available to help customers get started with Vantage features.
Information on how to get started with each Vantage provider integration and the cost reporting data that's collected
A suite of training videos and guides to introduce basic Vantage concepts and features
Create your first Cost Report on Vantage