> ## Documentation Index
> Fetch the complete documentation index at: https://docs.vantage.sh/llms.txt
> Use this file to discover all available pages before exploring further.
# Temporal Cloud
> Learn how to integrate Vantage with Temporal Cloud.
Vantage connects to Temporal Cloud through a [service account](https://docs.temporal.io/cloud/service-accounts), with the [Finance Admin role](https://docs.temporal.io/cloud/users#account-level-roles), using an associated API key for the service account. After authorizing Vantage access to your Temporal Cloud account, Vantage ingests cost and usage data using Temporal's [Cloud Billing API](https://docs.temporal.io/cloud/billing-api). All credentials are encrypted.
You can connect multiple Temporal Cloud integrations by providing API keys for multiple accounts.
## How Temporal Cloud Costs Are Calculated
Vantage uses Temporal Cloud Billing API data to calculate costs for supported billing periods. The Cloud Billing API provides billing report data with contracted costs, pricing quantities, charge descriptions, billing periods, and namespace-level attribution.
For Cloud Billing API data, Vantage uses the cost amounts returned by Temporal instead of estimating costs from manually configured rates. This means negotiated pricing reflected in Temporal's billing report is represented automatically in Vantage. If Temporal includes credits, discounts, or adjustments in its billing report, they appear as standard cost line items. See the [Cost Reports](/cost_reports#credits-discounts-refunds-and-taxes) documentation for how credits, discounts, refunds, and taxes can be shown or hidden in reports.
Temporal Cloud Billing API data is imported for the current calendar month and previous calendar month, where available. On the first day of a month, current-month data may not yet be available, so the previous month may be the first complete Cloud Billing API period shown in Vantage.
Existing customers who connected Temporal Cloud before Cloud Billing API support may have older historical periods that were imported through the legacy Usage API estimate model. See the [Migrate to Cloud Billing Data](/connecting_temporal#migrate-to-cloud-billing-data) section for details.
## Connect Your Temporal Cloud Account
### Prerequisites
* You must have a Vantage **Organization Owner** or **Integration Owner** role to add or remove this integration. See the [Role-Based Access Control](/rbac) documentation for details.
* You need the [Account Owner or Global Admin](https://docs.temporal.io/cloud/service-accounts#prerequisites) role in Temporal Cloud to create a dedicated service account for the Vantage integration, assign it the Finance Admin role, and create the associated API key.
The Finance Admin role has the same permissions as Account Read-only users, with additional permissions to view billing information and update payment information. Vantage will never perform any actions to change your payment method. It's recommended that you submit a feature request to Temporal Cloud for improved permission scoping, and Vantage will adopt fine-grained permissions if this becomes available.
* Create a free Vantage account, then follow the steps below to integrate Temporal Cloud costs.
### Create the Connection
To create an integration with Temporal Cloud and Vantage, create a service account and an API key for that service account.
#### Step 1 - Create a Service Account
The below instructions are based on the [Temporal Cloud documentation](https://docs.temporal.io/cloud/service-accounts#create-a-service-account).
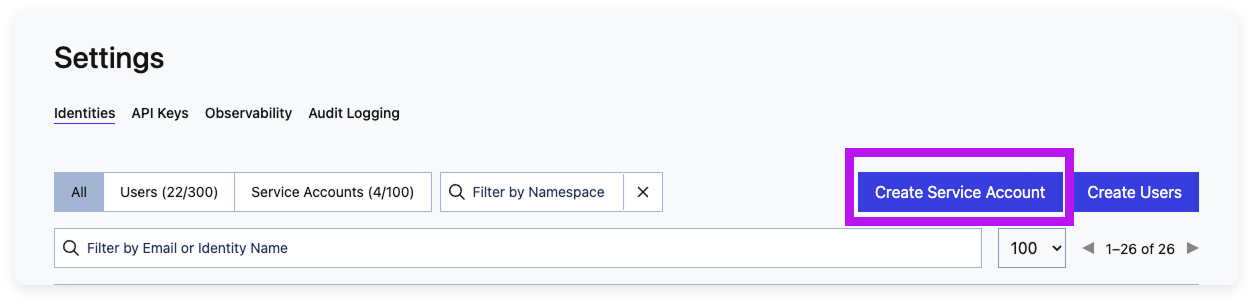
In Temporal Cloud, navigate to **[Settings > Identities](https://cloud.temporal.io/settings/identities)**.
At the top, click **Create Service Account**.
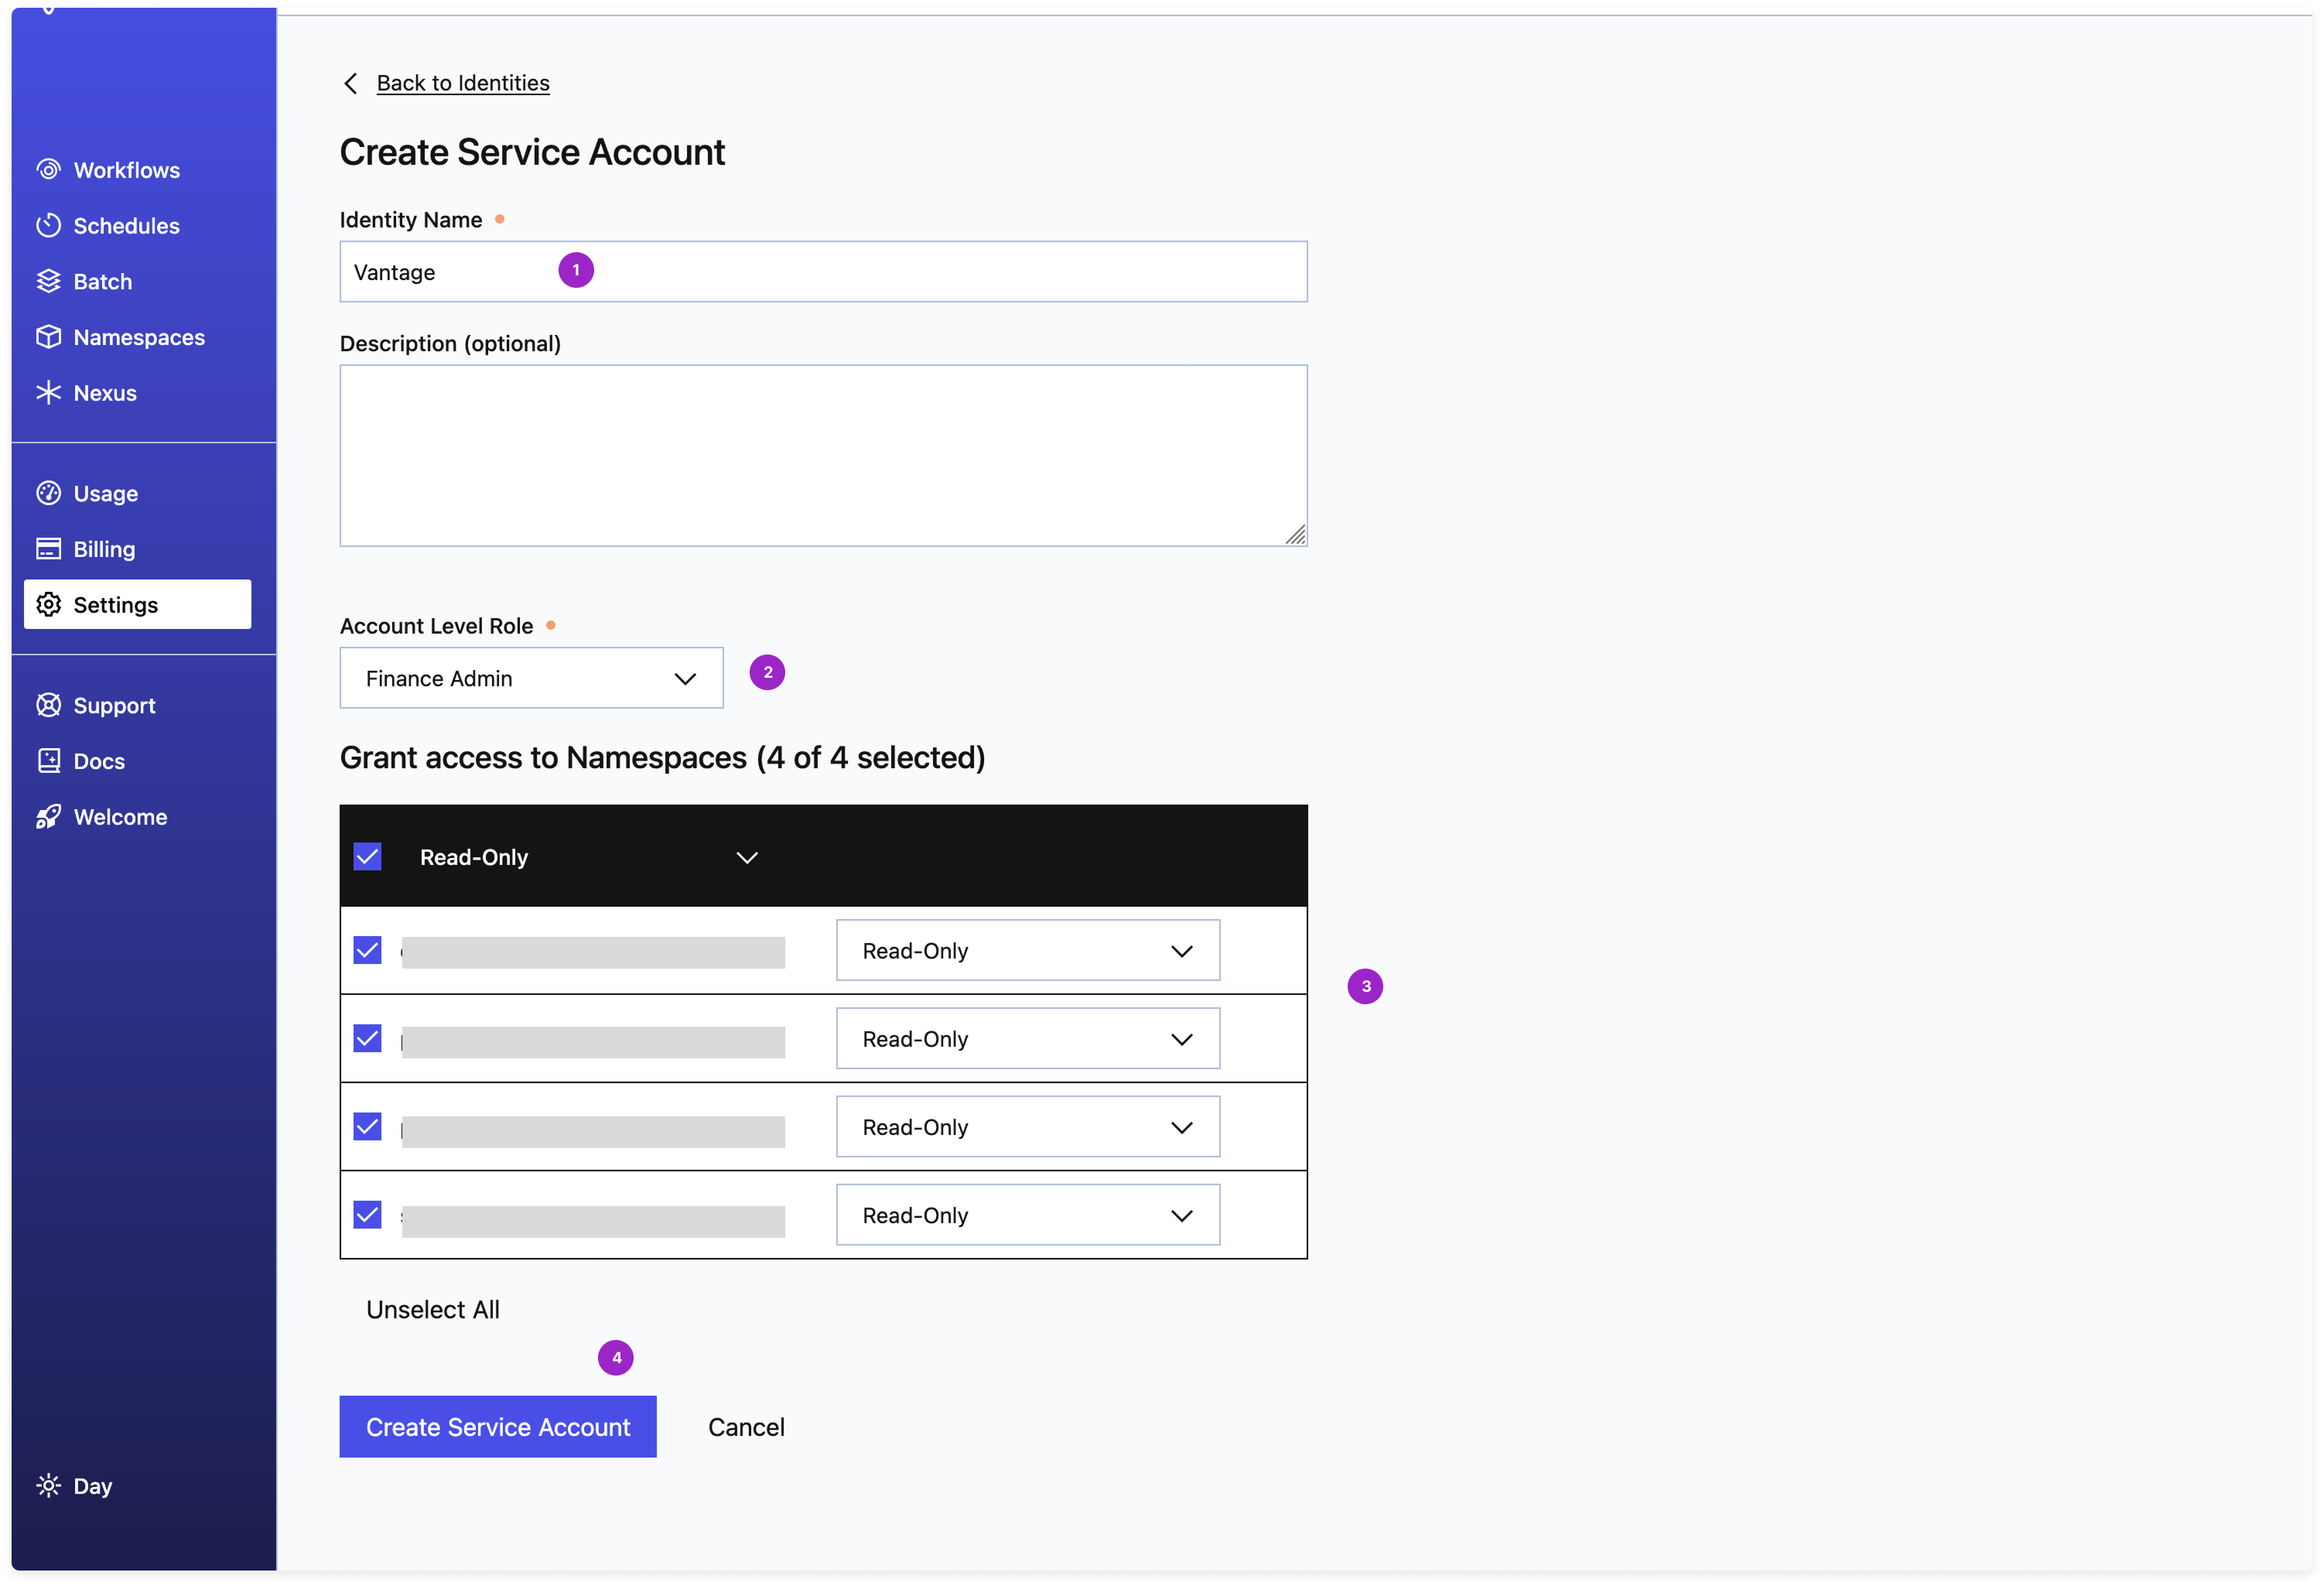
Enter an **Identity Name**, such as *vantage\_integration*.
Add an optional description to identify this account.
For **Account Level Role**, select **Finance Admin**.
For **Namespace Permissions**, set the access for each namespace to **Read-Only**.
If additional namespaces are added after you create this service account, and you want them included in your integration, you will need to go back and update the permissions to account for these new namespaces.
Click **Create Service Account**. Once created, you will be prompted to create an API key for the service account.
#### Step 2 - Create an API Key for the Service Account
The below instructions are based on the [Temporal Cloud documentation](https://docs.temporal.io/cloud/api-keys).
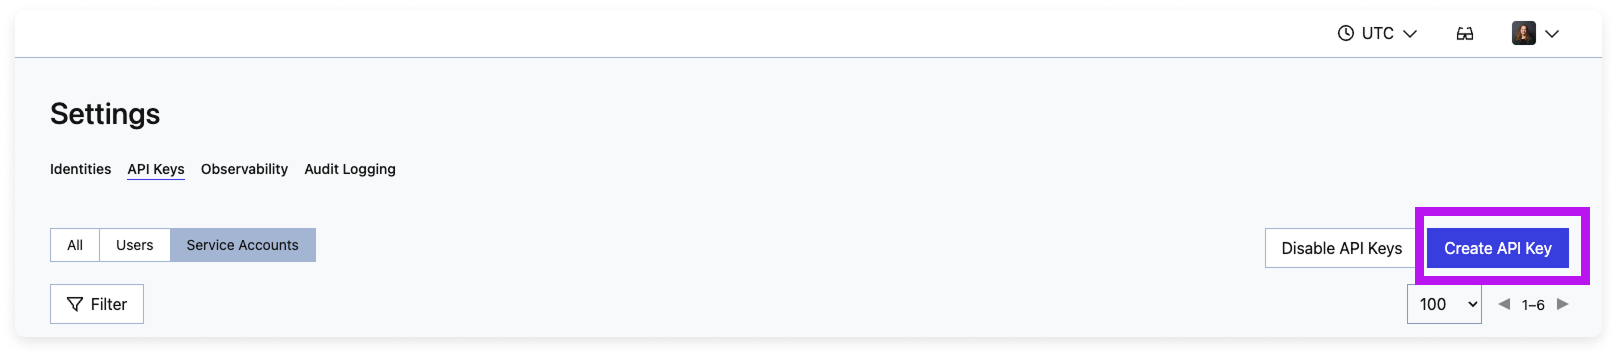
After you create the service account, you will be prompted to create an API key. You can also create an API key for the service account at any time. Navigate to **[Settings > API keys](https://cloud.temporal.io/settings/api-keys)**.
Click **Create API Key**.
Under **Create an API key for**, select **Service Account**.
For **Mapped to Identity**, search for and select the service account you just created.
Give the API key a **Name** and optional **Description**.
For **Expiry Date**, select a date for when the key should expire.
At this time, Temporal Cloud API keys can be configured to be valid for up to 2 years, after which you'll need to rotate your Temporal Cloud API key in the Vantage console.
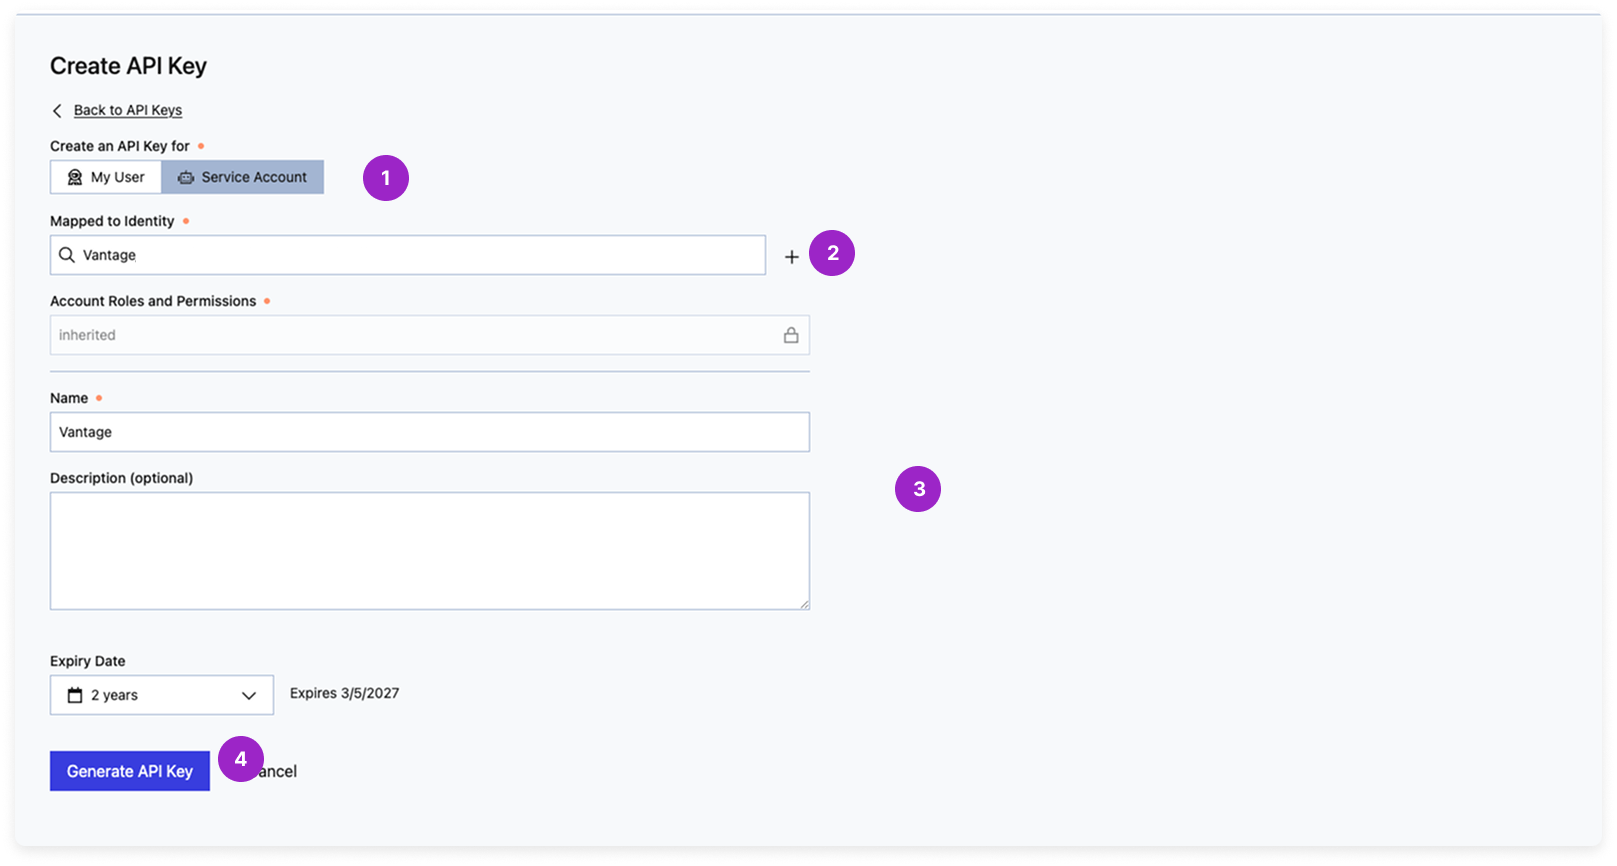
Click **Generate API Key** and copy the newly generated key.
#### Step 3 - Add Your API Key to Vantage
From the top navigation in Vantage, click **Settings**.
On the left navigation, select **Integrations** > **Temporal Cloud**.
The Temporal Cloud integrations page is displayed. Ensure you are on the **Connect** tab.
At the bottom of the page, click **Add API Key** and paste your newly generated API key. Optionally, add a **Description** to identify this integration.
Click **Connect Account**.
Vantage validates the API key before saving the integration. If the key is invalid, expired, or does not have the required Temporal Cloud role, Vantage displays an error and does not create the integration.
After clicking **Connect Account**, you will see the status of your integration change to **Importing** within the Vantage console. This status indicates that Vantage is actively importing your Temporal Cloud cost data. See the [Integration Status](/vantage_account#integration-status) documentation for details on integration statuses.
After the integration is complete, Vantage imports Temporal Cloud Billing API data for the current calendar month and previous calendar month, where available. Vantage will retain cost and usage data to match your retention period for all providers. As soon as costs are processed, they will be available on your All Resources Cost Report. If you remove your Temporal Cloud integration from Vantage, all costs associated with your Temporal Cloud API key will be removed from the Vantage console.
#### Next Steps - Manage Workspace Access
Once the import is complete and the integration status changes to **Stable**, you can select which workspaces this integration is associated with. See the [Workspaces](/workspaces#manage-workspace-provider-integrations) documentation for information.
## Migrate to Cloud Billing Data
This section applies to customers who connected Temporal Cloud before Vantage supported Temporal's Cloud Billing API.
### What's Improved with Cloud Billing Data
Previously, Vantage ingested Temporal Cloud costs using the Usage endpoint of the [Temporal Cloud Operations API](https://docs.temporal.io/ops), which returned raw consumption metrics (Actions and Storage usage) rather than billed costs. Vantage estimated costs by multiplying that usage by custom rates configured in Vantage for Actions, Active Storage, and Retained Storage. By default, Vantage applied Temporal's public pricing and the base Actions rate (under 5M per month); for higher Actions volumes without a private rate card, blended rates could be calculated by dividing total costs by usage. Actions rates were measured in millions of Actions and storage rates in Gigabyte-Hours. Because these were usage-based estimates, they did not account for Actions included in your plan, taxes, discounts, credits, committed spend, or [Plan Costs](https://docs.temporal.io/cloud/pricing#base_plans).
Cloud Billing Data uses Temporal's [Cloud Billing API](https://docs.temporal.io/cloud/billing-api) instead. For supported billing periods, Vantage uses Temporal-provided billing amounts rather than custom-rate estimates, giving a more complete view that includes contracted pricing and charge details from Temporal's billing reports. Custom rates do not apply to Cloud Billing API periods; if you still see custom rates on an existing integration, they apply only to older legacy periods. For those legacy periods, you can still use the [Custom Providers](/connecting_custom_providers) integration with [cost allocation](/tagging#cost-allocation-tags) to represent costs outside of usage costs.
### What You Need to Know Before Migrating
You do not need to create a second Temporal Cloud integration. The migration happens on your existing Temporal Cloud connection.
After Cloud Billing Data is enabled, Vantage re-imports the current and previous calendar month using Temporal's Cloud Billing API, where available. Older periods remain based on the previous Usage API estimate model unless reprocessed. For example, enabling Cloud Billing Data on June 25, 2026:
| Billing Period | Data Source |
| ------------------------- | -------------------------- |
| June 2026 (current month) | Cloud Billing API |
| May 2026 (previous month) | Cloud Billing API |
| April 2026 and earlier | Legacy Usage API estimates |
Cloud Billing API costs continue to appear under **Temporal Cloud** in Cost Reports. The migration changes the source of the cost data, but it does not create a separate provider or service. You may notice differences between older estimated periods and newer Billing API periods because newer data no longer relies on custom rates configured in Vantage.
### How to Migrate from the Usage API Integration
Navigate to the Temporal Cloud [settings page](https://console.vantage.sh/settings/temporal).
Select your existing Temporal Cloud integration from the list.
On the Manage Connection page, click the toggle to enable **Cloud Billing Data**.
Wait for Vantage to import Cloud Billing API data for supported billing periods. Your Cost Reports will continue to show costs under **Temporal Cloud**.
If your existing API key has expired or no longer has the required Temporal Cloud role, the Cloud Billing Data import will fail. Rotate the API key on your Temporal Cloud integration to resolve this. See the [Temporal API key documentation](https://docs.temporal.io/cloud/api-keys) for details on creating or rotating API keys.
## Use Case: Associate Temporal Cloud Namespaces with Infrastructure Costs Using Virtual Tags
If your teams are running workloads across Temporal Cloud and other infrastructure providers, you can use [Virtual Tags](/tagging) in Vantage to group and analyze total application costs.
For example, you may want to track the total costs for the Payments team, which operates multiple workloads in Temporal Cloud. By creating a Virtual Tag with the key `Team` and the value `Payments`, you can apply a filter to group together things like Temporal Cloud costs filtered by the `payments-prod` and `payments-staging` namespaces.
You can view all namespaces using the **Resource** filter/grouping criteria on a Cost Report.
See the following example in the [FinOps as Code repository](https://github.com/vantage-sh/finops-as-code/tree/main/terraform/temporal-costs) for steps on how to set up a tagging schema for teams and namespaces using the Vantage Terraform provider.
## Data Refresh
See the [provider data refresh documentation](/provider_data_refresh) for information on when data for each provider refreshes in Vantage.
## Temporal Cloud Reporting Dimensions
On Temporal Cloud [Cost Reports](/cost_reports), you can filter across several dimensions:
* Organization (e.g., Temporal Cloud billing account name, billing account ID, or the description set when connecting the integration)
* Service (e.g., Temporal Cloud)
* Charge Type (e.g., Usage; Discount when provided by Temporal)
* Category (e.g., Actions, Storage, Other)
* Subcategory (e.g., Actions, Active Storage, Retained Storage)
* Resource ID (e.g., namespace or Temporal resource ID)
* SKU (e.g., Temporal SKU ID)
* Tags: Includes Temporal Cloud tags (such as `$tmprl_project`), [Virtual Tags](/tagging) created in Vantage, and the following provider tags that Vantage automatically creates from Temporal billing data:
* `temporal:resource_type`: The Temporal resource type associated with the charge, such as `Namespace`, allowing you to filter and group costs by resource type.
* `temporal:resource_id`: The Temporal resource ID associated with the charge, allowing you to filter and group costs by the underlying Temporal resource.
Temporal tags included in the Cloud Billing API report, such as `$tmprl_project`, are also available as Cost Report tags using their original tag keys.