> ## Documentation Index
> Fetch the complete documentation index at: https://docs.vantage.sh/llms.txt
> Use this file to discover all available pages before exploring further.
# MongoDB Atlas
> Learn how to integrate Vantage with MongoDB Atlas.
Vantage integrates with your MongoDB account using the [Invoices API](https://www.mongodb.com/docs/atlas/reference/api-resources-spec/#tag/Invoices). To see [Active Resources](/active_resources) for your MongoDB Atlas account, Vantage uses the [Clusters API](https://www.mongodb.com/docs/atlas/reference/api-resources-spec/#tag/Clusters) and the [Projects API](https://www.mongodb.com/docs/atlas/reference/api-resources-spec/#tag/Projects).
## Connect Your MongoDB Atlas Account
### Prerequisites
* To create an API key for Vantage to ingest costs, you must be an **Organization Owner** inside the MongoDB Atlas console.
* To add the API key to relevant projects to use Active Resource inventories inside Vantage, you must be a **Project Owner** in the MongoDB Atlas console.
For more information on user roles in MongoDB Atlas, see the [MongoDB Atlas documentation](https://www.mongodb.com/docs/atlas/reference/user-roles/).
* You must have a Vantage **Organization Owner** or **Integration Owner** role to add or remove this integration. See the [Role-Based Access Control](/rbac) documentation for details.
* [Create a free Vantage account](https://console.vantage.sh/signup), then follow the steps below to integrate MongoDB Atlas costs.
### Step 1 - Review the Vantage Integration Page
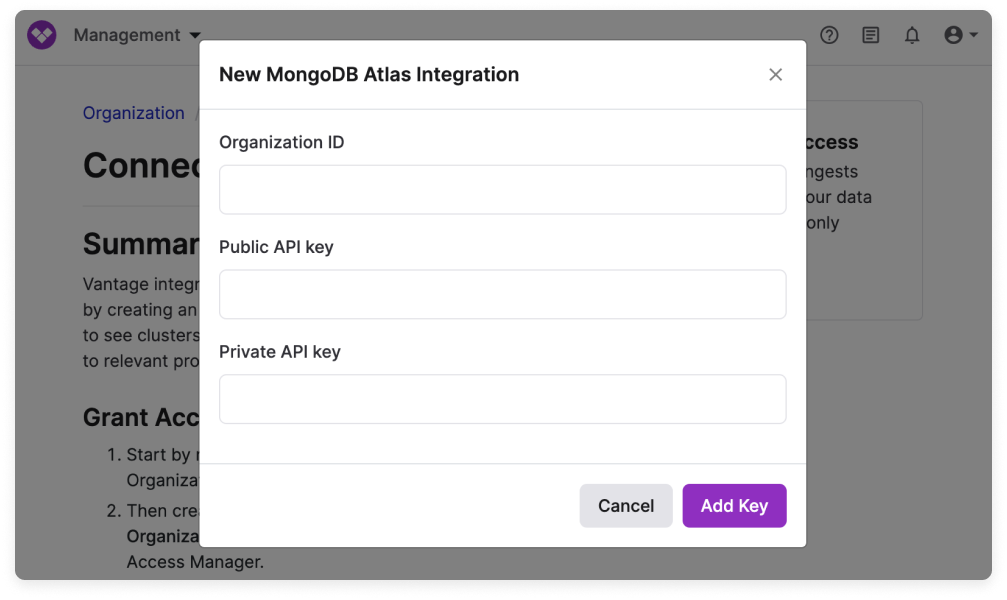
Navigate to the [MongoDB Atlas Settings](https://console.vantage.sh/settings/mongo) page in the Vantage console. Then, click **Add API Key**.
You will need to add your **Organization ID**, **Public API key**, and **Private API key**. Detailed steps for obtaining each of these items are provided below. Leave this tab open so you can go back and populate these fields as you obtain each value.
### Step 2 - Obtain Organization ID
In a new browser tab, navigate to the [MongoDB Atlas console](https://account.mongodb.com/account/login).
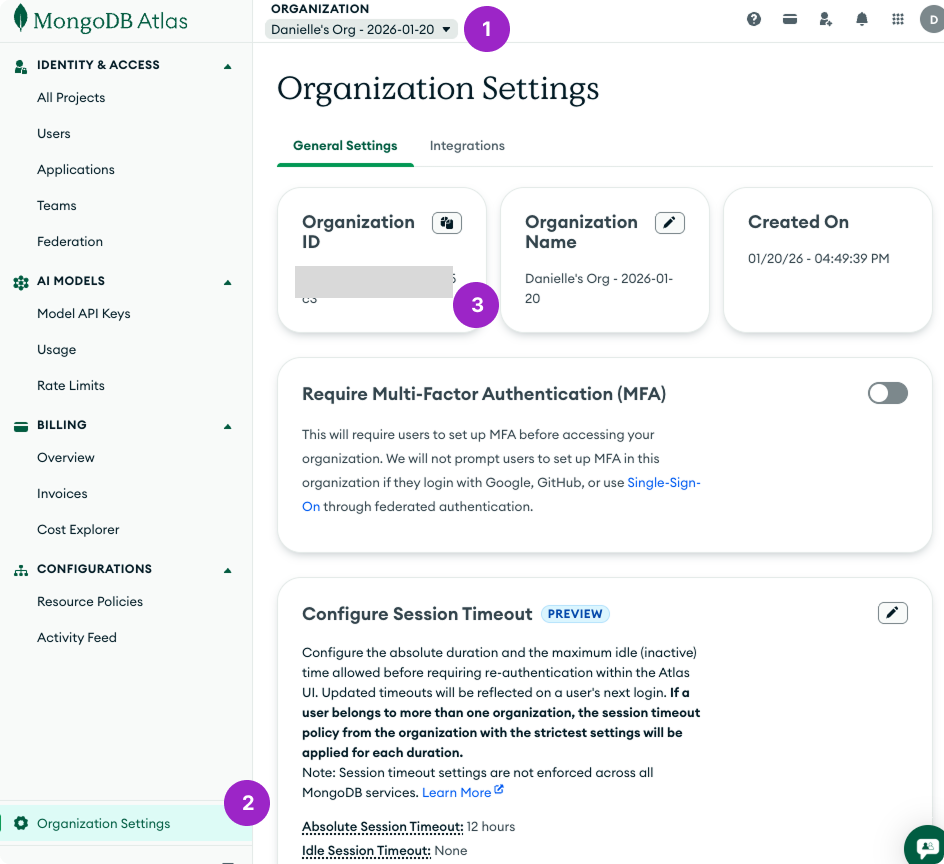
At the top of the page, click the **Organization** dropdown menu, and select your organization.
On the left menu, click **Organization Settings**.
Your **Organization ID** will be displayed at the top. Copy the **Organization ID**. Then, go back to your Vantage browser tab and paste your ID into the **Organization ID** field.
### Step 3 - Create an Organization API Key
Next, you'll create an API key and grant it read-only permissions to your invoices and, optionally, to cluster-level cost data.
From the left navigation menu, click **Applications**.
Select the **API Keys** tab, then click **Create API Key** (or click **Add new** > **API Key** at the top if you already have created one).
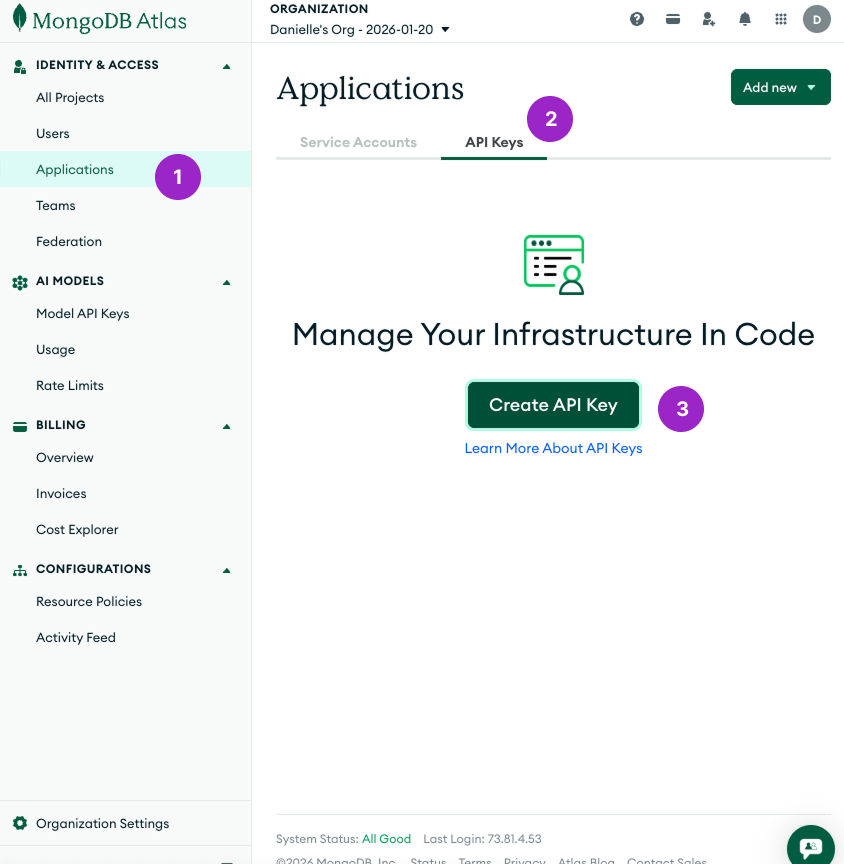
On the **Create API Key** screen, configure the following details:
* For **Description**, enter a name, like *Vantage Integration*.
* For **Organization Permissions**, select **Organization Billing Viewer** and **Organization Read Only**.
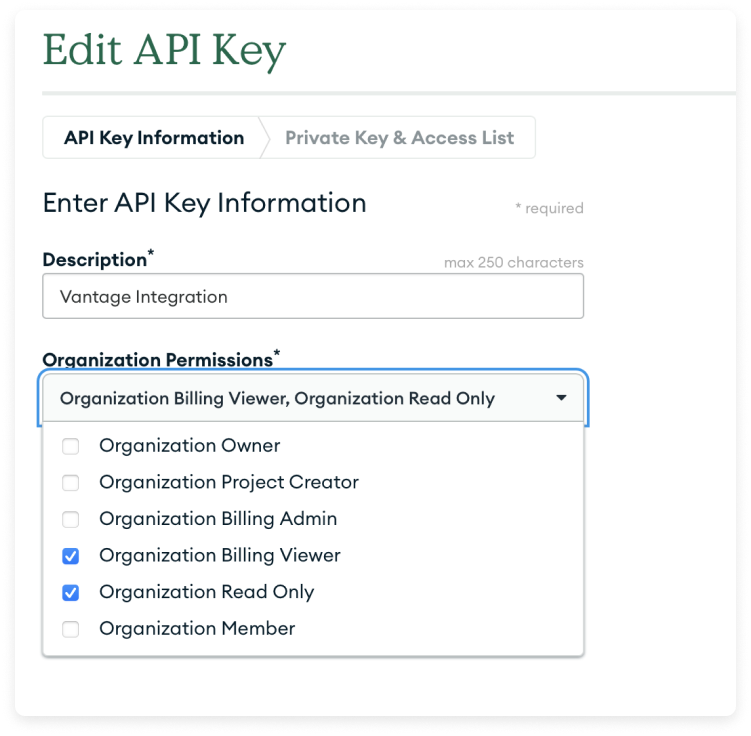
Click **Next**. Your public and private keys are displayed. Copy the keys and paste them into the **Public API key** and **Private API key** fields in Vantage.
If your organization requires an IP Access List for access control, you will need to add each of the following IPs to the **API Access List** section. Add each IP address individually:
```
54.87.66.45
3.95.43.133
54.162.3.72
44.199.143.63
3.218.103.23
```

At the bottom, click **Done**.
If you want to have Vantage ingest per-cluster resource data from MongoDB Atlas, then proceed to the next section. Otherwise, back in the Vantage console, click **Add Key**.
### Step 4 - Grant Project Access for Active Resources
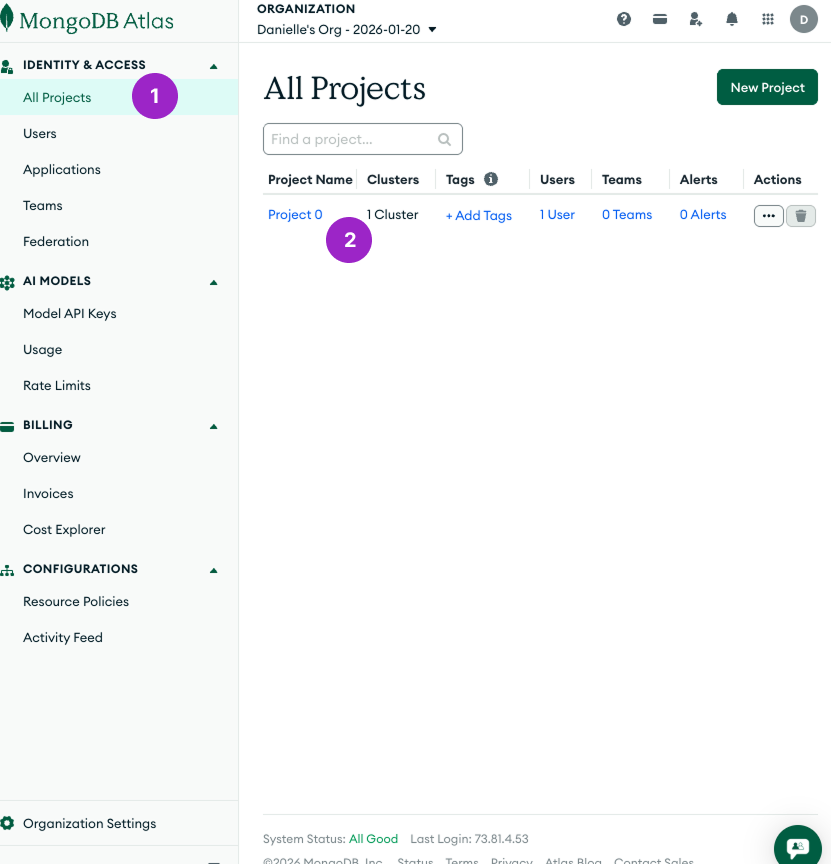
On the left navigation menu, under **Identity & Access**, select **All Projects** to see your list of Atlas projects. Select your project from the list.
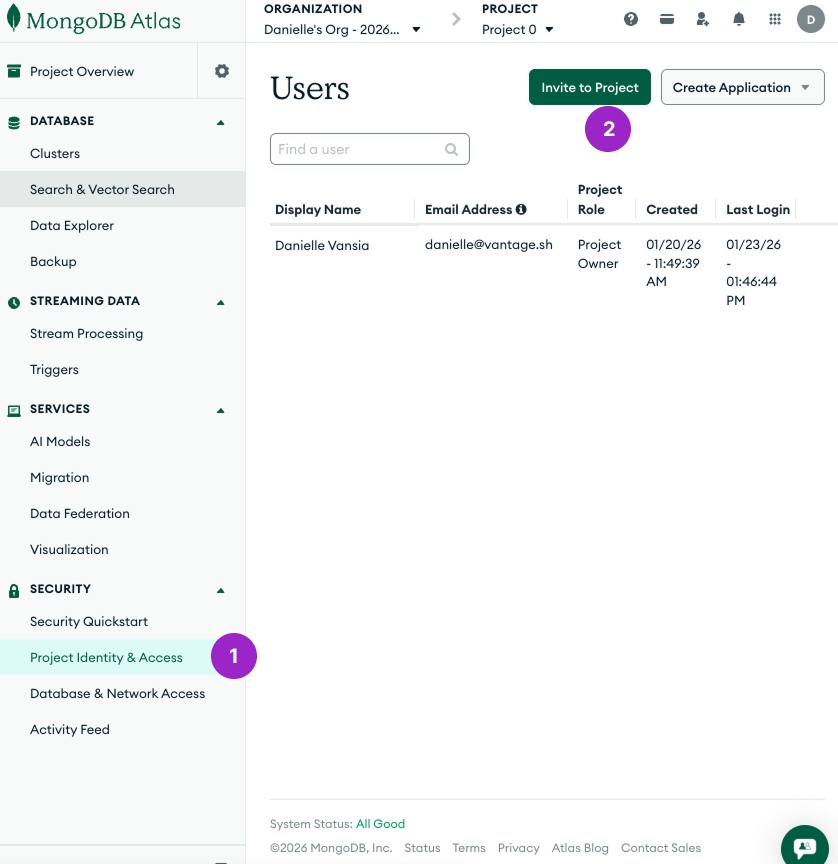
On the left menu, select **Project Identity & Access**.
Click **Invite to Project**.
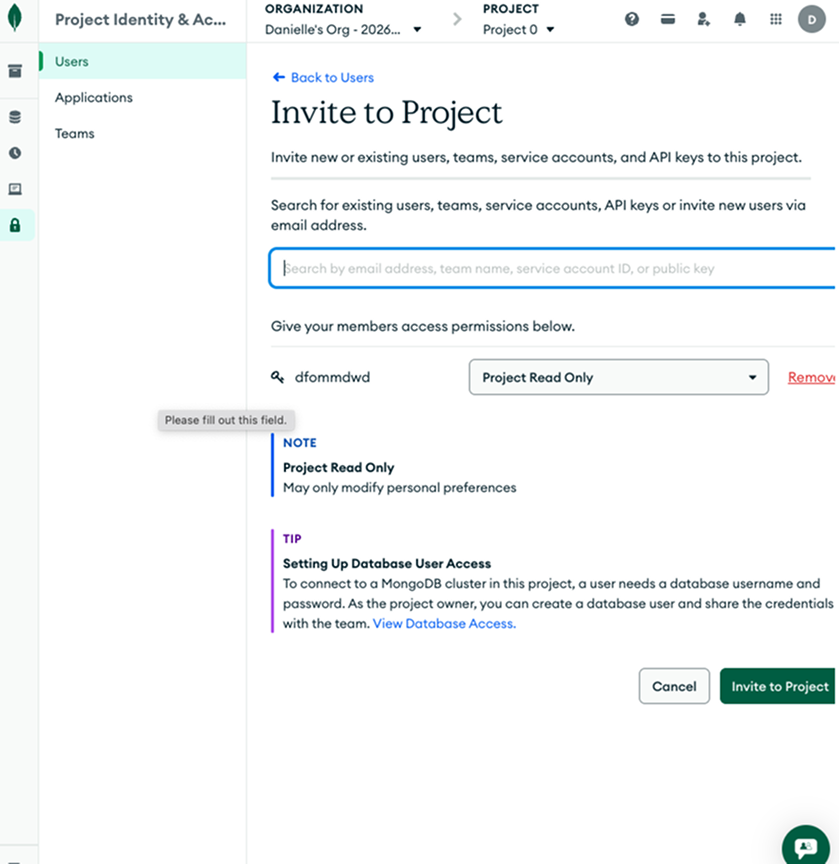
Search for and select the Vantage Integration API key to add it to the project.
Grant the Vantage Integration API key **Project Read Only** access. Then, click **Invite to Project**. Repeat this process for any other projects where you want to see resource-level costs.
Back in the Vantage console, click **Add Key**.
After clicking **Add Key**, your MongoDB Atlas integration status should automatically update to **Importing** within the Vantage console. This status indicates that Vantage is actively importing your MongoDB Atlas cost data. If you've successfully granted project access for active resources, your Active Resources view will begin populating with cost data. See the [Integration Status](/vantage_account#integration-status) documentation for details on integration statuses.
### Next Steps - Manage Workspace Access
Once the import is complete and the integration status changes to **Stable**, you can select which workspaces this integration is associated with. See the [Workspaces](/workspaces#manage-workspace-provider-integrations) documentation for information.
## Data Refresh
See the [provider data refresh documentation](/provider_data_refresh) for information on when data for each provider refreshes in Vantage.
## MongoDB Atlas Reporting Dimensions
On MongoDB Atlas [Cost Reports](/cost_reports), you can filter across several dimensions:
* Project (project name when available, otherwise project ID)
* Category (Atlas Cluster - Atlas Instance M2)
* Tag (includes MongoDB tags and [virtual tags](/tagging) created in Vantage for this provider)
* Provider Tag (`mongo:group_name`, the Atlas project name from invoice data)
* Resource (service resource ID)
* Charge Type (e.g., Usage)
* Organization (organization name)
* Service (e.g., REALM)
Credits are not displayed for MongoDB Atlas costs in Vantage. The MongoDB Atlas provider API does not make credit information available for retrieval.
## Active Resources
MongoDB Atlas clusters are synced as active resources and available in [resource reports](/active_resources).