> ## Documentation Index
> Fetch the complete documentation index at: https://docs.vantage.sh/llms.txt
> Use this file to discover all available pages before exploring further.
# Google Cloud
> Learn how to integrate Vantage with Google Cloud.
Vantage uses a [service account](https://cloud.google.com/iam/docs/service-accounts) to integrate with your GCP account. The service account is generated on a per-customer basis. Vantage requests extremely basic and limited permissions for GCP. During the integration process, you will grant the service account access *only* to the specific BigQuery dataset that contains your billing data.
## Prerequisites
Before you start the integration process, you will need to complete the following prerequisites:
* Create a project to store your Cloud Billing export data.
* Create a BigQuery dataset to store your Cloud Billing export data.
* Enable Cloud Billing export.
* You must have a Vantage **Organization Owner** or **Integration Owner** role to add or remove this integration. See the [Role-Based Access Control](/rbac) documentation for details.
See the [GCP Cloud Billing export](/enabling_gcp_billing_export/) instructions for details on how to complete the above steps. Then, return to this page to complete the rest of the integration process.
If your organization enforces domain restrictions, you can add the following Google Cloud organization ID to allow Vantage access: `421856710303`. If you instead need the customer ID, use `C03l99qsz`.
**If you have a pre-existing Cloud Billing export** set up, ensure your configuration adheres to the requirements below before moving further.
* Your project is linked to the same Cloud Billing account that the Cloud Billing export is enabled on.
We recommend you create a dedicated project to store all Cloud Billing data, rather than using an existing project.
* Detailed Billing Export is enabled, *not* Standard Billing Export.
* The BigQuery dataset and table are deployed to either **US (multiple regions in United States)** or **EU (multiple regions in European Union)**.
* If you have multiple Cloud Billing accounts, you will need to enable Cloud Billing exports on each account.
If your GCP billing data is typically displayed in a currency other than USD, Vantage will convert it to USD using the `currency_conversion_rate` field in the Cloud Billing export data.
## Create a Connection
Open a new browser tab, and navigate to the [Vantage GCP Settings page](https://console.vantage.sh/settings/gcp). You should see your customer-specific service account displayed at the top of the integration page. Keep this page open.
### Step 1 - Grant the Vantage Service Account Permission to Access BigQuery
Back in GCP, navigate to the [IAM console](https://console.cloud.google.com/iam-admin/iam), and complete the steps below to grant the Vantage service account permission to access BigQuery.
At the top of the IAM console, select the project that hosts the BigQuery dataset with your Cloud Billing export data.
Configure the following permissions:
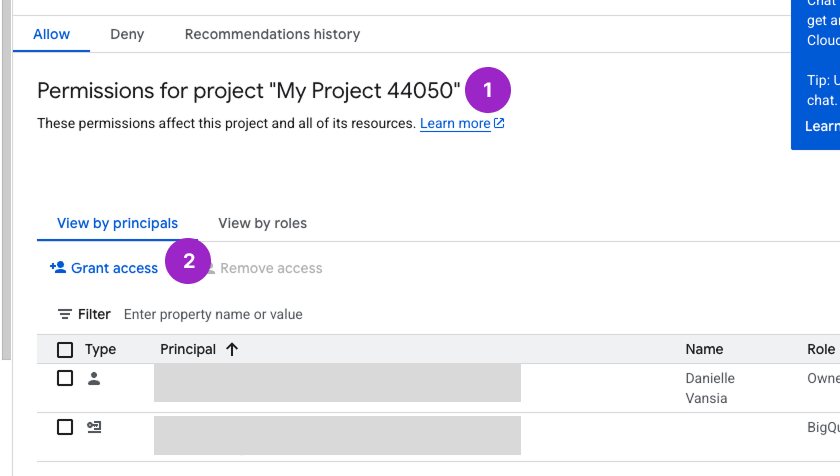
* In the center of the page, under **Permissions for project "My Project ABCD"**, click **+ Grant access**.
* In the **New principals** field, under **Add principals**, paste the value for your Vantage service account. This value is the one displayed on the [Vantage GCP Integration page](https://console.vantage.sh/settings/gcp) you opened earlier.
* In the **Role** field, under **Assign roles**, search for and select **BigQuery Job User**.
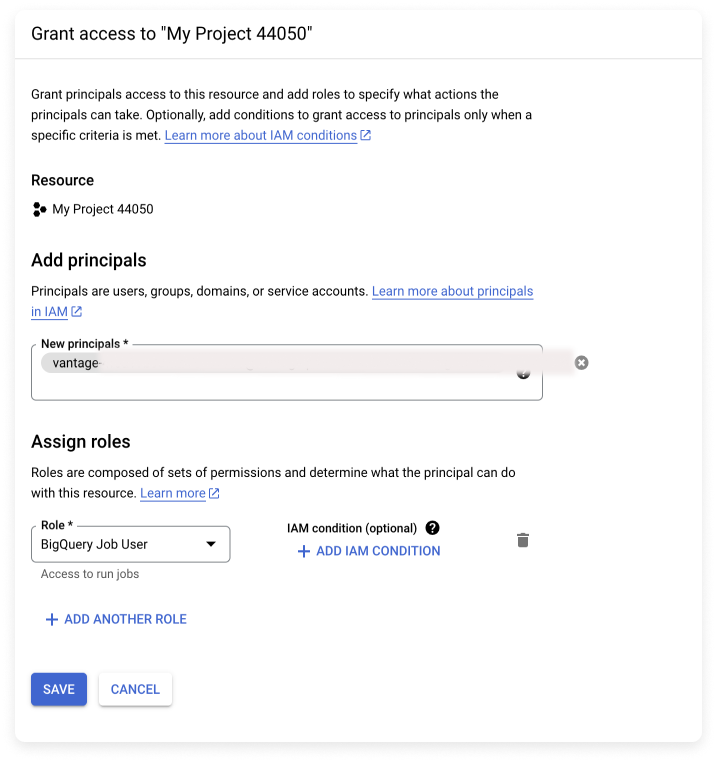
Click **Save**.
### Step 2 - Grant the Vantage Service Account Permission to Access the BigQuery Dataset
Go back to [BigQuery](https://console.cloud.google.com/bigquery), and complete the steps below to grant the Vantage service account permission to access the BigQuery dataset.
At the top of the BigQuery console, ensure the project that you set up to contain your billing data is selected.
In the **Classic Explorer** panel, select your project to expand it.
Select the **three vertical dots** next to the dataset name, then click **Open**. The **Dataset info** will be displayed on the right. *Keep this screen open as you will need to obtain your project ID and dataset name in the [Add Your GCP Configuration Information to the Vantage Console](/connecting_gcp#step-4-add-your-gcp-configuration-information-to-the-vantage-console) step.*
Select the three vertical dots next to the dataset name again, then click **Share** > **Manage permissions**.
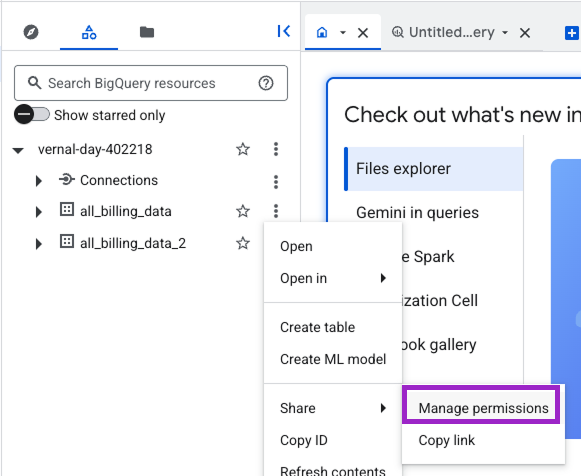
*In this example, **project-id-123456** is the project and **all\_billing\_data** is the dataset.*
On the **Share permissions** panel that appears on the right, click **+ Add principal**.
In the **New principals** field, under **Add principals**, search for and select the Vantage service account.
Copy the full name of your service account from the Vantage console into the search field to search for it.
In the **Role** field, under **Assign roles**, search for and select **BigQuery Data Viewer**.
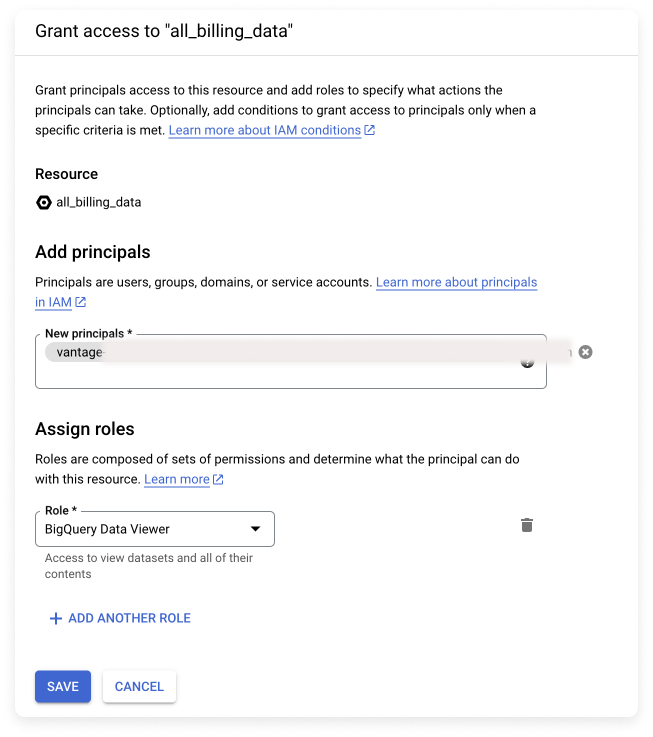
Click **Save**.
### Step 3 - Grant the Vantage Service Account Permissions to Access Active Resources
To enable [active resources](/active_resources), you must grant the Vantage GCP service account permissions *at the organization level*. This allows Vantage to gather data on active resources across your organization. For a list of all supported GCP active resources, see the [GCP Supported Services](/gcp_supported_services) documentation.
**Choosing your permission approach:**
The **Viewer role** (Simple) is the quickest option and covers all services with a single built-in role. However, it grants broad read access across GCP, including the ability to read BigQuery table contents and Cloud Storage object contents.
The **custom role** (Minimal Permissions) grants only the specific permissions Vantage needs to list resource metadata. Choose this option if your organization has security requirements that prohibit broad read access.
Grant the built-in **Viewer** role to the Vantage service account at the organization level.
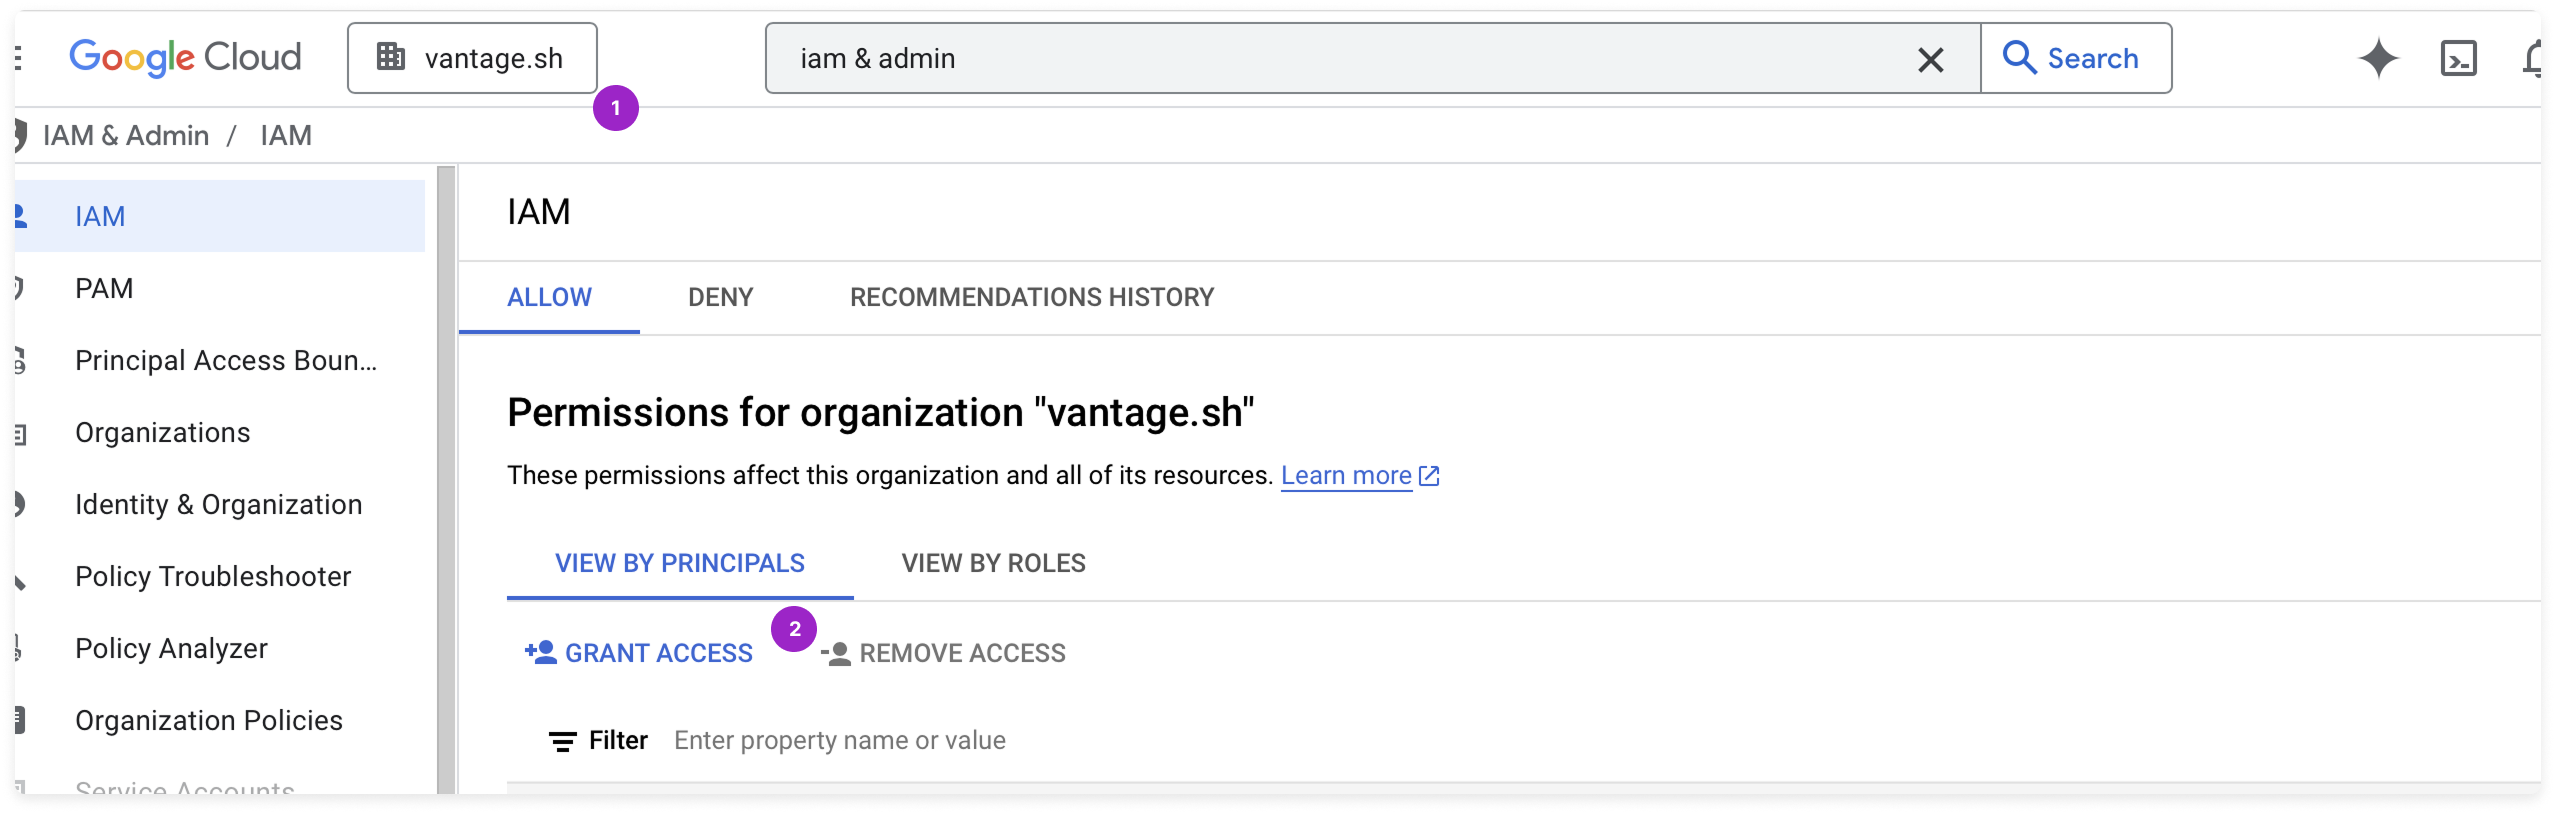
Open a new tab in GCP, and navigate to **IAM & Admin**.
On the top left of the screen, switch to your organization.
Click **+ Grant access**.
In the **New principals** field, under **Add principals**, paste the value for your Vantage service account.
This value is the one displayed on the [Vantage GCP Integration page](https://console.vantage.sh/settings/gcp) you opened earlier and have used for other permissions.
Under **Assign roles**, click **Basic** and select the **Viewer** role from the **Role** list. This adds the role needed for active resources.
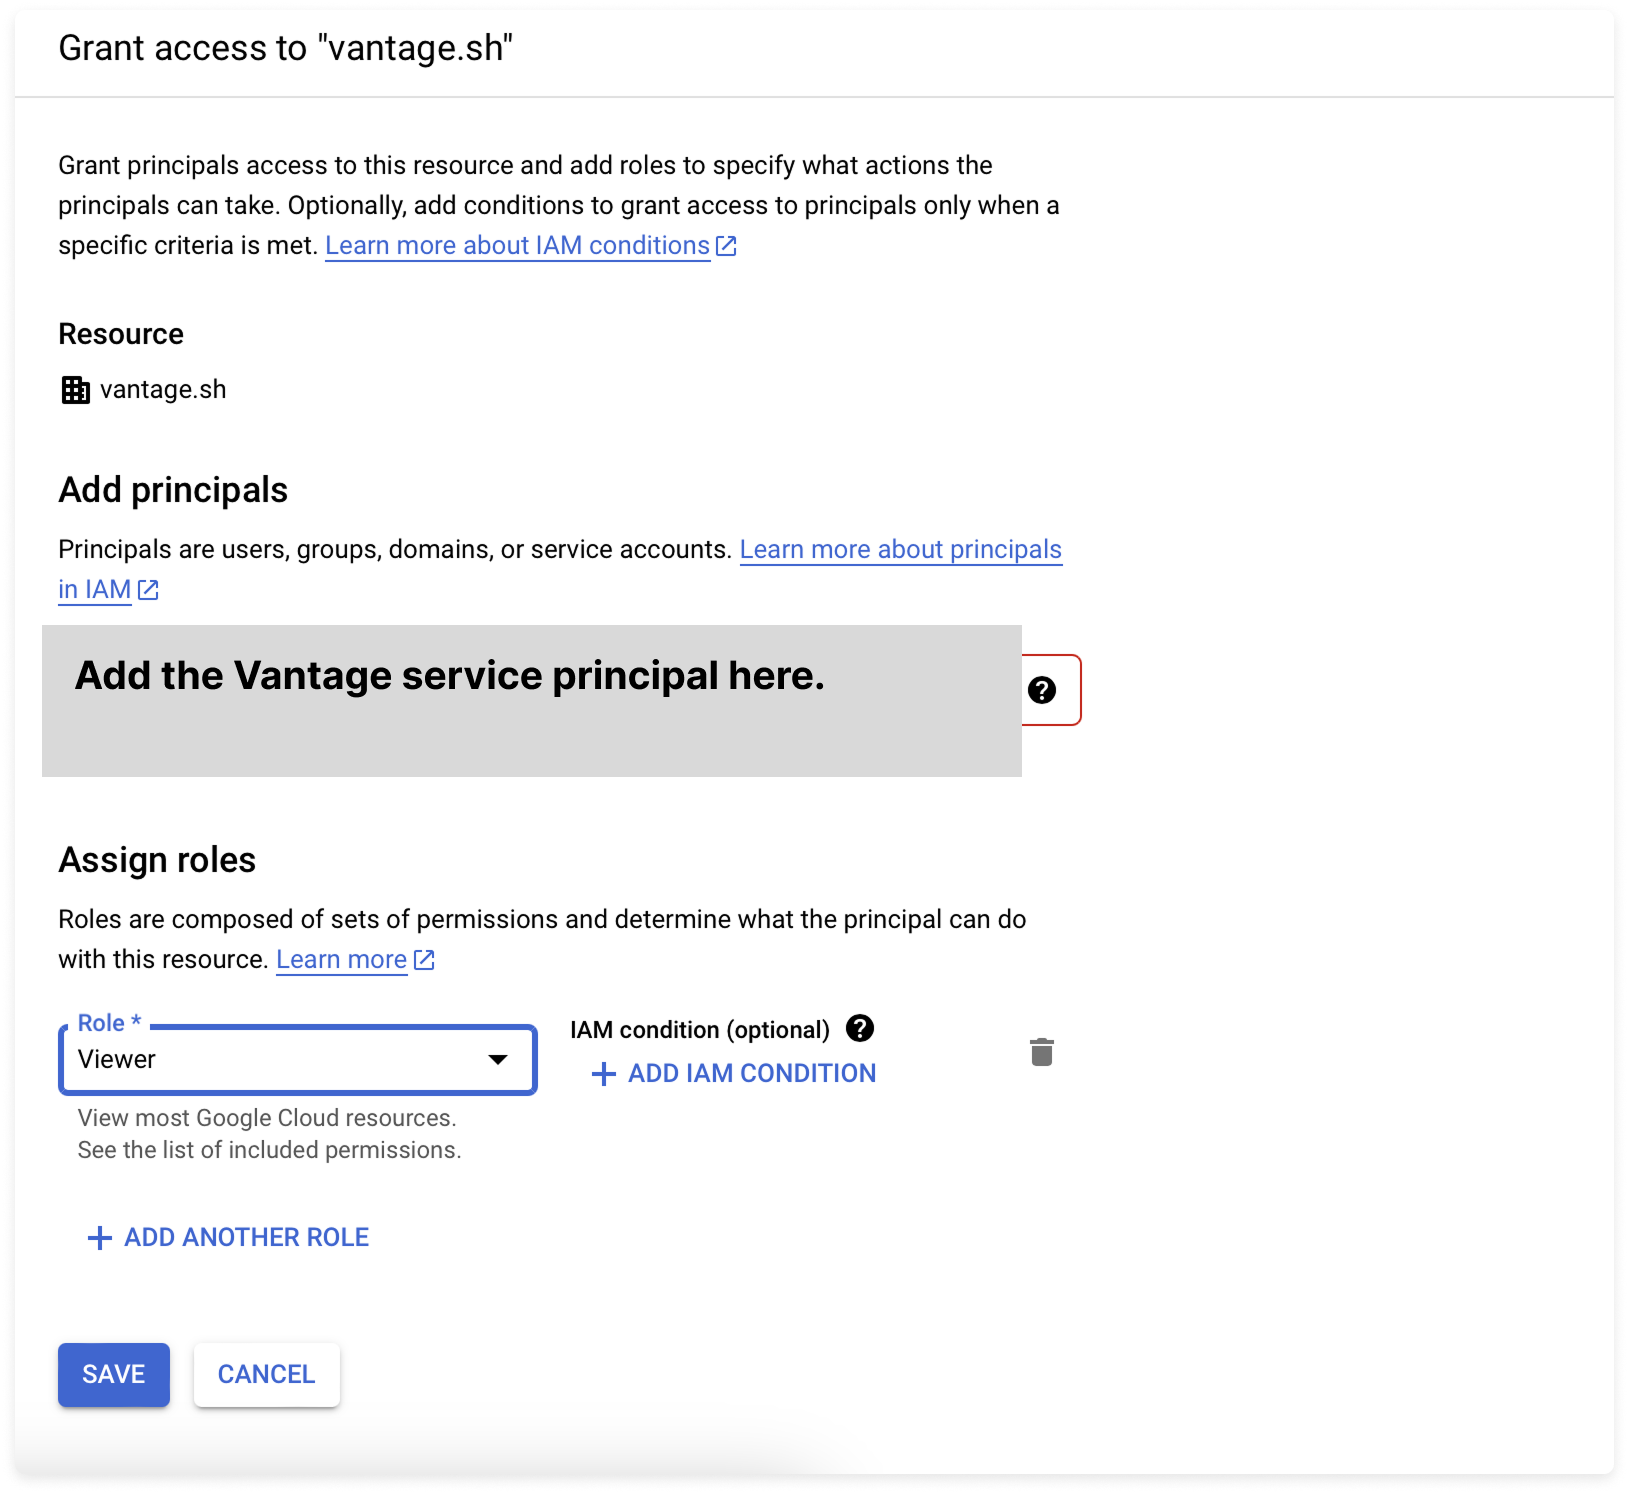
Click **Save**.
Create a custom IAM role with only the permissions required for Vantage to list active resource metadata. This role does **not** grant access to BigQuery table contents, Storage object contents, or Secret Manager secret values.
**Troubleshooting missing permissions:** If you notice that active resources for a specific GCP service are not appearing in Vantage, the custom role may be missing a required permission. Contact Vantage support with the service name, and we'll provide the specific IAM permission to add. You can update an existing custom role by editing the YAML file and running `gcloud iam roles update` instead of `create`.
Create a file named `vantage-active-resources-role.yaml` with the following content:
```yaml vantage-active-resources-role.yaml theme={null}
title: Vantage Active Resources Viewer
description: Read-only access to resource metadata for Vantage active resources sync
stage: GA
includedPermissions:
- resourcemanager.projects.list
- resourcemanager.projects.get
- resourcemanager.folders.get
- compute.instances.list
- compute.disks.list
- storage.buckets.list
- bigtable.instances.list
- dataflow.jobs.list
- bigquery.datasets.get
- logging.sinks.list
- cloudsql.instances.list
- spanner.instances.list
- appengine.applications.get
- appengine.services.list
- datastore.databases.list
- run.services.list
- container.clusters.list
- redis.instances.list
- cloudfunctions.functions.list
- alloydb.clusters.list
- alloydb.instances.list
- alloydb.backups.list
- secretmanager.secrets.list
```
Create the custom role at the organization level. Replace `ORG_ID` with your GCP organization ID:
```bash theme={null}
gcloud iam roles create vantageActiveResourcesViewer \
--organization=ORG_ID \
--file=vantage-active-resources-role.yaml
```
Grant the custom role to the Vantage service account. Replace `ORG_ID` with your GCP organization ID and `VANTAGE_SERVICE_ACCOUNT` with the service account from the [Vantage GCP Integration page](https://console.vantage.sh/settings/gcp):
```bash theme={null}
gcloud organizations add-iam-policy-binding ORG_ID \
--member="serviceAccount:VANTAGE_SERVICE_ACCOUNT" \
--role="organizations/ORG_ID/roles/vantageActiveResourcesViewer"
```
### Step 4 - Add Your GCP Configuration Information to the Vantage Console
Go back to your browser tab that has BigQuery open. Then, in another tab, go back to the [Vantage GCP Integration page](https://console.vantage.sh/settings/gcp) to complete the integration process.
At the bottom of the Vantage GCP Integration page, click **Add Project Info**. A pop-up is displayed, which requires your Billing account ID, the project ID for the project that hosts the BigQuery dataset, and the BigQuery dataset name.
To obtain your **Billing Account ID**:
* Go to [**GCP Billing**](https://console.cloud.google.com/billing).
* Copy the value for your billing account, displayed in the **Account ID** column. It will look something like `1234AB-123456-7ABC12`.

To obtain your **Project ID hosting BigQuery dataset** and **BigQuery Dataset Name**:
* In the **Dataset info** screen of BigQuery (previously opened in step 3 of the [BigQuery permissions](/connecting_gcp#step-2-grant-the-vantage-service-account-permission-to-access-the-bigquery-dataset) section), observe the value on the **Dataset ID** line (ensure you are on the **Details** tab).
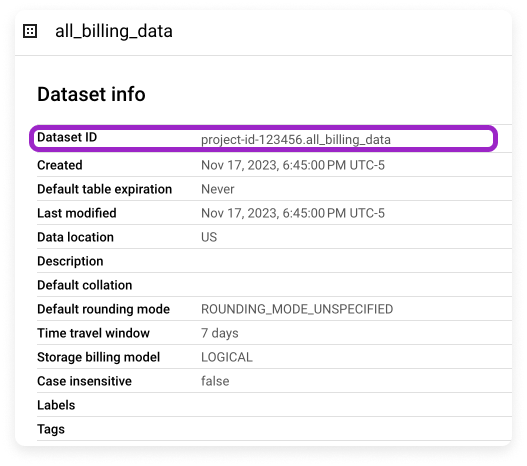
* Copy everything before the period. For example, in **project-id-123456.all\_billing\_data**, copy only **project-id-123456**. Paste this in the **Project ID hosting BigQuery dataset** field in Vantage.
* Copy everything after the period and paste it in the **BigQuery Dataset Name** field in Vantage. (For example, in **project-id-123456.all\_billing\_data**, copy **all\_billing\_data**.)
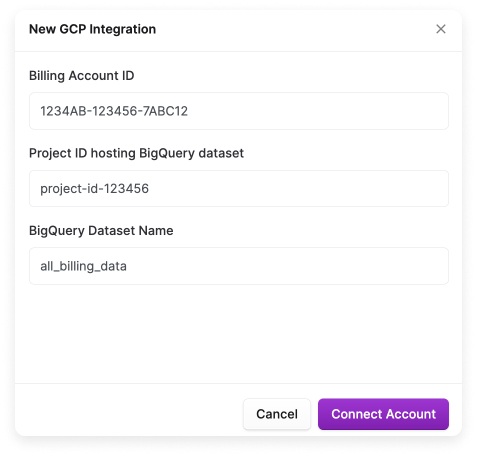
Click **Connect Account**.
It typically takes a few hours for data to start appearing. Cloud Billing data is added retroactively for the current and previous month when detailed usage cost data is configured. Full data for the current and previous month can take 24–48 hours to fully propagate.
After creating your connection, you will see the status of your integration change to **Importing** within the Vantage console. This status indicates that Vantage is actively importing your GCP cost data. See the [Integration Status](/vantage_account#integration-status) documentation for details on integration statuses.
### Next Steps - Manage Workspace Access
Once the import is complete and the integration status changes to **Stable**, you can select which workspaces this integration is associated with. See the [Workspaces](/workspaces#manage-workspace-provider-integrations) documentation for information.
## Data Refresh
See the [provider data refresh documentation](/provider_data_refresh) for information on when data for each provider refreshes in Vantage.
## Reporting Dimensions
On GCP [Cost Reports](/cost_reports), you can filter across several dimensions:
* Project (project name)
* Category (e.g., Cloud Functions Invocations (2nd Gen))
* Subcategory (e.g., Compute Engine - E2 Custom Instance Ram running in Americas - this will most often be the same as Category, but in cases where the Category is Other, the Subcategory will provide more detail, such as a SKU description as shown here)
* Label/Not Labeled (includes GCP labels and [virtual tags](/tagging) created in Vantage for this provider). In addition, the following provider tags are automatically created by Vantage from GCP data and are available for filtering and grouping when the GCP folder tag feature is enabled:
* `gcp:folder:id`: The GCP folder ID associated with the project, allowing you to filter and group costs by folder ID.
* `gcp:folder:name`: The GCP folder name associated with the project, allowing you to filter and group costs by folder name.
* `gcp:folder`: The combined folder ID and name (format: `id/name`), allowing you to filter and group costs by folder.
* `gcp:project_id`: The GCP project ID associated with the line item, allowing you to filter and group costs by project ID.
* `gcp:project_name`: The human-readable GCP project name, allowing you to filter and group costs by project name.
* `gcp:invoice_month`: The GCP invoice month (format: `YYYYMM`), allowing you to filter and group costs by invoice month.
* `gcp:sku`: The GCP SKU ID for the line item, allowing you to filter and group costs by individual SKU.
* Resource (resource ID)
* Region (e.g., Us East1)
* Charge Type (e.g., Usage)
* Billing Account (billing account ID)
* Marketplace (Toggle to show only Marketplace purchases or excluded)
* Service (e.g., Cloud Build)
## Reconcile Vantage With GCP Invoice Totals
If you compare a GCP invoice to a Vantage Cost Report and the totals do not line up exactly, the difference is usually caused by how the data is grouped rather than by missing costs.
Use the following workflow to match a GCP invoice more closely:
* Filter the report to the relevant **Billing Account**.
* Group or filter by the `gcp:invoice_month` provider tag to align the report with GCP's invoice month.
* When validating a single invoice month with a date-based Cost Report, include the last day of the previous month and the first day of the following month. Vantage bins GCP costs in UTC using `usage_start_time`, while GCP invoice views may reflect a different local timezone.
* Review your report's **Cost Settings** to confirm whether credits, discounts, refunds, and taxes are included. You may need to enable these settings in Vantage to match the invoice totals shown in GCP.
* If you recently connected the integration, allow 24–48 hours for the current and previous month to fully propagate before comparing totals.
If you manage several billing accounts and want more readable labels in reports, create [Virtual Tags](/tagging) that map each billing account ID to a friendly name.