> ## Documentation Index
> Fetch the complete documentation index at: https://docs.vantage.sh/llms.txt
> Use this file to discover all available pages before exploring further.
# Fastly
> Learn how to integrate Vantage with Fastly.
Vantage integrates with your Fastly account through a read-only API token. Fastly API tokens are free for you to create, and adding them to the Vantage console takes only a few minutes.
## Connect Your Fastly Account
### Prerequisites
* You must have a Vantage **Organization Owner** or **Integration Owner** role to add or remove this integration. See the [Role-Based Access Control](/rbac) documentation for details.
* [Create a free Vantage account](https://console.vantage.sh/signup), then follow the steps below to create a Fastly API token.
Navigate and log in to the [Fastly console](https://www.fastly.com/).
On the [**API tokens** page](https://manage.fastly.com/account/personal/tokens), re-enter your password if prompted. Then, click **+ Create Token**.
Enter the following token details:
* For **Name**, enter something relevant, like *VantageReadOnlyToken*.
* For **Type**, select **Automation token**.
* If the **Role** option is displayed, select **Billing**.
* For **Scope**, select **Read-only access (`global:read`) — Read account information configuration and stats**. Ensure all other options remain unchecked. Vantage will never attempt to make changes to your Fastly infrastructure.
* For **Access**, select **All Services on YOUR\_ORGANIZATION\_NAME**.
* For **Expiration**, select **Never expire**.
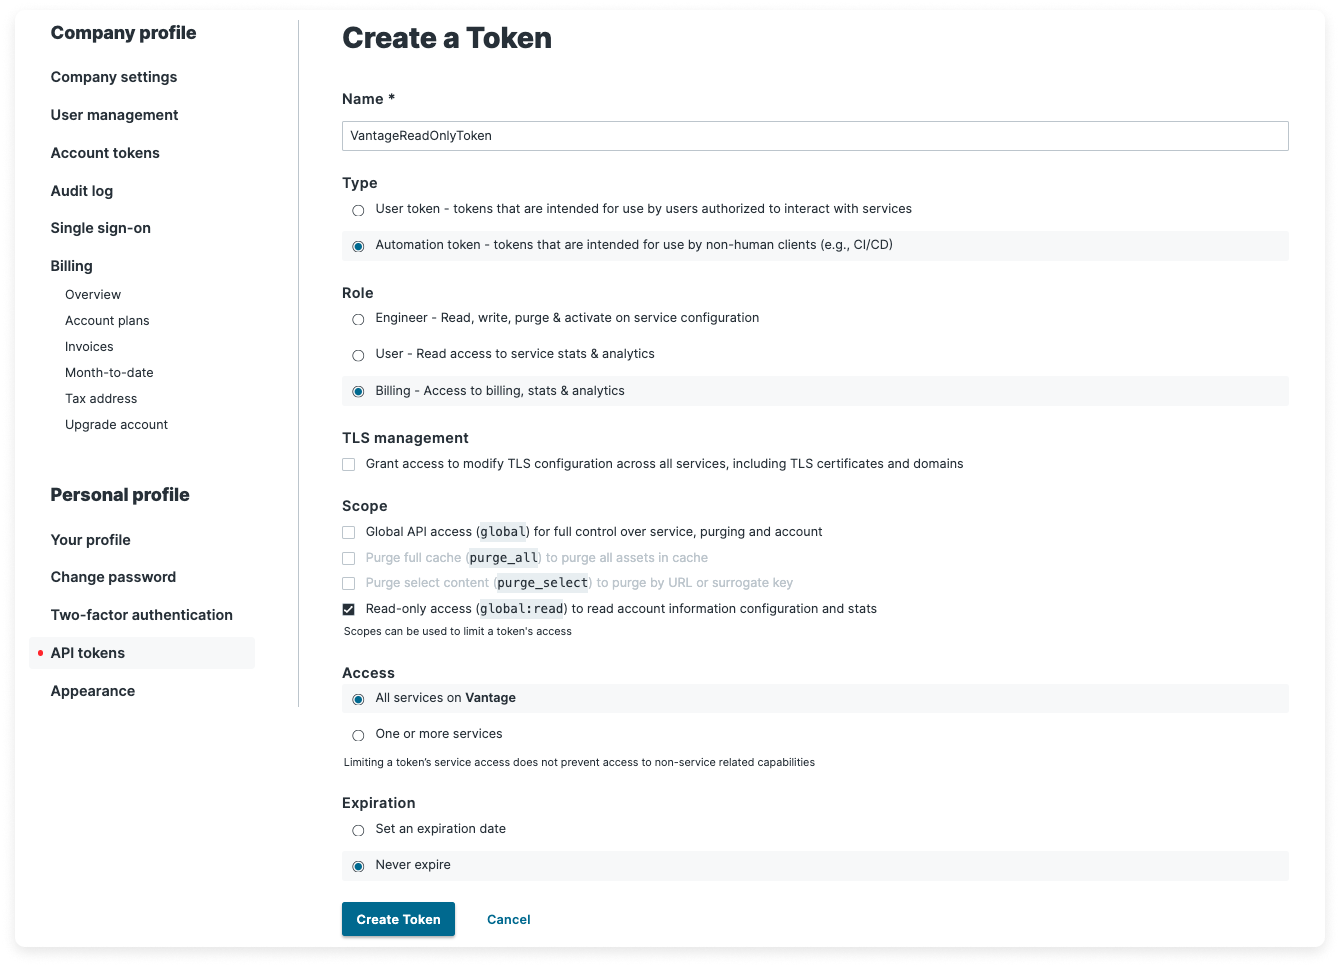
Click **Create Token**, and re-enter your password if prompted. Fastly will generate your API token. Copy this token for the next steps.
### Create the Connection
From the Vantage console, navigate to the [Fastly Settings page](https://console.vantage.sh/settings/fastly).
Click **Add API Token**, then paste the API token you just generated.
Click **Connect Account**.
After clicking **Connect Account**, you will see the status of your integration change to **Importing** within the Vantage console. This status indicates that Vantage is actively importing your Fastly cost data. Vantage will automatically begin ingesting and visualizing your costs. It should take about an hour for cost data to populate. See the [Integration Status](/vantage_account#integration-status) documentation for details on integration statuses.
### Next Steps - Manage Workspace Access
Once the import is complete and the integration status changes to **Stable**, you can select which workspaces this integration is associated with. See the [Workspaces](/workspaces#manage-workspace-provider-integrations) documentation for information.
## Data Refresh
See the [provider data refresh documentation](/provider_data_refresh) for information on when data for each provider refreshes in Vantage.
## Fastly Reporting Dimensions
On Fastly [Cost Reports](/cost_reports), you can filter across several dimensions:
* Account (account name)
* Category (e.g., CDN Data Transfer)
* Subcategory (e.g., CDN Requests)
* Resource (service resource ID)
* Region (e.g., USA)
* Charge Type (e.g., Usage)
* Service (e.g., CDN)
* Tag ([virtual tags](/tagging) created in Vantage for this provider)