> ## Documentation Index
> Fetch the complete documentation index at: https://docs.vantage.sh/llms.txt
> Use this file to discover all available pages before exploring further.
# Databricks
> Learn how to integrate Vantage with Databricks.
Vantage connects to your Databricks account using a dedicated Serverless SQL warehouse to query `system` tables within a [Unity Catalog](https://docs.databricks.com/aws/en/data-governance/unity-catalog/get-started)-enabled workspace. Vantage requires only the Data Reader permission to access these system tables and does not have the ability to perform any write actions or administrative changes in your Databricks account.
You can perform the Databricks integration for each Databricks account you have or each region your Databricks account uses. Each integration you perform will collect data for all the workspaces within your Databricks account that are deployed within the same region.
[Usage data](/usage_based_reporting) is available for services that measure consumption, such as usage in DBUs ([Databricks Units](https://docs.databricks.com/aws/en/getting-started/concepts#billing-databricks-units-dbus)) or GBs.
## Databricks System Tables
[System tables](https://docs.databricks.com/aws/en/admin/system-tables/) are a set of Unity Catalog tables that expose operational and billing metadata. For cost monitoring, Vantage uses the following tables:
* `system.billing.usage`: contains SKU-level usage data by workspace.
* `system.billing.list_prices`: provides SKU-level list pricing.
* `system.billing.account_prices`: shows discounted prices for customers on enterprise agreements.
This table is considered to be in [Private Preview](https://docs.databricks.com/aws/en/release-notes/release-types) through Databricks and may require you to work with your Databricks account team to enable it.
If Databricks costs in Vantage appear to reflect list pricing rather than your negotiated enterprise rates, verify that `system.billing.account_prices` is enabled and backfilled in your Databricks account. After this table is available, subsequent ingestions use discounted pricing. Historical cost data that was imported before `account_prices` was available is not automatically updated. Contact [support@vantage.sh](mailto:support@vantage.sh) to request a re-import of prior periods.
* `system.compute.clusters`: contains metadata, like human-readable names, for clusters and custom tagging.
* `system.compute.warehouses`: contains metadata such as warehouse configuration, human-readable warehouse names, and custom tags.
* `system.access.workspaces_latest`: contains human-readable names for workspaces.
If you are migrating from the v1 Databricks integration, see [How to Migrate from the v1 Integration to v2](/connecting_databricks#how-to-migrate-from-the-v1-integration-to-v2) before creating a new connection.
## Connect Your Databricks Account
You can connect to Databricks either [manually](/connecting_databricks#create-the-connection) using the below workflow or using a [Terraform module](/connecting_databricks#connect-via-terraform).
The Serverless SQL Warehouse required for the integration will incur a cost, estimated at approximately \$84/month. Vantage uses the smallest possible Serverless SQL Warehouse to keep these costs minimal.
### Prerequisites
* You must have a Vantage **Organization Owner** or **Integration Owner** role to add or remove this integration. See the [Role-Based Access Control](/rbac) documentation for details.
* You need [account admin](https://docs.databricks.com/en/administration-guide/index.html) privileges in Databricks.
* A [Unity Catalog-enabled](https://docs.databricks.com/aws/en/data-governance/unity-catalog/get-started#how-do-i-know-if-my-workspace-was-enabled-for-unity-catalog) workspace.
* Review [this page](https://docs.databricks.com/aws/en/data-governance/unity-catalog/manage-privileges/) from the Databricks documentation for additional information about permissions with Unity Catalog.
* [Create a free Vantage account](https://console.vantage.sh/signup), then follow the steps below to integrate Databricks costs.
Vantage will use the [following IP addresses](/security#:~:text=Does%20Vantage%20use%20fixed%20IP%20addresses%20when%20connecting%20to%20external%20providers%2C%20such%20as%20AWS%20or%20Azure%3F) when connecting to your Databricks account.
### Create the Connection
To integrate your Databricks account with Vantage, follow the below steps:
#### Step 1 - Collect Credentials and Open Workspace
Log in to the [Databricks console](https://accounts.cloud.databricks.com/).
From the top right of the console, click your avatar and copy your **Databricks Account ID** for later use.
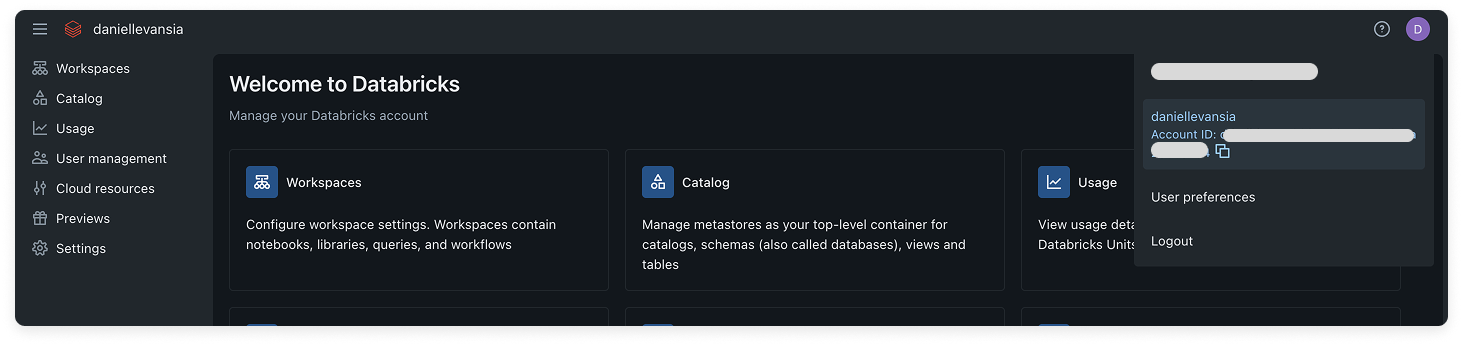 Click **Workspaces**, then select a Unity Catalog-enabled workspace within your Databricks account.
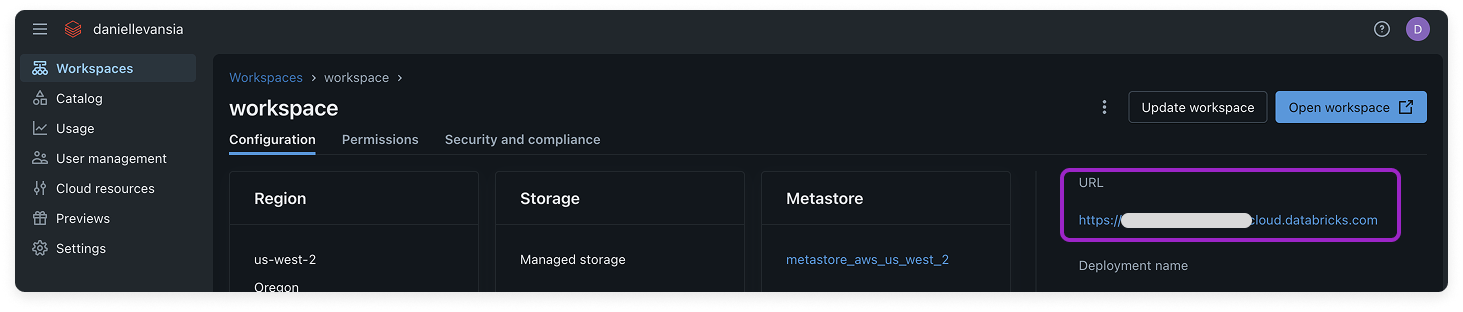
Copy your **Workspace URL** for later use. Then, open the workspace.
Click **Workspaces**, then select a Unity Catalog-enabled workspace within your Databricks account.
Copy your **Workspace URL** for later use. Then, open the workspace.
 #### Step 2 - Create a Service Principal
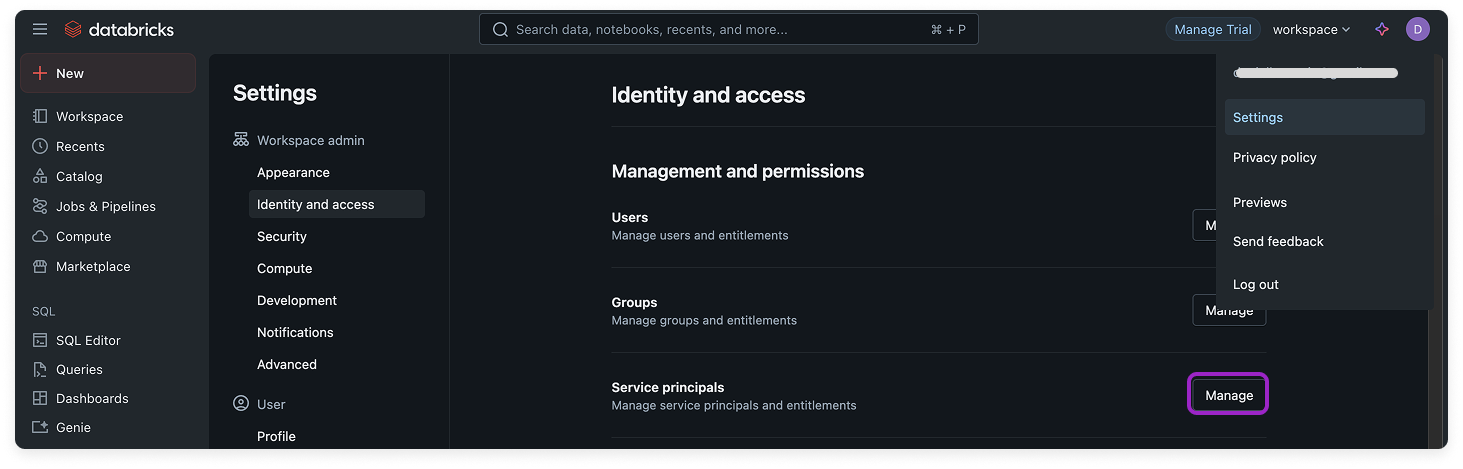
From the top right of the workspace, click your avatar and select **Settings**.
On the **Settings** screen, under **Workspace admin**, select **Identity and access**.
Next to **Service principals**, click **Manage**.
#### Step 2 - Create a Service Principal
From the top right of the workspace, click your avatar and select **Settings**.
On the **Settings** screen, under **Workspace admin**, select **Identity and access**.
Next to **Service principals**, click **Manage**.
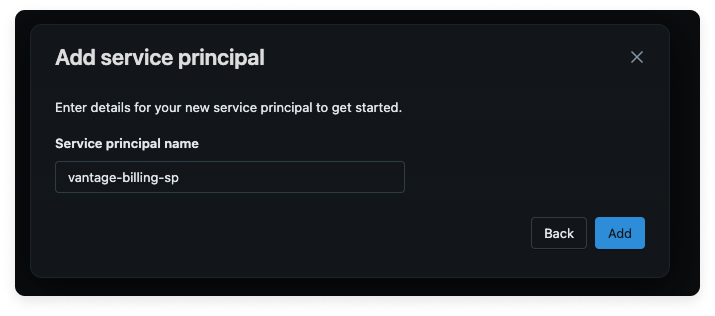
 Click **Add service principal**.
* On the **Add new service principal** modal, click **Add new**.
* For **Service principal name**, enter *vantage-billing-sp*.
* Click **Add**.
Click **Add service principal**.
* On the **Add new service principal** modal, click **Add new**.
* For **Service principal name**, enter *vantage-billing-sp*.
* Click **Add**.
 Open the newly created service principal, then select the **Secrets** tab.
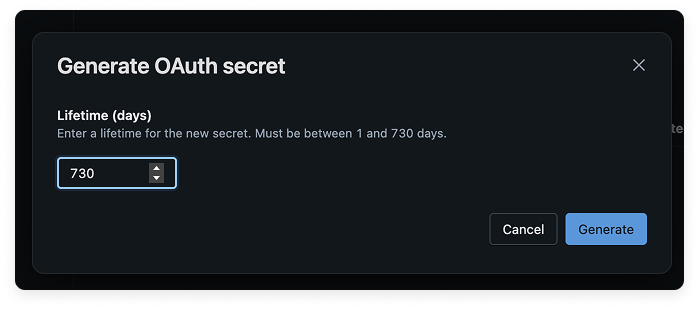
Click **Generate secret**.
Enter a secret **Lifetime** of 730 days, then click **Generate**. (When the secret expires, you'll need to create a new one and reconfigure the integration in Vantage with the corresponding secret and client ID.)
Open the newly created service principal, then select the **Secrets** tab.
Click **Generate secret**.
Enter a secret **Lifetime** of 730 days, then click **Generate**. (When the secret expires, you'll need to create a new one and reconfigure the integration in Vantage with the corresponding secret and client ID.)
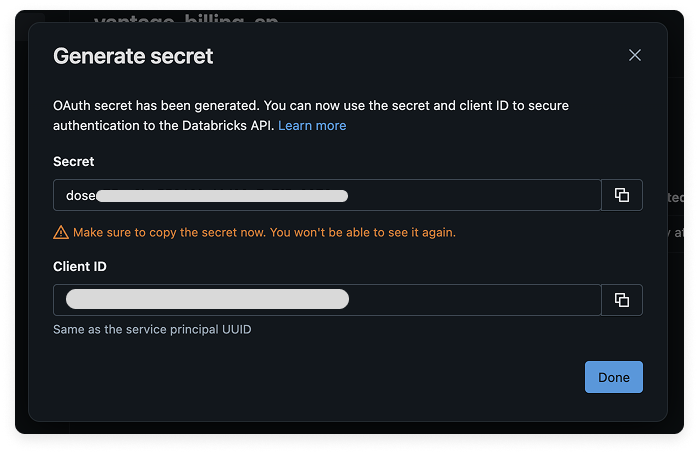
 Your **Secret** and **Client ID** are displayed. Copy these values for later use.
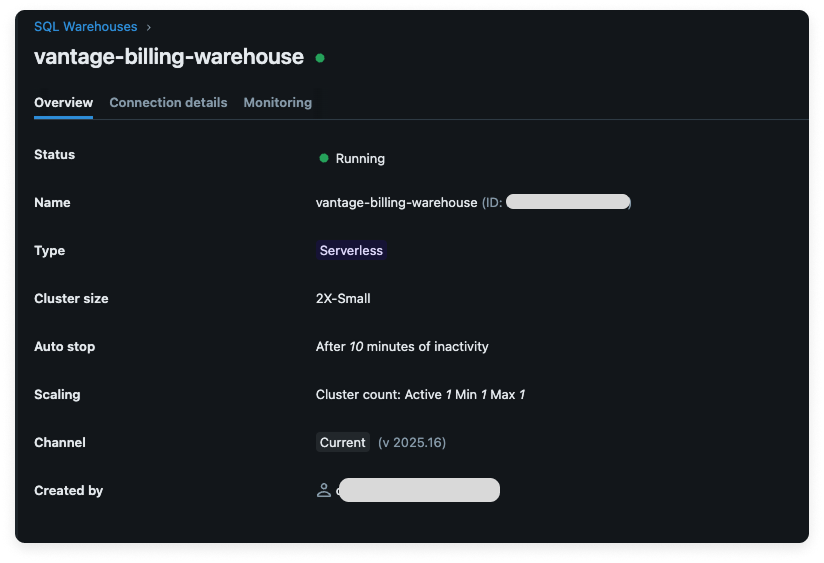
 #### Step 3 - Create a Serverless SQL Warehouse and Assign Permissions
From the left navigation menu, under **SQL**, click **SQL Warehouses.**
Click **Create SQL warehouse**, and enter the following information:
* For **Name,** enter *vantage-billing-warehouse*.
* For **Cluster size**, select **2X-Small**.
* For **Type**, select **Serverless**.
#### Step 3 - Create a Serverless SQL Warehouse and Assign Permissions
From the left navigation menu, under **SQL**, click **SQL Warehouses.**
Click **Create SQL warehouse**, and enter the following information:
* For **Name,** enter *vantage-billing-warehouse*.
* For **Cluster size**, select **2X-Small**.
* For **Type**, select **Serverless**.
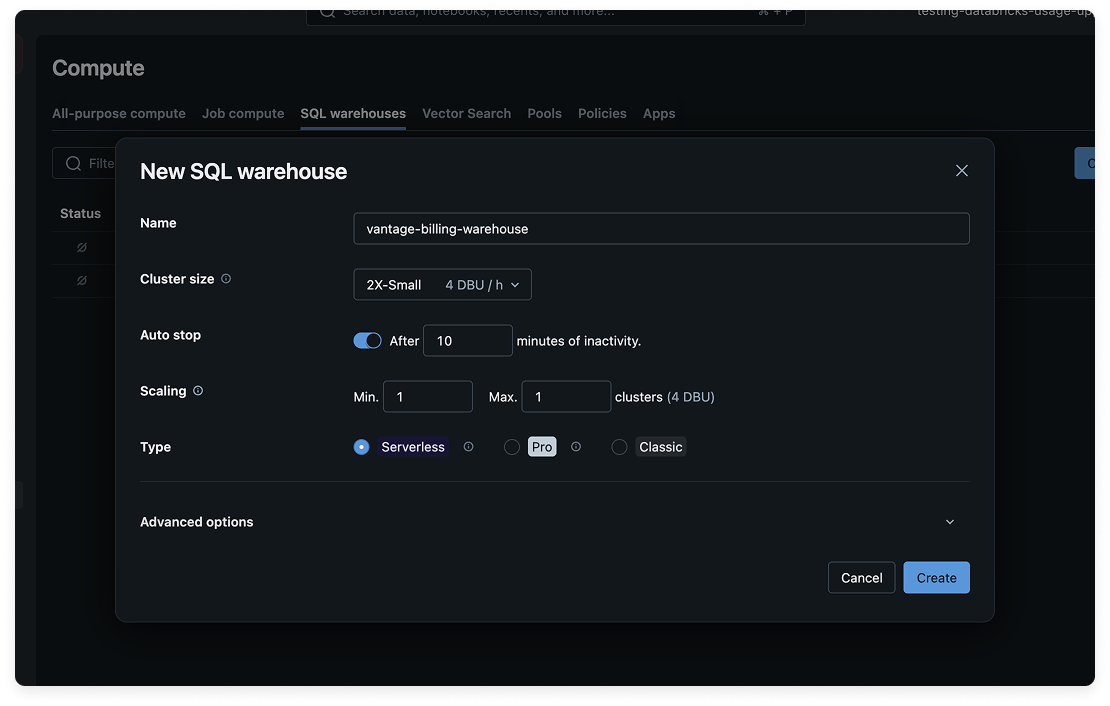 Click **Create**.
After the warehouse is created, the **Manage permissions** modal window is displayed. (To access this modal, you can also click **Permissions** on the top right of the screen.)
Search for and select the **vantage-billing-sp** service principal.
Select the **Can Use** permission and click **Add**.
Click **Create**.
After the warehouse is created, the **Manage permissions** modal window is displayed. (To access this modal, you can also click **Permissions** on the top right of the screen.)
Search for and select the **vantage-billing-sp** service principal.
Select the **Can Use** permission and click **Add**.
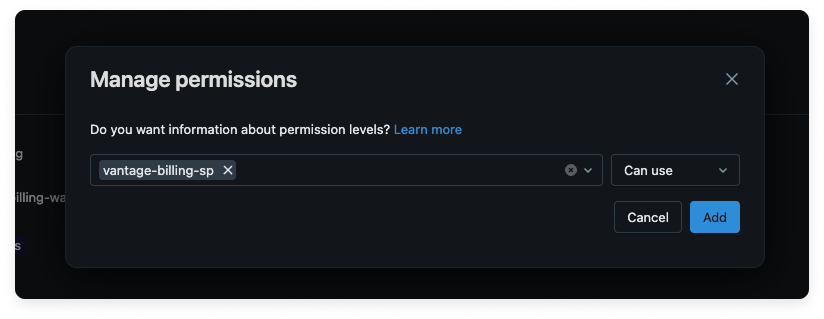 Close the **Manage permissions** modal and copy your warehouse ID, displayed next to the warehouse name, for later use.
 #### Step 4 - Grant Data Reader Permissions to the Service Principal
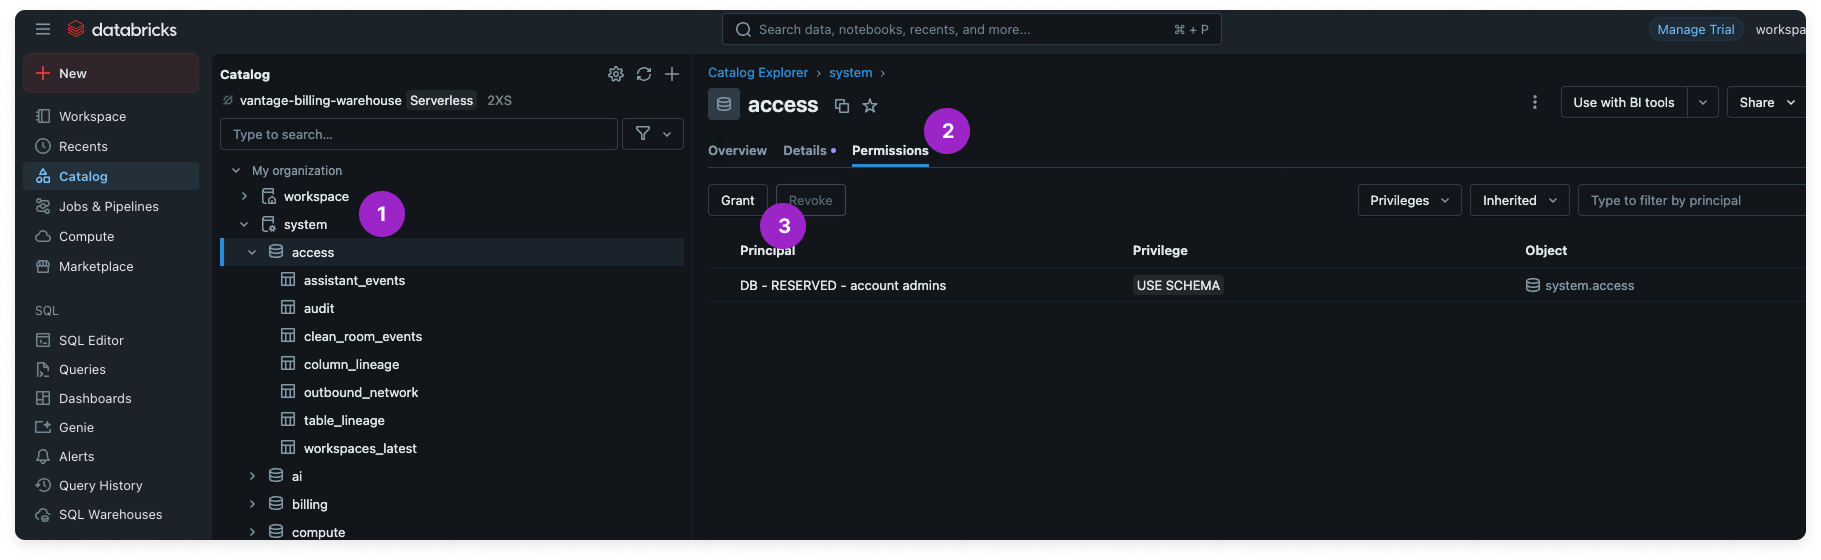
From the top of the left navigation menu, click **Catalog**.
In the **Catalog** menu, expand **My Organization > system**.
Select the `access` schema. On the right, click **Permissions > Grant**.
#### Step 4 - Grant Data Reader Permissions to the Service Principal
From the top of the left navigation menu, click **Catalog**.
In the **Catalog** menu, expand **My Organization > system**.
Select the `access` schema. On the right, click **Permissions > Grant**.
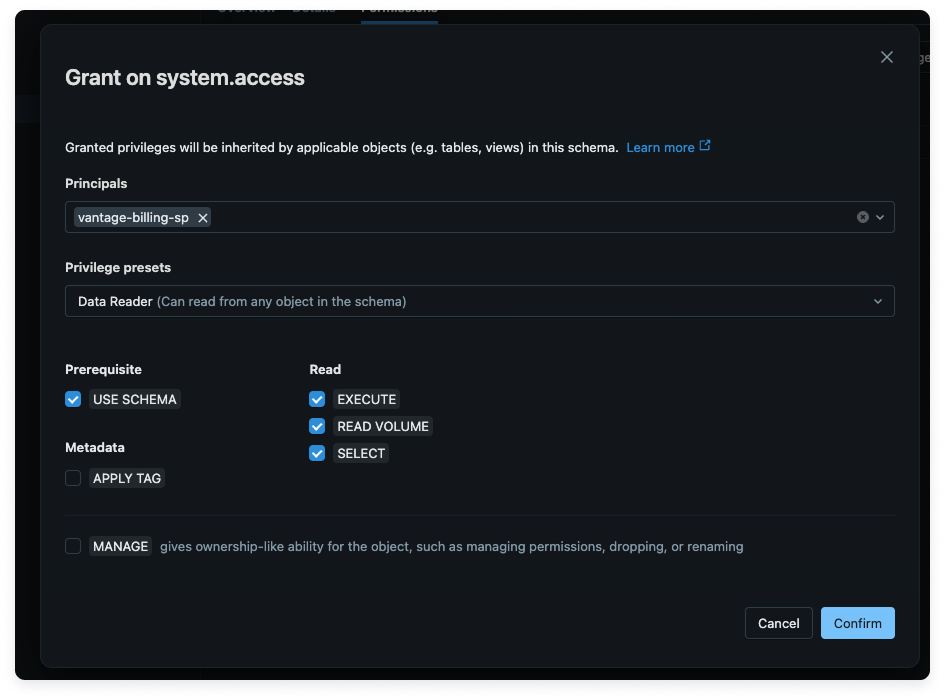
 Enter the following information to create a grant on `system.access`:
* For **Principals**, select the **vantage-billing-sp** service principal.
* For **Privilege presets**, select **Data Reader**.
Click **Confirm**.
Enter the following information to create a grant on `system.access`:
* For **Principals**, select the **vantage-billing-sp** service principal.
* For **Privilege presets**, select **Data Reader**.
Click **Confirm**.
 Repeat the last two steps and grant Data Reader permissions for the `billing` and `compute` schemas.
#### Step 5 - Add Credentials to Vantage
From the Vantage console, navigate to the [Databricks Settings](https://console.vantage.sh/settings/databricks/) page.
Click the **Connect** tab, then click **Set Up Account**.
On the **Integration** modal screen, enter the following information:
* For **Databricks Account ID**, enter your account ID that you obtained in step 1.
* For **Service Principal OAuth Client ID** and **Service Principal OAuth Client Secret**, add the ID and secret you obtained in step 2.
* For **Workspace URL**, add the URL you obtained in step 1.
* For **SQL Warehouse ID**, add the warehouse ID you obtained in step 3.
Click **Connect Account**.
After clicking **Connect Account**, you will see the status of your integration change to **Importing** within the Vantage console. This status indicates that Vantage is actively importing your Databricks cost data. Vantage will load the previous six months of Databricks usage data. See the [Integration Status](/vantage_account#integration-status) documentation for details on integration statuses.
As soon as costs are processed, they will be available on your **All Resources** Cost Report. If you decide to remove your Databricks integration from Vantage, all costs associated with your Databricks account will be removed from the Vantage console.
## Connect via Terraform
You can also connect your Databricks account using the `terraform-databricks-vantage-integration` module. Follow the steps in the module's [README](https://github.com/vantage-sh/terraform-databricks-vantage-integration) to connect your account.
## Next Steps - Manage Workspace Access
Once the import is complete and the integration status changes to **Stable**, you can select which workspaces this integration is associated with. See the [Workspaces](/workspaces#manage-workspace-provider-integrations) documentation for information.
## Migrate to the New Databricks Billing Integration
This section provides information about v1 and v2 of the Databricks integration in Vantage.
### What's Improved in the New Integration
Previously, Vantage ingested Databricks costs using Databricks billable usage logs (integration released in December 2022). These logs provided SKU-level usage but reflected only list pricing, and enterprise customers had to manually apply discounts in Vantage to approximate their actual costs.
The new integration (released in July 2025) uses the Databricks system tables and provides more accurate, granular cost data. Switching to this integration ensures your cloud cost data in Vantage is more complete, accurate, and reflective of your negotiated Databricks pricing.
Vantage recommends you perform the new integration to receive the most up-to-date billing data from Databricks, as new products will not be added to the former billable usage logs.
### What You Need to Know Before Migrating
Data availability for the new integration depends on:
* Your Databricks account’s creation date
* When system tables were enabled
* How long the data has been retained in your account
Databricks currently provides [one year of free retention](https://docs.databricks.com/aws/en/admin/system-tables/#which-system-tables-are-available), with plans to add configurable retention for system tables; however, backfills of system tables in Databricks will not be supported.
Run this query in your Databricks account to see the oldest full month of data available:
```sql theme={null}
SELECT MIN(usage_date) as oldest_full_month
FROM system.billing.usage
WHERE DAY(usage_date) = 1;
```
If your Vantage retention period extends further back than your available system tables data, you can continue to use the previous Vantage integration to maintain historical continuity.
To ensure data is not double-counted, Vantage will:
* Backfill your new Databricks Vantage integration as far back as the Databricks system tables contain data
* Remove any overlapping data from your old Databricks Vantage integration
### How to Migrate from the v1 Integration to v2
This integration guide provides the steps for migrating from v1 to v2. Keep your v1 integration active while you set up and validate v2, then disable the v1 log delivery after confirming that v2 data is available and accurate.
#### Step 1 - Set Up the v2 Integration
Create a new Databricks integration while your v1 integration remains active. Use one of the following setup methods:
#### Step 2 - Validate v2 Data
After clicking **Connect Account**, you will see the status of your v2 integration change to **Importing** within the Vantage console. Vantage will load the previous six months of Databricks usage data. As soon as costs are processed, they will be available on your **All Resources** Cost Report.
Before disabling v1 log delivery, validate the new integration:
* Wait for the v2 integration to finish importing and change to **Stable**.
* Compare recent month totals between your v1 and v2 Databricks costs.
* If you had manually applied discounts on v1, verify that v2 reflects your negotiated pricing from `system.billing.account_prices`.
* Confirm that Cost Reports, saved filters, Virtual Tags, dashboards, and alerts using Databricks costs still behave as expected.
#### Step 3 - Disable v1 Billable Usage Log Delivery
After v2 is validated, disable the Databricks log delivery configuration that sends v1 billable usage logs to Vantage.
Configure the [Databricks CLI](https://docs.databricks.com/en/dev-tools/cli/install.html) for account-level authentication. Follow the [user-to-machine authentication guide](https://docs.databricks.com/en/dev-tools/cli/authentication.html#u2m-auth) to ensure you have valid credentials.
The commands below assume you have followed Databricks’s instructions and have account-level access. Be sure to use the profile that corresponds with your Databricks account administrator.
Disable the log delivery configuration named `vantage-billable-usage-delivery` using its `config_id`.
```bash theme={null}
# find log delivery with config_name = 'vantage-billable-usage-delivery'
databricks account log-delivery list | jq '.[] | select(.config_name == "vantage-billable-usage-delivery" and .status == "ENABLED")'
# disable log delivery
databricks account log-delivery patch-status \
--json '{ "status": "DISABLED" }'
```
```json theme={null}
{
"account_id": "xxx",
"config_id": "d0bd8965-576c-11f0-8bd2-063fa5ec6fe1",
"config_name": "vantage-billable-usage-delivery",
"creation_time": 1751478531000,
"credentials_id": "d8116e60-094f-4dce-a8e7-21b0f8fe1678",
"delivery_path_prefix": "databricks/23c328cc-d58d-4cba-9b6a-5f1d061cdf69/90d61e57-21e1-482d-ad62-f98904e47a4b",
"delivery_start_time": "2025-01",
"log_delivery_status": {
"last_attempt_time": "2025-07-29T12:57:06Z",
"last_successful_attempt_time": "2025-07-29T12:57:06Z",
"message": "All logs were successfully delivered.",
"status": "SUCCEEDED"
},
"log_type": "BILLABLE_USAGE",
"output_format": "CSV",
"status": "ENABLED",
"storage_configuration_id": "341a1551-0822-40d6-b6d0-9fbc3f78e906",
"update_time": 1753857212000
},
```
Once disabled, Databricks stops pushing data to a bucket, and it will no longer trigger any data ingests to Vantage.
#### Step 4 - Remove or Retain the v1 Integration in Vantage
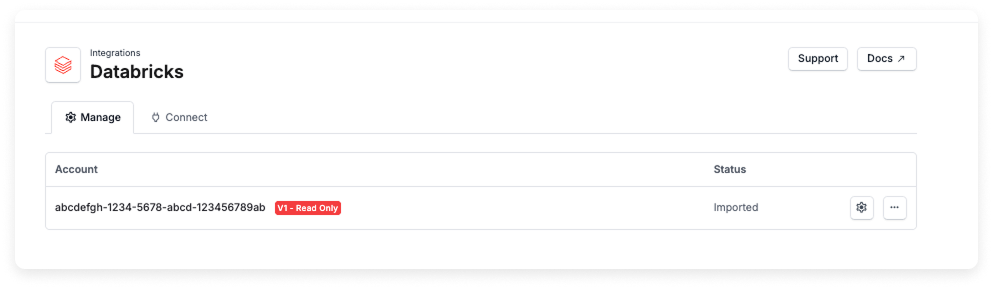
To view your v1 Databricks integration in Vantage, navigate to the [Integrations page](https://console.vantage.sh/settings/databricks). The integration is displayed with the label `V1 - Read Only`, and you’ll be unable to make updates to that integration in Vantage.
If you need to update any manually applied Databricks discounts on a v1 integration, contact [support@vantage.sh](mailto:support@vantage.sh).
After v1 log delivery is disabled, you can remove the v1 integration from Vantage if you no longer need any remaining historical data that exists only on v1. If you still need that history for reporting continuity, leave the v1 integration in read-only mode.
If you decide to remove your Databricks integration from Vantage, all costs associated with that integration will be removed from the Vantage console.
If you have multiple Databricks accounts, repeat these migration steps for each account ID.
Repeat the last two steps and grant Data Reader permissions for the `billing` and `compute` schemas.
#### Step 5 - Add Credentials to Vantage
From the Vantage console, navigate to the [Databricks Settings](https://console.vantage.sh/settings/databricks/) page.
Click the **Connect** tab, then click **Set Up Account**.
On the **Integration** modal screen, enter the following information:
* For **Databricks Account ID**, enter your account ID that you obtained in step 1.
* For **Service Principal OAuth Client ID** and **Service Principal OAuth Client Secret**, add the ID and secret you obtained in step 2.
* For **Workspace URL**, add the URL you obtained in step 1.
* For **SQL Warehouse ID**, add the warehouse ID you obtained in step 3.
Click **Connect Account**.
After clicking **Connect Account**, you will see the status of your integration change to **Importing** within the Vantage console. This status indicates that Vantage is actively importing your Databricks cost data. Vantage will load the previous six months of Databricks usage data. See the [Integration Status](/vantage_account#integration-status) documentation for details on integration statuses.
As soon as costs are processed, they will be available on your **All Resources** Cost Report. If you decide to remove your Databricks integration from Vantage, all costs associated with your Databricks account will be removed from the Vantage console.
## Connect via Terraform
You can also connect your Databricks account using the `terraform-databricks-vantage-integration` module. Follow the steps in the module's [README](https://github.com/vantage-sh/terraform-databricks-vantage-integration) to connect your account.
## Next Steps - Manage Workspace Access
Once the import is complete and the integration status changes to **Stable**, you can select which workspaces this integration is associated with. See the [Workspaces](/workspaces#manage-workspace-provider-integrations) documentation for information.
## Migrate to the New Databricks Billing Integration
This section provides information about v1 and v2 of the Databricks integration in Vantage.
### What's Improved in the New Integration
Previously, Vantage ingested Databricks costs using Databricks billable usage logs (integration released in December 2022). These logs provided SKU-level usage but reflected only list pricing, and enterprise customers had to manually apply discounts in Vantage to approximate their actual costs.
The new integration (released in July 2025) uses the Databricks system tables and provides more accurate, granular cost data. Switching to this integration ensures your cloud cost data in Vantage is more complete, accurate, and reflective of your negotiated Databricks pricing.
Vantage recommends you perform the new integration to receive the most up-to-date billing data from Databricks, as new products will not be added to the former billable usage logs.
### What You Need to Know Before Migrating
Data availability for the new integration depends on:
* Your Databricks account’s creation date
* When system tables were enabled
* How long the data has been retained in your account
Databricks currently provides [one year of free retention](https://docs.databricks.com/aws/en/admin/system-tables/#which-system-tables-are-available), with plans to add configurable retention for system tables; however, backfills of system tables in Databricks will not be supported.
Run this query in your Databricks account to see the oldest full month of data available:
```sql theme={null}
SELECT MIN(usage_date) as oldest_full_month
FROM system.billing.usage
WHERE DAY(usage_date) = 1;
```
If your Vantage retention period extends further back than your available system tables data, you can continue to use the previous Vantage integration to maintain historical continuity.
To ensure data is not double-counted, Vantage will:
* Backfill your new Databricks Vantage integration as far back as the Databricks system tables contain data
* Remove any overlapping data from your old Databricks Vantage integration
### How to Migrate from the v1 Integration to v2
This integration guide provides the steps for migrating from v1 to v2. Keep your v1 integration active while you set up and validate v2, then disable the v1 log delivery after confirming that v2 data is available and accurate.
#### Step 1 - Set Up the v2 Integration
Create a new Databricks integration while your v1 integration remains active. Use one of the following setup methods:
#### Step 2 - Validate v2 Data
After clicking **Connect Account**, you will see the status of your v2 integration change to **Importing** within the Vantage console. Vantage will load the previous six months of Databricks usage data. As soon as costs are processed, they will be available on your **All Resources** Cost Report.
Before disabling v1 log delivery, validate the new integration:
* Wait for the v2 integration to finish importing and change to **Stable**.
* Compare recent month totals between your v1 and v2 Databricks costs.
* If you had manually applied discounts on v1, verify that v2 reflects your negotiated pricing from `system.billing.account_prices`.
* Confirm that Cost Reports, saved filters, Virtual Tags, dashboards, and alerts using Databricks costs still behave as expected.
#### Step 3 - Disable v1 Billable Usage Log Delivery
After v2 is validated, disable the Databricks log delivery configuration that sends v1 billable usage logs to Vantage.
Configure the [Databricks CLI](https://docs.databricks.com/en/dev-tools/cli/install.html) for account-level authentication. Follow the [user-to-machine authentication guide](https://docs.databricks.com/en/dev-tools/cli/authentication.html#u2m-auth) to ensure you have valid credentials.
The commands below assume you have followed Databricks’s instructions and have account-level access. Be sure to use the profile that corresponds with your Databricks account administrator.
Disable the log delivery configuration named `vantage-billable-usage-delivery` using its `config_id`.
```bash theme={null}
# find log delivery with config_name = 'vantage-billable-usage-delivery'
databricks account log-delivery list | jq '.[] | select(.config_name == "vantage-billable-usage-delivery" and .status == "ENABLED")'
# disable log delivery
databricks account log-delivery patch-status \
--json '{ "status": "DISABLED" }'
```
```json theme={null}
{
"account_id": "xxx",
"config_id": "d0bd8965-576c-11f0-8bd2-063fa5ec6fe1",
"config_name": "vantage-billable-usage-delivery",
"creation_time": 1751478531000,
"credentials_id": "d8116e60-094f-4dce-a8e7-21b0f8fe1678",
"delivery_path_prefix": "databricks/23c328cc-d58d-4cba-9b6a-5f1d061cdf69/90d61e57-21e1-482d-ad62-f98904e47a4b",
"delivery_start_time": "2025-01",
"log_delivery_status": {
"last_attempt_time": "2025-07-29T12:57:06Z",
"last_successful_attempt_time": "2025-07-29T12:57:06Z",
"message": "All logs were successfully delivered.",
"status": "SUCCEEDED"
},
"log_type": "BILLABLE_USAGE",
"output_format": "CSV",
"status": "ENABLED",
"storage_configuration_id": "341a1551-0822-40d6-b6d0-9fbc3f78e906",
"update_time": 1753857212000
},
```
Once disabled, Databricks stops pushing data to a bucket, and it will no longer trigger any data ingests to Vantage.
#### Step 4 - Remove or Retain the v1 Integration in Vantage
To view your v1 Databricks integration in Vantage, navigate to the [Integrations page](https://console.vantage.sh/settings/databricks). The integration is displayed with the label `V1 - Read Only`, and you’ll be unable to make updates to that integration in Vantage.
If you need to update any manually applied Databricks discounts on a v1 integration, contact [support@vantage.sh](mailto:support@vantage.sh).
After v1 log delivery is disabled, you can remove the v1 integration from Vantage if you no longer need any remaining historical data that exists only on v1. If you still need that history for reporting continuity, leave the v1 integration in read-only mode.
If you decide to remove your Databricks integration from Vantage, all costs associated with that integration will be removed from the Vantage console.
If you have multiple Databricks accounts, repeat these migration steps for each account ID.
 #### Step 5 - Manage Workspace Access
Once the v2 import is complete and the integration status changes to **Stable**, you can select which workspaces this integration is associated with. See the [Workspaces](/workspaces#manage-workspace-provider-integrations) documentation for information.
## Data Refresh
See the [provider data refresh documentation](/provider_data_refresh) for information on when data for each provider refreshes in Vantage.
## Databricks Reporting Dimensions
On Databricks [Cost Reports](/cost_reports), you can filter across several dimensions:
* Billing Account (e.g., Organization)
* Linked Account (e.g., Workspace)
* Service (e.g., Jobs Compute)
* Charge Type (e.g., Usage)
* Category (e.g., Photon)
* Subcategory (e.g., Serverless)
* Resource ID (specific ID for a given Databricks resource)
* Tags (Tags from Databricks, see section below, and [Virtual Tags](/tagging) created in Vantage)
### Databricks Tags
The Tag filter contains values like job\_id, which can be used to view costs for specific Databricks jobs. Vantage gets tags from `identity_metadata`, `usage_metadata`, and `custom_tags` from `system.billing.usage`; `workspace_name` from `system.access.workspaces_latest`; `cluster_name`, `tags`, and `driver_instance_pool_id` from `system.compute.clusters`; and `warehouse_channel`, `warehouse_type`, `warehouse_name` from `system.compute.warehouses`. Below is a list of tags Vantage ingests.
* `cluster_id`
* `job_id`
* `warehouse_id`
* `instance_pool_id`
* `node_type`
* `job_run_id`
* `notebook_id`
* `dlt_pipeline_id`
* `endpoint_name`
* `endpoint_id`
* `dlt_update_id`
* `dlt_maintenance_id`
* `metastore_id`
* `run_name`
* `job_name`
* `notebook_path`
* `central_clean_room_id`
* `source_region`
* `destination_region`
* `app_id`
* `app_name`
* `private_endpoint_name`
* `budget_policy_id`
* `run_as`
* `sql_warehouse_own_by`
* `created_by`
* `workspace_name`
* `cluster_name`
* `cluster_own_by`
* `clusterNodeType`
* `warehouse_name`
* `warehouse_channel`
* `warehouse_type`
* `driver_instance_pool_id`
## Access Vantage via Databricks MCP Catalog
The [Vantage MCP](/vantage_mcp) is available in the Databricks Marketplace and [Model Context Protocol (MCP) Catalog](https://www.databricks.com/blog/accelerate-ai-development-databricks-discover-govern-and-build-mcp-and-agent-bricks), which makes it easy to integrate cloud cost intelligence directly into your Databricks AI workflows.
* Gain unified visibility into Databricks costs alongside AWS, Azure, GCP, and other cloud services
* Analyze cost drivers, usage patterns, and trends with automated reporting and FinOps insights
* Apply Virtual Tags in Vantage to allocate Databricks costs by team, environment, or business unit and ask questions about how these costs are allocated
Review the [Databricks documentation](https://docs.databricks.com/aws/en/generative-ai/mcp/) for information on how to use MCP servers in Databricks. You need an active Vantage account with a Databricks integration (follow the instructions above). You also need a [Vantage API key](/vantage_account#create-an-api-token) to use as your bearer token.
Log in to the Databricks console, and navigate to the **Databricks Marketplace**.
Use the **Product** filter to filter by **MCP servers**.
Select **Vantage** and click **Install**.
Enter a **Connection name**, your Vantage token, and accept the provided terms.
Click **Install**.
#### Step 5 - Manage Workspace Access
Once the v2 import is complete and the integration status changes to **Stable**, you can select which workspaces this integration is associated with. See the [Workspaces](/workspaces#manage-workspace-provider-integrations) documentation for information.
## Data Refresh
See the [provider data refresh documentation](/provider_data_refresh) for information on when data for each provider refreshes in Vantage.
## Databricks Reporting Dimensions
On Databricks [Cost Reports](/cost_reports), you can filter across several dimensions:
* Billing Account (e.g., Organization)
* Linked Account (e.g., Workspace)
* Service (e.g., Jobs Compute)
* Charge Type (e.g., Usage)
* Category (e.g., Photon)
* Subcategory (e.g., Serverless)
* Resource ID (specific ID for a given Databricks resource)
* Tags (Tags from Databricks, see section below, and [Virtual Tags](/tagging) created in Vantage)
### Databricks Tags
The Tag filter contains values like job\_id, which can be used to view costs for specific Databricks jobs. Vantage gets tags from `identity_metadata`, `usage_metadata`, and `custom_tags` from `system.billing.usage`; `workspace_name` from `system.access.workspaces_latest`; `cluster_name`, `tags`, and `driver_instance_pool_id` from `system.compute.clusters`; and `warehouse_channel`, `warehouse_type`, `warehouse_name` from `system.compute.warehouses`. Below is a list of tags Vantage ingests.
* `cluster_id`
* `job_id`
* `warehouse_id`
* `instance_pool_id`
* `node_type`
* `job_run_id`
* `notebook_id`
* `dlt_pipeline_id`
* `endpoint_name`
* `endpoint_id`
* `dlt_update_id`
* `dlt_maintenance_id`
* `metastore_id`
* `run_name`
* `job_name`
* `notebook_path`
* `central_clean_room_id`
* `source_region`
* `destination_region`
* `app_id`
* `app_name`
* `private_endpoint_name`
* `budget_policy_id`
* `run_as`
* `sql_warehouse_own_by`
* `created_by`
* `workspace_name`
* `cluster_name`
* `cluster_own_by`
* `clusterNodeType`
* `warehouse_name`
* `warehouse_channel`
* `warehouse_type`
* `driver_instance_pool_id`
## Access Vantage via Databricks MCP Catalog
The [Vantage MCP](/vantage_mcp) is available in the Databricks Marketplace and [Model Context Protocol (MCP) Catalog](https://www.databricks.com/blog/accelerate-ai-development-databricks-discover-govern-and-build-mcp-and-agent-bricks), which makes it easy to integrate cloud cost intelligence directly into your Databricks AI workflows.
* Gain unified visibility into Databricks costs alongside AWS, Azure, GCP, and other cloud services
* Analyze cost drivers, usage patterns, and trends with automated reporting and FinOps insights
* Apply Virtual Tags in Vantage to allocate Databricks costs by team, environment, or business unit and ask questions about how these costs are allocated
Review the [Databricks documentation](https://docs.databricks.com/aws/en/generative-ai/mcp/) for information on how to use MCP servers in Databricks. You need an active Vantage account with a Databricks integration (follow the instructions above). You also need a [Vantage API key](/vantage_account#create-an-api-token) to use as your bearer token.
Log in to the Databricks console, and navigate to the **Databricks Marketplace**.
Use the **Product** filter to filter by **MCP servers**.
Select **Vantage** and click **Install**.
Enter a **Connection name**, your Vantage token, and accept the provided terms.
Click **Install**.