> ## Documentation Index
> Fetch the complete documentation index at: https://docs.vantage.sh/llms.txt
> Use this file to discover all available pages before exploring further.
# Azure MCA Account
> Learn how to integrate Vantage with Azure MCA.
With the Azure MCA integration, you allow the Vantage service principal to have access at the billing scope level.
When you configure this integration, the Vantage service principal is granted **billing account reader** permissions. The service principal does *not* have permissions—nor will it ever attempt—to make any changes to your infrastructure.
You must have a Vantage **Organization Owner** or **Integration Owner** role to add or remove this integration. See the [Role-Based Access Control](/rbac) documentation for details.
To integrate your Azure MCA account with Vantage, follow the below steps:
## Step 1 - Create a New Application Registration
From the main page of the Azure portal, search for and navigate to **Microsoft Entra ID**.
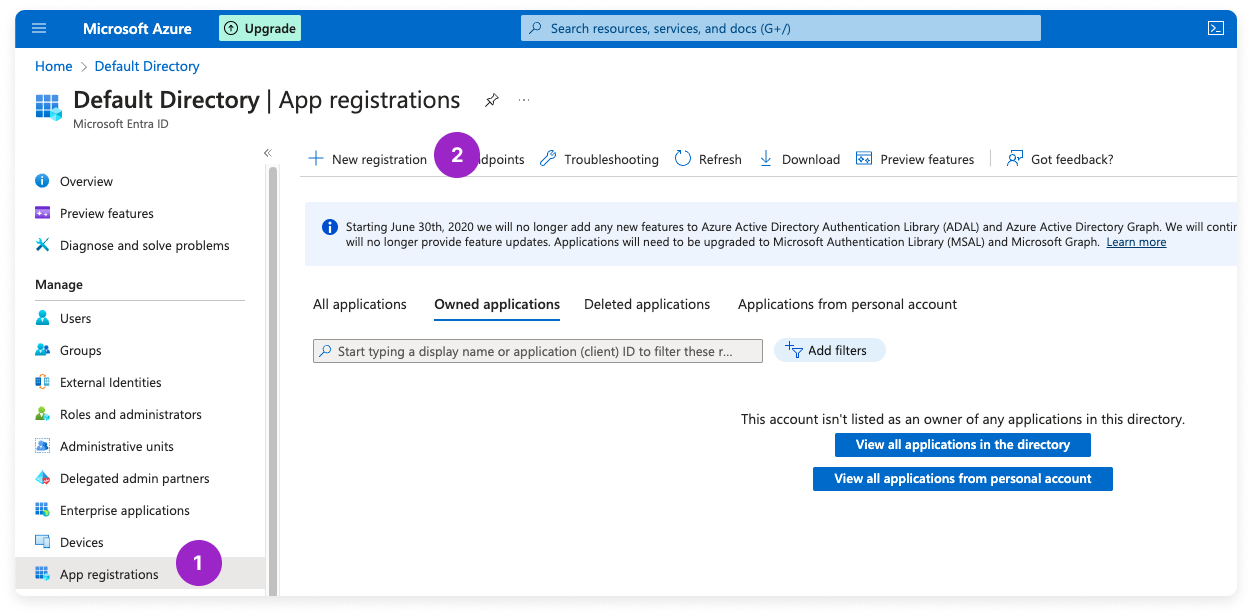
In the left navigation, under **Manage**, select **App registrations**.
Click **+ New registration**.
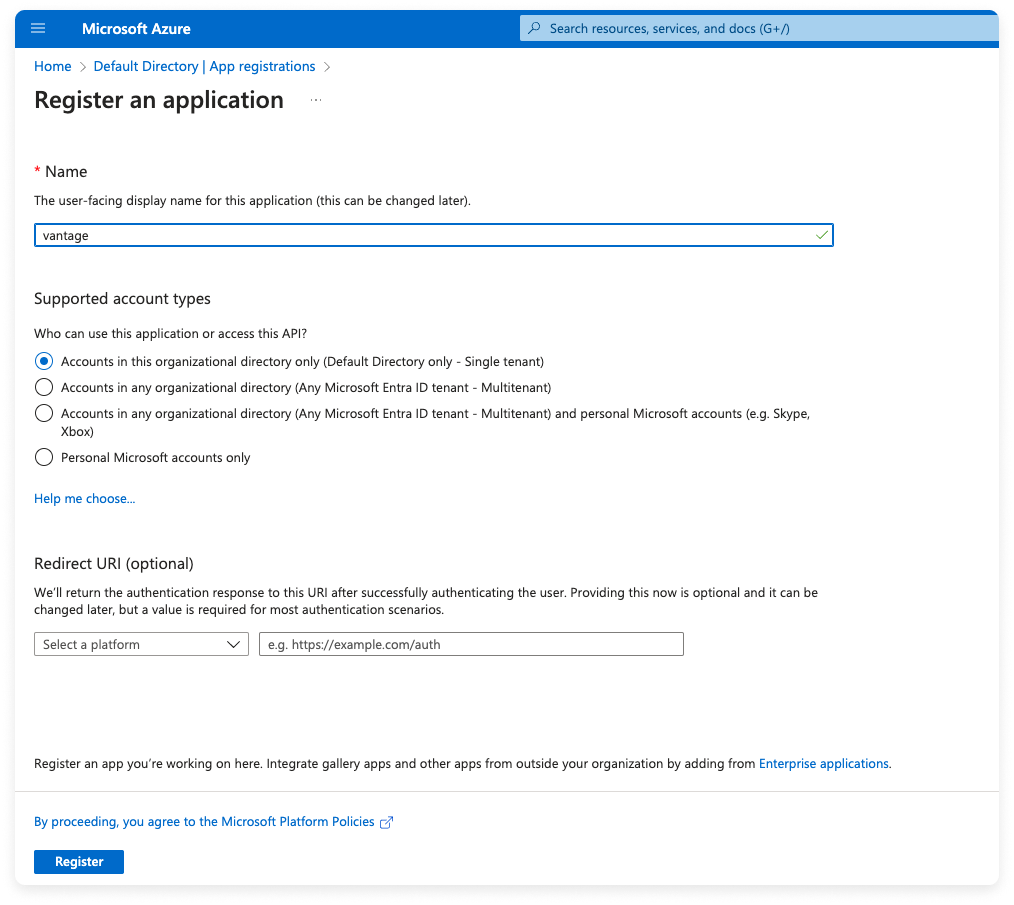
The **Register an application** screen is displayed. For **Name**, enter *vantage*.
Leave all other settings as their defaults and click **Register**.
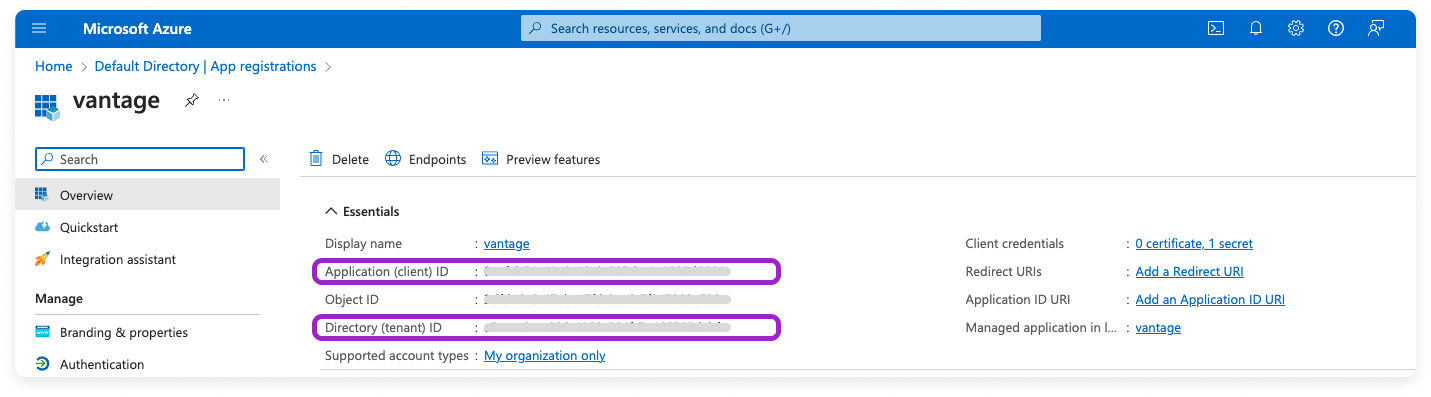
The app details are displayed. Record the **Application (client) ID** and **Directory (tenant) ID** to use later.
## Step 2 - Generate a Client Secret
On the same page, next to the **Client credentials** field, click **Add a certificate or secret**. (You can also access the **Certificates and secrets** screen from the left navigation menu.)
Click **+ New client secret**.
The **Add a client secret** pane is displayed. For **Description**, enter a description, such as *vantage-secret*.
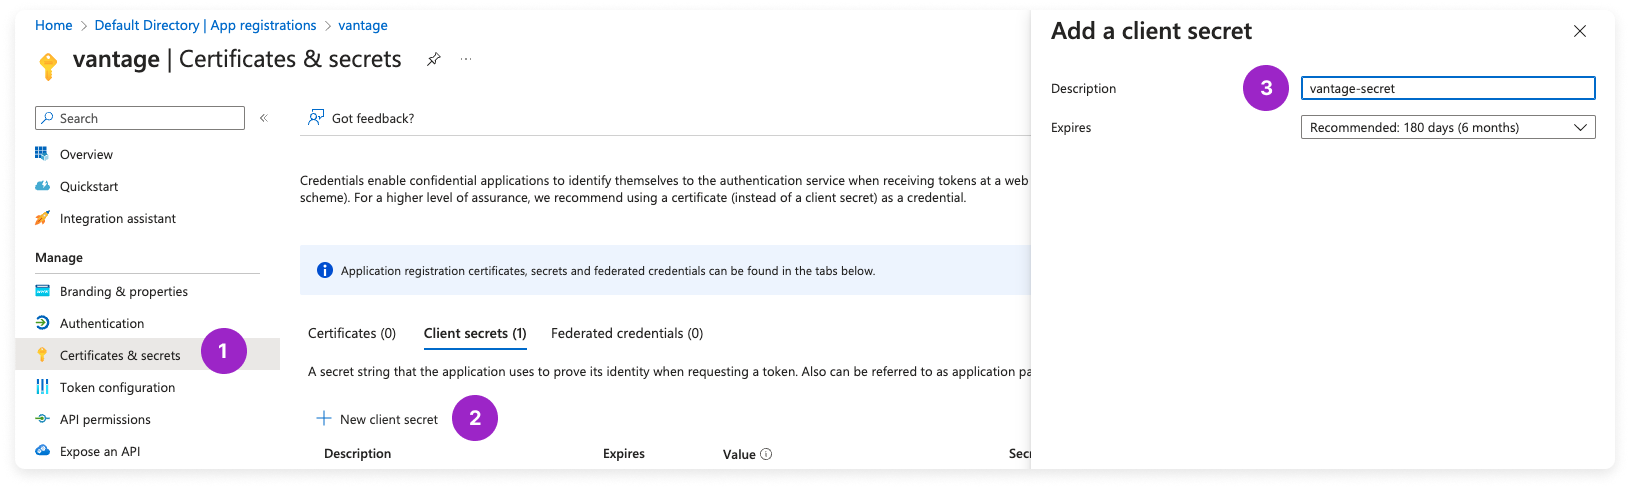
For **Expires**, select an expiration option for the secret.
If this secret expires, you will need to supply Vantage with a new secret *before* the expiration date.
Click **Add**.
The newly created secret is displayed. Copy the secret's **Value** to add to the Vantage console later. This value will be displayed only one time.
## Step 3 - Obtain Your Billing Account ID
Navigate to **Cost Management + Billing**.
On the left menu, click **Billing scopes** and select your **MCA Billing Account** from the list.
On the left menu, click **Settings** > **Properties**.
Copy your **Billing account id** to add to the Vantage console later.
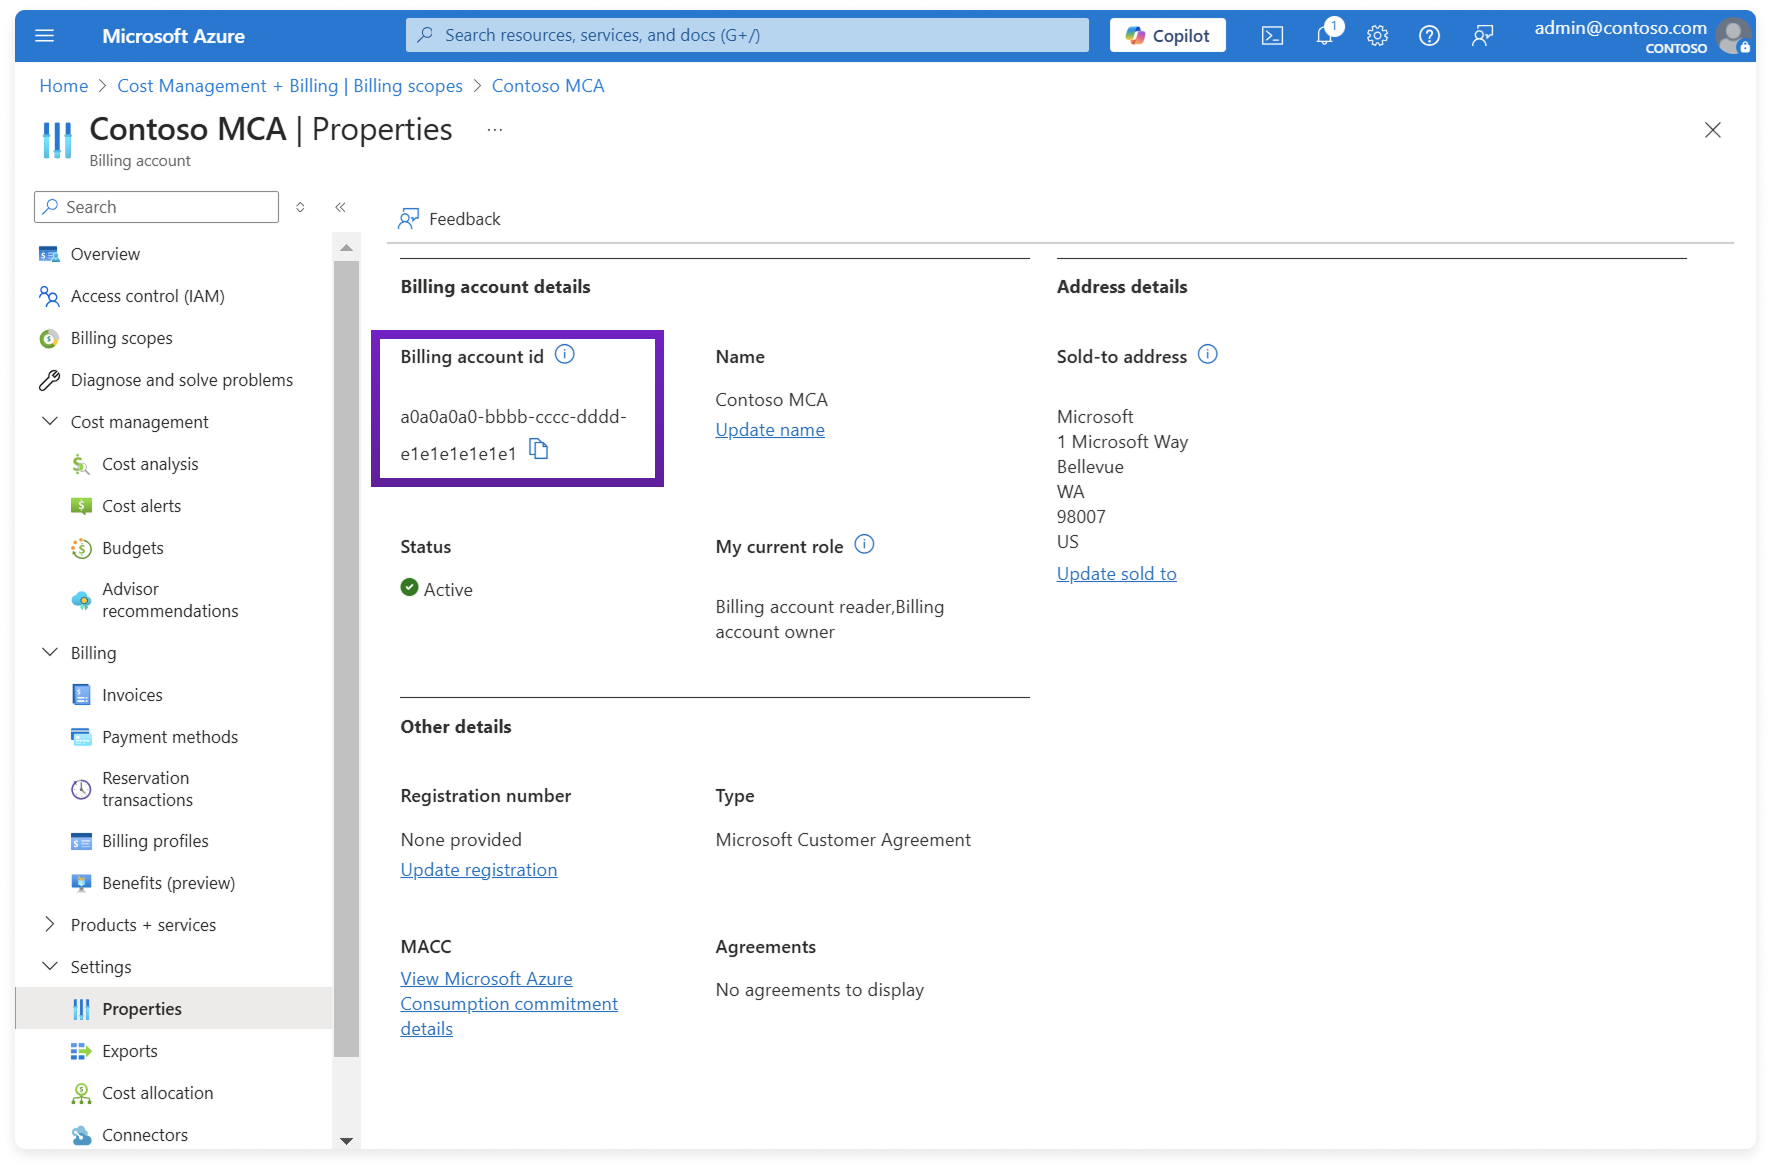
*Source: Microsoft*
## Step 4 - Assign the Billing Account Reader Role to the Service Principal
From the left menu, select **Access Control (IAM)**.
At the top, click **Add**.
On the right **Add role assignment** pane, select **Billing account reader**.
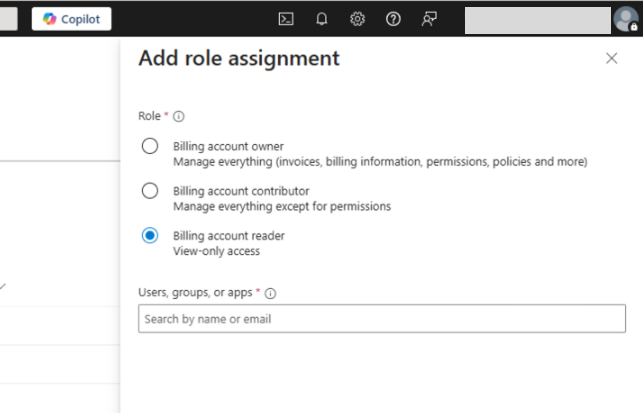
Under **Users, groups, or apps**, search for and select the *vantage* service principal that was generated when you created the app registration in step 1.
Click **Add**.
## Step 5 - Add App Registration Credentials to Vantage
Navigate to the [Integrations page](https://console.vantage.sh/settings/integrations) in the Vantage console, and add an Azure integration.
On the Azure integration page, click **Add Credentials**.
Add the following credentials:
* For **Azure AD Tenant ID**, add the **Directory (tenant) ID** you obtained in step 1.
* For **Service Principal App ID**, add the **Application (client) ID** you obtained in step 1.
* For **Service Principal Password**, add the client secret you obtained in step 2.
* For **Billing Account Id**, add the **Billing Account Id** you obtained in step 3.
Click **Connect Account**.
After completing the connection, you will see the status of your integration change to **Importing** within the Vantage console. This status indicates that Vantage is actively importing your Azure cost data. See the [Integration Status](/vantage_account#integration-status) documentation for details on integration statuses.
## Step 6 - Grant Reader Access for Active Resources and Recommendations
Steps 1-5 grant **billing account reader** access, which is sufficient for importing Azure **cost data** into Cost Reports. Billing account reader does *not* grant access to your resource inventory, so this step is required to use Active Resources and recommendations.
To populate the [Active Resources](/active_resources) tab and Azure [cost recommendations](/connecting_azure#azure-cost-recommendations), the same *vantage* service principal must also be granted the built-in **Reader** role at the **subscription** scope. This is required even when MCA billing access is already configured, because Vantage reads your resource inventory through the Azure Resource Manager APIs, which billing account reader does not cover.
Assign the **Reader** role using the Azure CLI, repeating the command for each subscription you want inventoried:
```bash theme={null}
az role assignment create --assignee --role Reader --scope "/subscriptions/"
```
You can also assign the **Reader** role through the Azure portal by following the [portal instructions](/connecting_azure#step-3-grant-the-service-principal-permissions) from the standard Azure integration.
After granting the **Reader** role:
* Wait for the next daily sync. Resources can take up to \~24 hours to appear. See the [Active Resources](/active_resources) documentation for details.
* Confirm the Azure integration is [assigned to the workspace](/workspaces#manage-workspace-provider-integrations) you're viewing, as resources only appear in workspaces where the integration is enabled.
## Optional Azure Reservations and Savings Plans
Steps 1-5 above are sufficient for importing Azure cost data into Vantage.
If you also want Azure Reservations and Azure Savings Plans to appear on the [Commitments](/commitments) page, continue to [Optional Azure Reservations and Savings Plans](/connecting_azure#optional-azure-reservations-and-savings-plans) and complete the additional permission steps there.
## Update Your Client Secret
If you need to update your Azure MCA integration's client secret, see the [Update Your Client Secret](/connecting_azure#update-your-client-secret) section in the main Azure connection documentation for detailed instructions.
## Next Steps - Workspace Access
Once the import is complete and the integration status changes to **Stable**, you can select which workspaces this integration is associated with. See the [Workspaces](/workspaces#manage-workspace-provider-integrations) documentation for information.