> ## Documentation Index
> Fetch the complete documentation index at: https://docs.vantage.sh/llms.txt
> Use this file to discover all available pages before exploring further.
# Azure
> Learn how to integrate Vantage with Azure.
Vantage integrates with your Azure account using an Active Directory [service principal](https://learn.microsoft.com/en-us/azure/active-directory/fundamentals/service-accounts-principal).
## Before You Begin: Review Azure Billing Account Types
Microsoft offers different billing account types based on your organization’s setup. The way that you'll complete your Azure integration with Vantage depends on which account type you have.
To determine your billing account type, follow the steps in the [Azure documentation](https://learn.microsoft.com/en-us/azure/cost-management-billing/manage/view-all-accounts#check-the-type-of-your-account).
If your organization uses a Microsoft Customer Agreement (MCA), Enterprise Agreement (EA), or Azure Cloud Solution Provider (CSP), follow the specific integration steps linked below.
If you are on another account type such as Pay as You Go, use the instructions on this page to integrate your account with Vantage.
Follow the specific integration steps for Microsoft Customer Agreement (MCA) accounts.
Follow the specific integration steps for Enterprise Agreement (EA) accounts.
Follow the specific integration steps for Azure Cloud Solution Provider (CSP) accounts.
## Azure GovCloud
Azure Government Cloud requires additional manual configuration by the Vantage team. Customers cannot currently enable this through the UI. If you need to connect an Azure Government Cloud subscription, contact [Vantage Support](mailto:support@vantage.sh) and provide the following information after integrating:
* Your Azure Government Cloud tenant ID
* The billing account ID associated with the GovCloud tenant (`/providers/Microsoft.Billing/billingAccounts/`). Note: Subscription-based GovCloud accounts may not have a billing account ID.
**Azure CSP accounts are not supported for Azure Government Cloud.** Azure CSP integrations rely on the Microsoft Cost Management and Billing API, which is not available for Azure Government Cloud subscriptions. If you have an Azure CSP account with Government Cloud subscriptions, you will not be able to integrate these subscriptions with Vantage.
## Connect Your Azure Account (Non-MCA, EA, or CSP Account)
This service principal is assigned access to individual [subscriptions](https://learn.microsoft.com/en-us/azure/cloud-adoption-framework/ready/landing-zone/design-area/resource-org-subscriptions).
The service principal is granted [Reader](https://learn.microsoft.com/en-us/azure/role-based-access-control/built-in-roles#reader) permissions. It does **not** have permissions—nor will it ever attempt—to make any changes to your infrastructure.
Instructions are provided below for you to connect via the [Azure CLI](/connecting_azure#connect-via-the-azure-cli) or the [Azure portal](/connecting_azure#connect-via-the-azure-portal).
### Connect via the Azure CLI
#### Prerequisites
* You must have a Vantage **Organization Owner** or **Integration Owner** role to add or remove this integration. See the [Role-Based Access Control](/rbac) documentation for details.
* The below commands are run via the [Azure CLI](https://learn.microsoft.com/en-us/cli/azure/?view=azure-cli-latest). Ensure you have access to Azure CLI and can create service principals and manage their permissions.
* [Create a free Vantage account](https://console.vantage.sh/signup), then follow the steps below to integrate Azure costs.
#### Step 1 - Create an Azure Service Principal
Create a service principal using the following command:
```bash theme={null}
az ad sp create-for-rbac -n "vantage"
```
You should see output similar to the below output:
```json theme={null}
{
"appId": "2d218f0f5-7ad5-4a12-abc7-bad2889d6407",
"displayName": "vantage",
"password": "8zkj3~yswKd433U12SHrvp22UoA6tOOOkZ_BYar2",
"tenant": "1050a480-ef60-43d7-b8db-224aad100b60"
}
```
Record the `appId`, `password`, and `tenant` as you will enter these credentials into the Vantage console.
#### Step 2 - Grant the Service Principal Permissions
Grant permissions to the `appId` from the service principal created above. The scope is a subscription. Ensure you replace `` with the `appId`. Replace `` with your subscription ID.
```bash theme={null}
az role assignment create --assignee --role Reader --scope "/subscriptions/"
```
If you also want Azure Reservations and Azure Savings Plans to appear on the [Commitments](/commitments) page, continue to [Optional Azure Reservations and Savings Plans](#optional-azure-reservations-and-savings-plans). Otherwise, skip to the [Save the Credentials in Vantage](/connecting_azure#save-credentials) section to complete the connection with Vantage.
### Connect via the Azure Portal
#### Prerequisites
* You must have a Vantage **Organization Owner** or **Integration Owner** role to add or remove this integration. See the [Role-Based Access Control](/rbac) documentation for details.
* The below instructions are for connecting using the Azure portal. If you already completed the steps via the Azure CLI, skip to the [Save the Credentials in Vantage](/connecting_azure#save-credentials) section. You should have access to set up service principals and grant those service principals permissions.
* [Create a free Vantage account](https://console.vantage.sh/signup), then follow the steps below to integrate Azure costs.
#### Step 1 - Create a New Application Registration
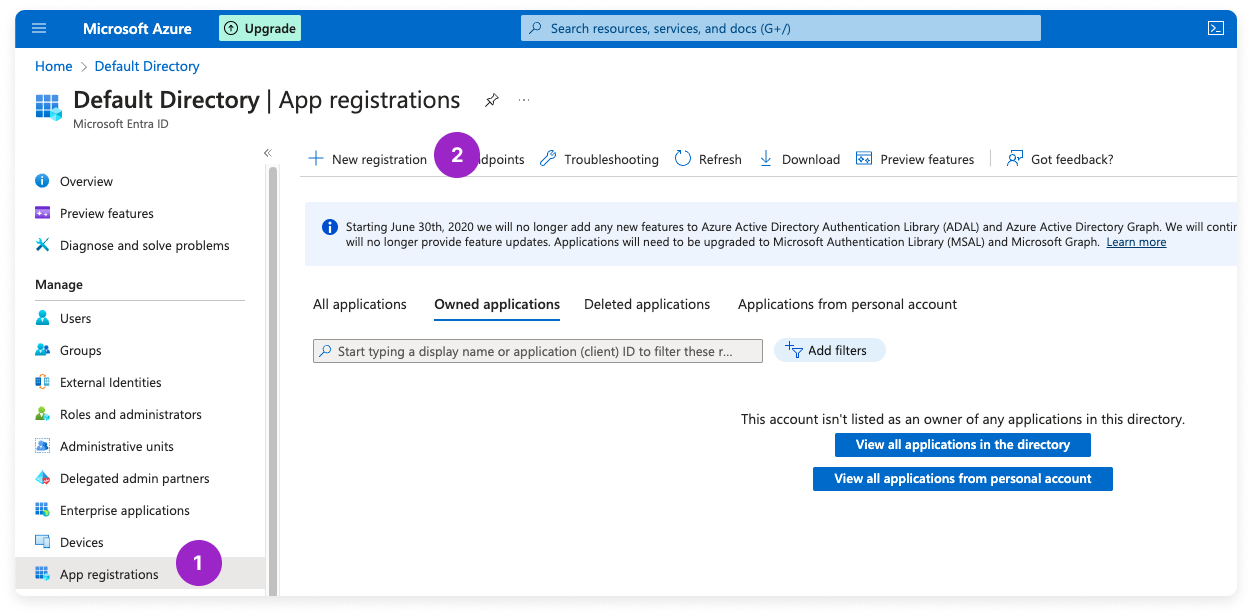
From the main page of the Azure portal, search for and navigate to **Microsoft Entra ID**.
In the left navigation, under **Manage**, select **App registrations**.
Click **+ New registration**.
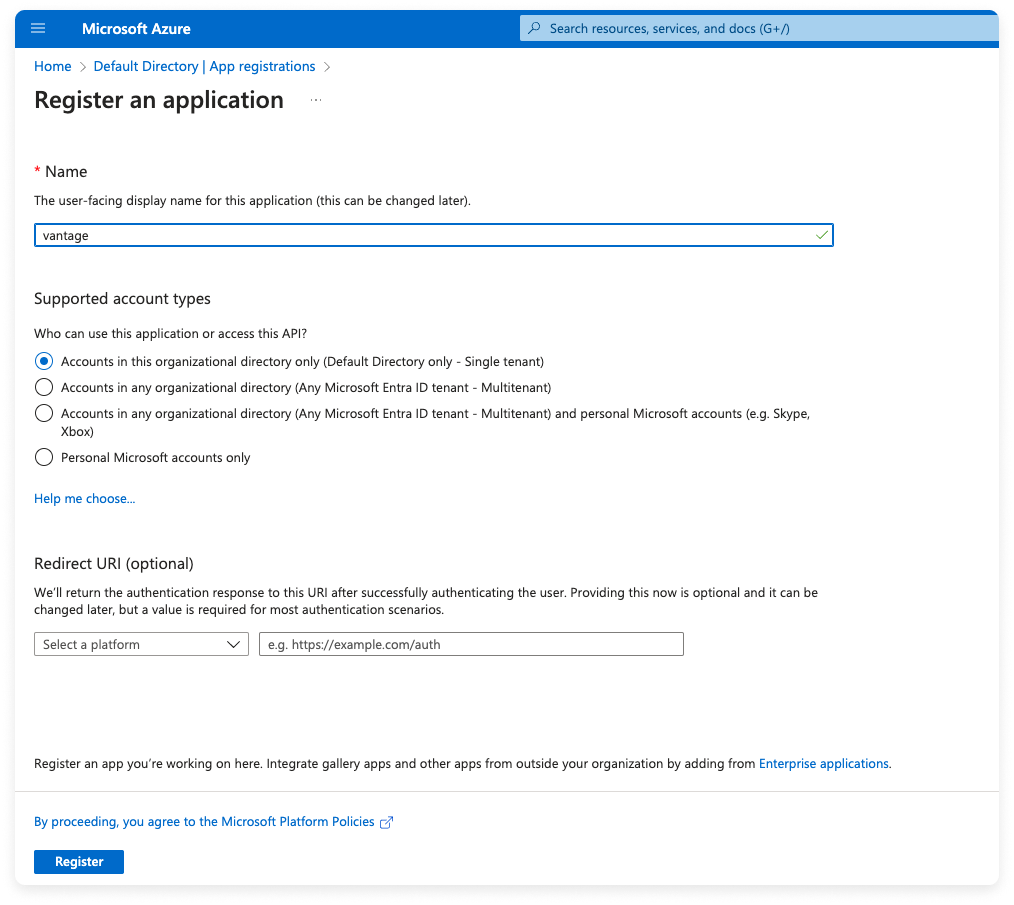
The **Register an application** screen is displayed. For **Name**, enter *vantage*.
Leave all other settings as their defaults and click **Register**.
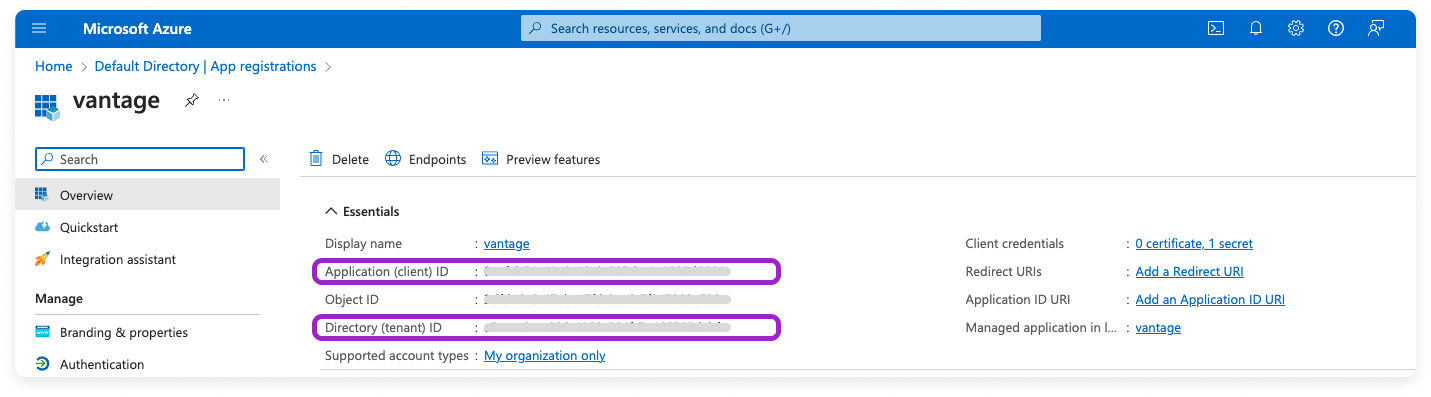
The app details are displayed. Record the **Application (client) ID** and **Directory (tenant) ID** to use later.
#### Step 2 - Generate a Client Secret
On the same page, next to the **Client credentials** field, click **Add a certificate or secret**. (You can also access the **Certificates and secrets** screen from the left navigation menu.)
Click **+ New client secret**.
The **Add a client secret** pane is displayed. For **Description**, enter a description, such as *vantage-secret*.
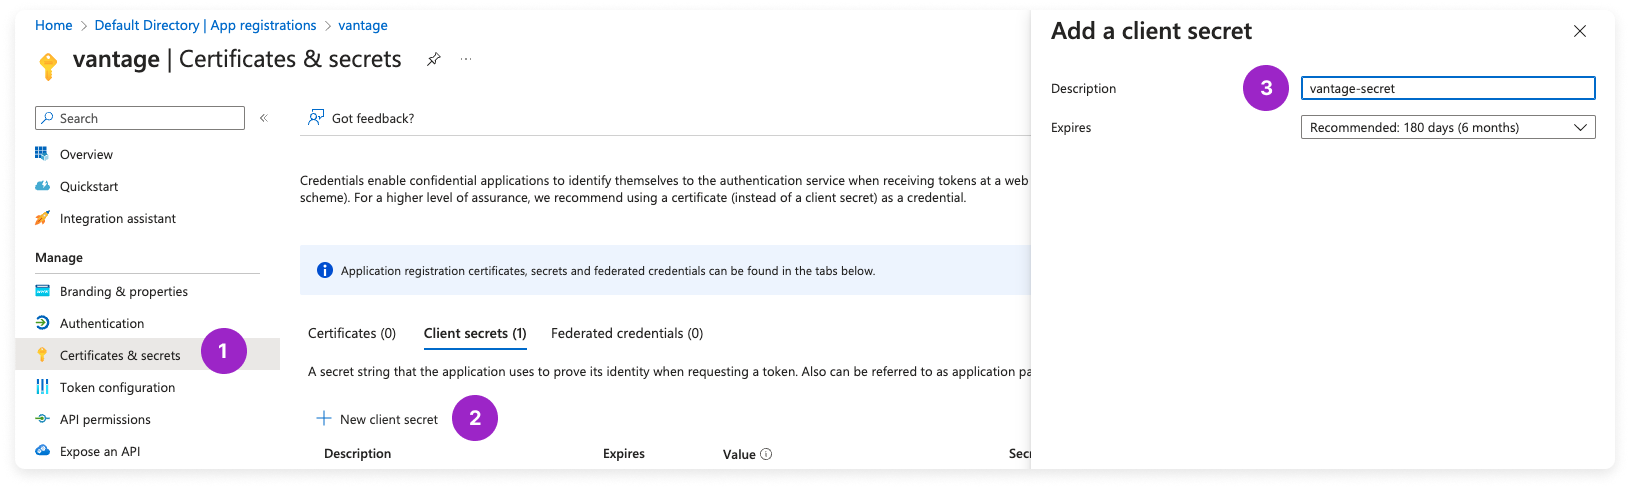
For **Expires**, select an expiration option for the secret.
If this secret expires, you will need to supply Vantage with a new secret *before* the expiration date. See the [Update Your Client Secret](/connecting_azure#update-your-client-secret) section for instructions on how to update your credentials.
Click **Add**.
The newly created secret is displayed. Copy the secret's **Value** to add to the Vantage console later. This value will be displayed only one time.
#### Step 3 - Grant the Service Principal Permissions
From the top navigation, search for and navigate to **Subscriptions**.
Open the subscription for which you will be assigning permissions.
On the left navigation, click **Access control (IAM)**.
Click **Add role assignment**.
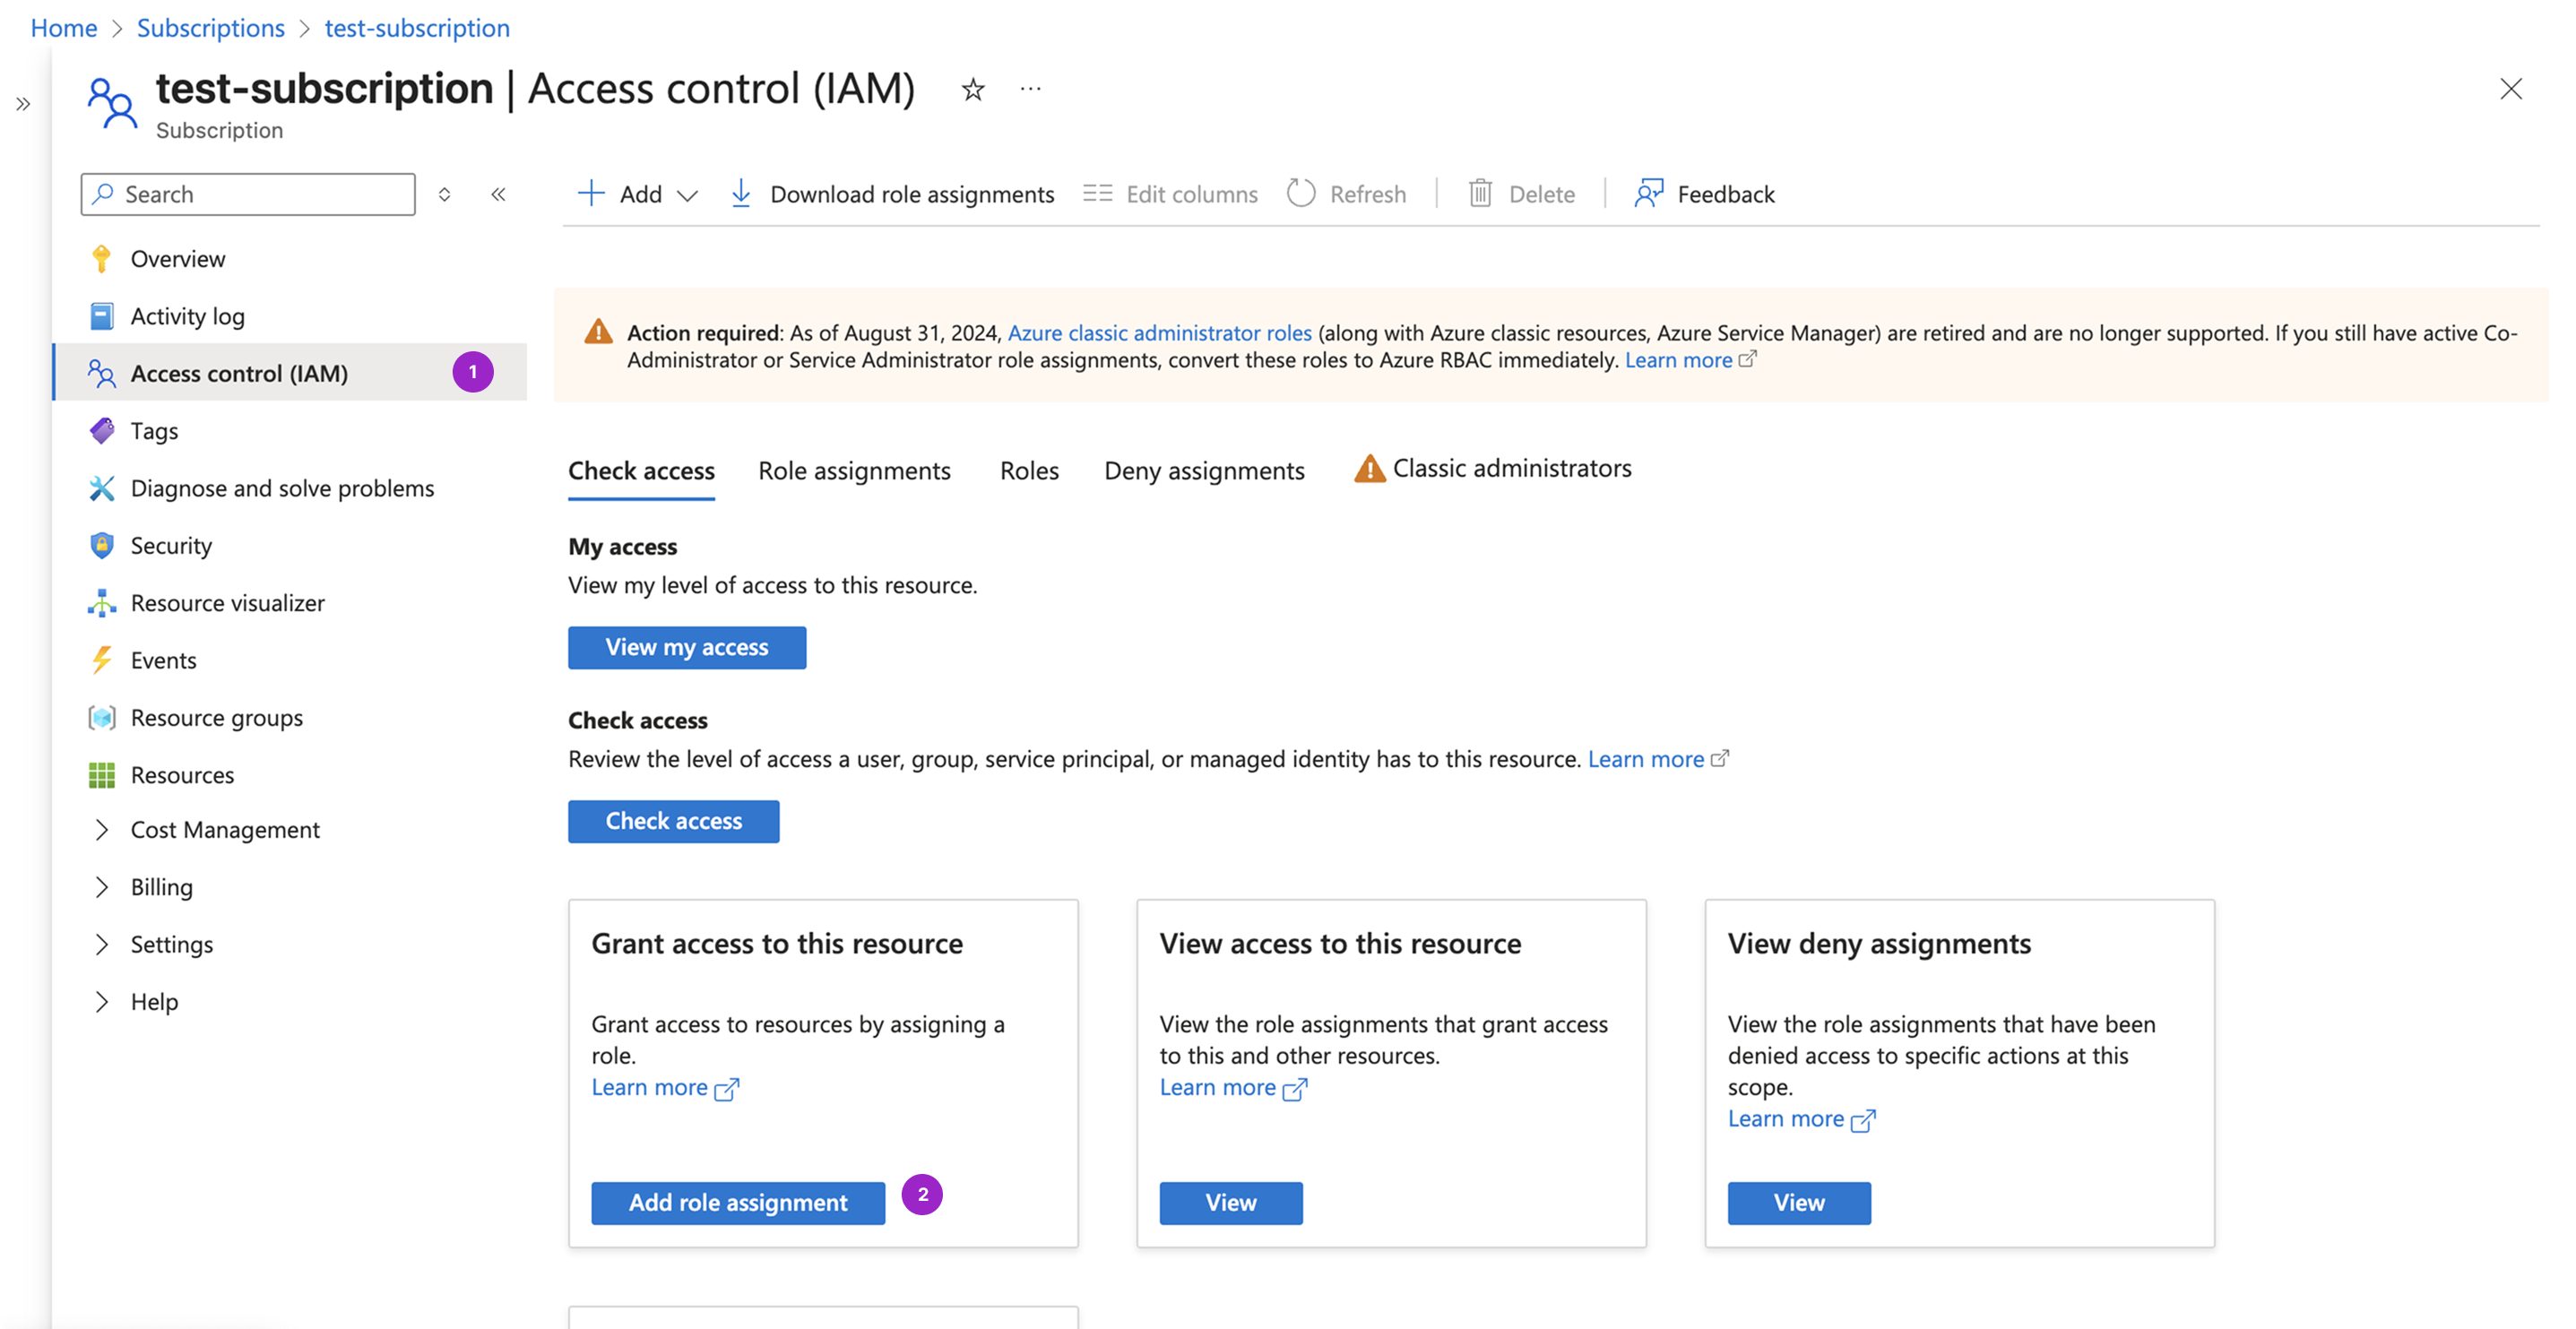
On the **Add role assignment** screen, select **Reader**. Then, click **Next**.
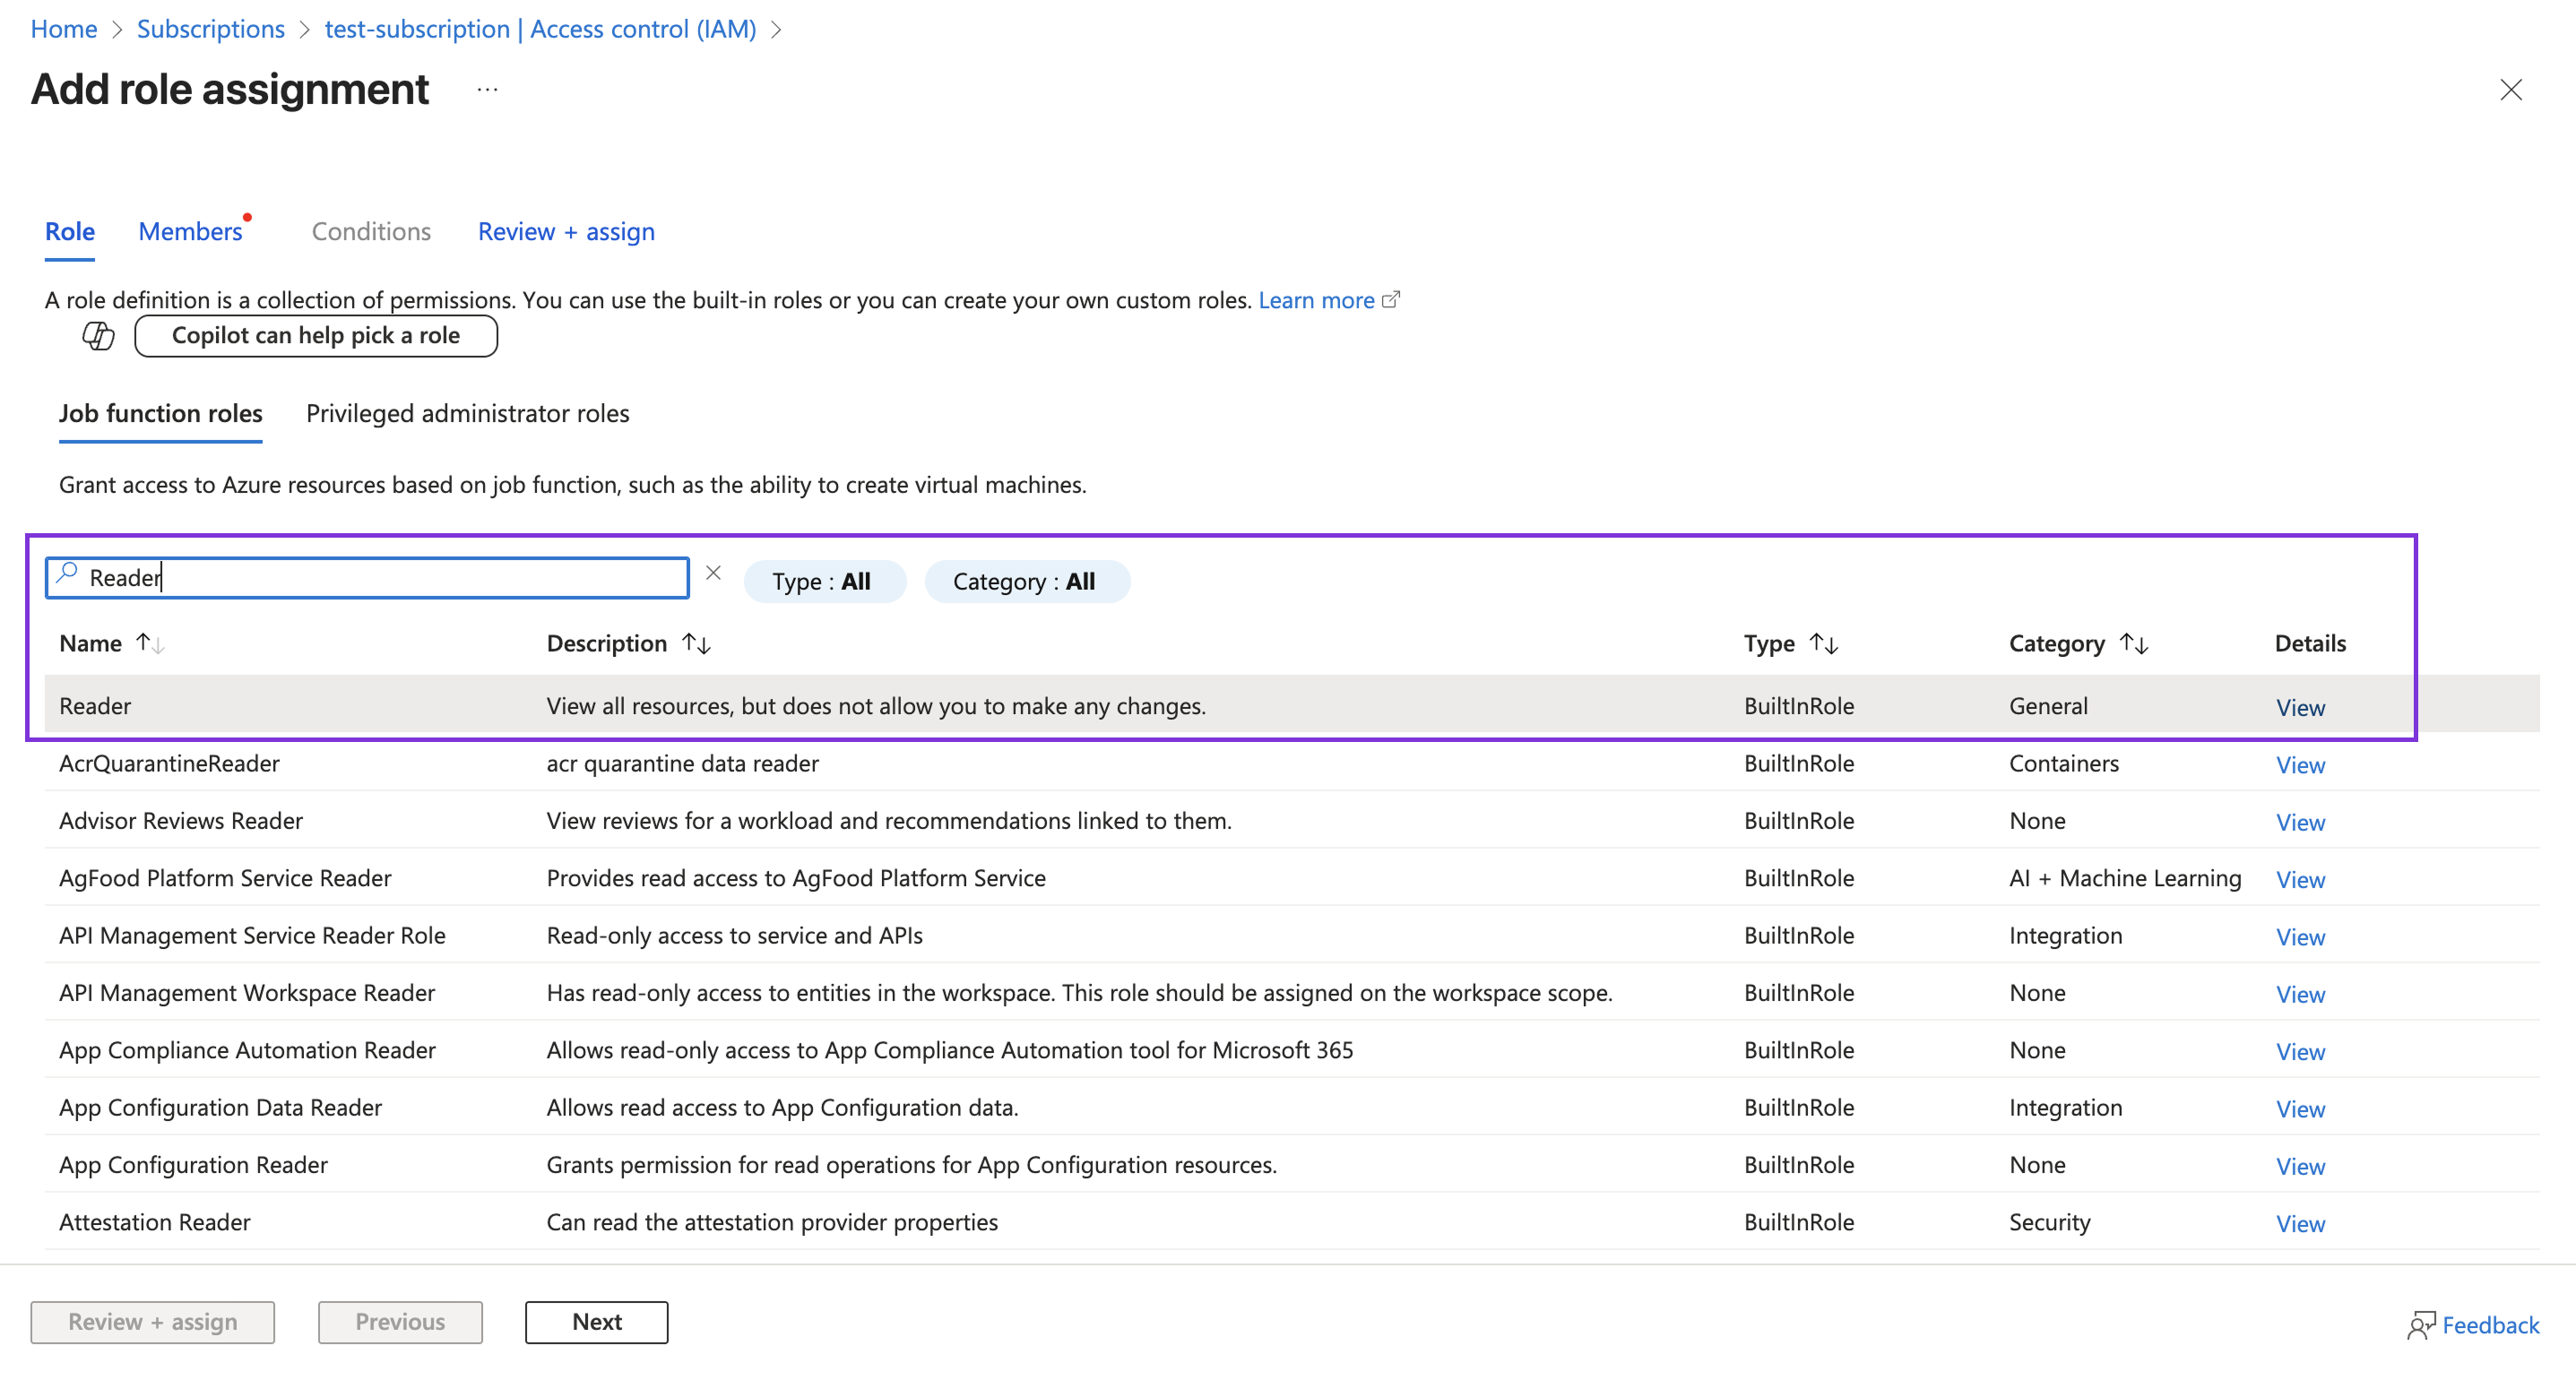
For **Assign access to**, select **User, group, or service principal**.
Click **+ Select members**. The **Select members** tab is displayed on the right. Search for the *vantage* app you created before. Select the listed app, then click **Select**.
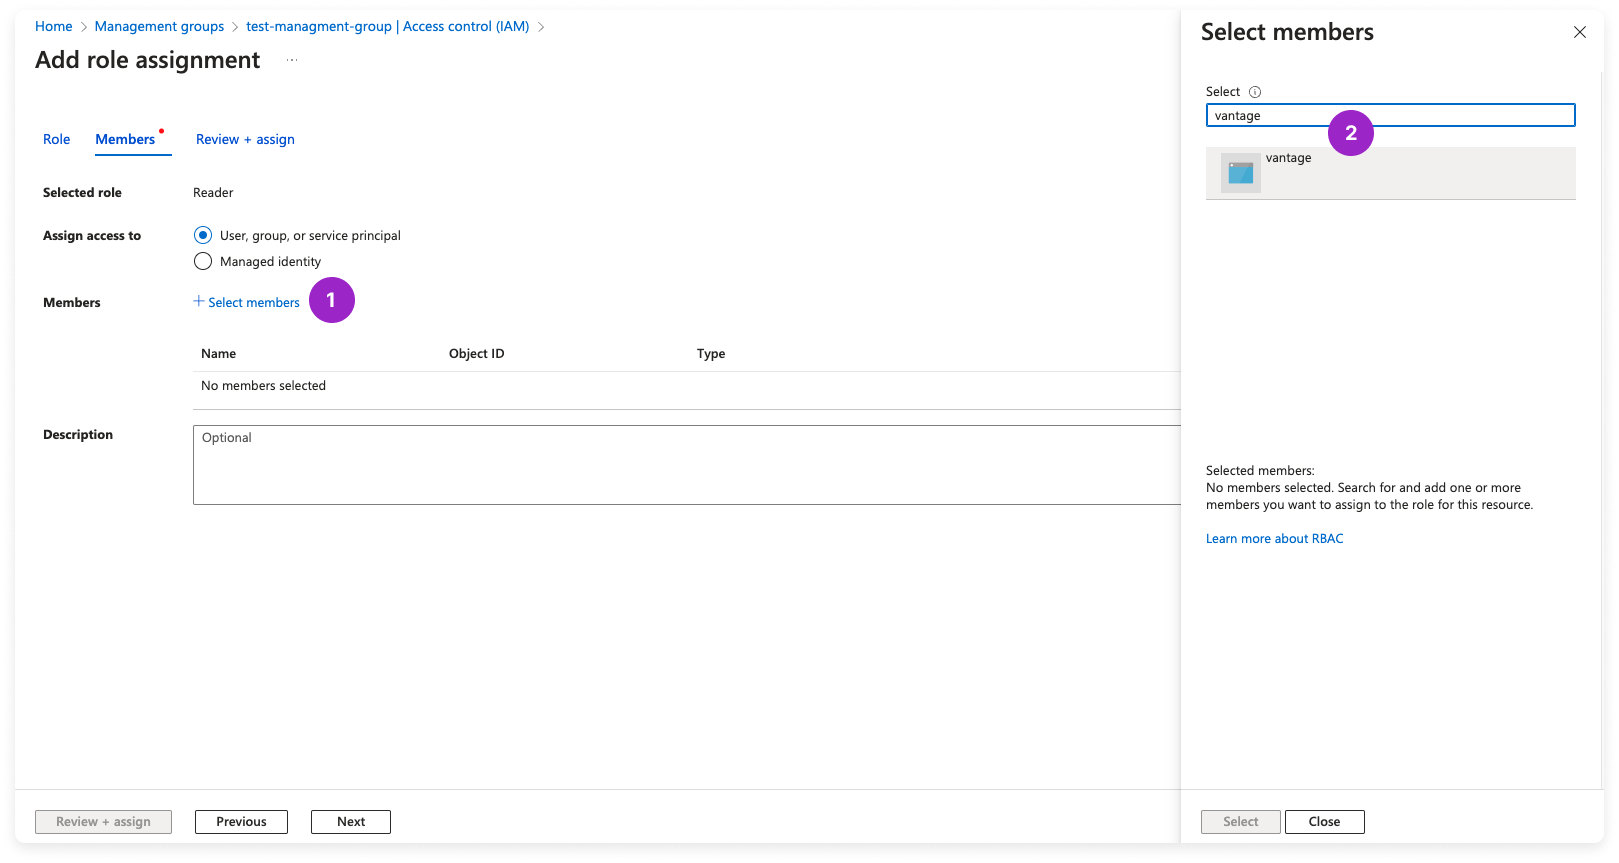
Click **Next** > **Review + assign**.
If you also want Azure Reservations and Azure Savings Plans to appear on the [Commitments](/commitments) page, continue to [Optional Azure Reservations and Savings Plans](#optional-azure-reservations-and-savings-plans). Otherwise, skip to the [Save the Credentials in Vantage](/connecting_azure#save-credentials) section to complete the connection with Vantage.
### Save the Credentials in Vantage
After you complete the steps for connecting via the Azure CLI or Azure portal, follow the steps below to add the Azure tenant ID, service principal App ID, and service principal password/secret in Vantage.
Navigate to the [Integrations page](https://console.vantage.sh/settings/integrations) in the Vantage console, and add an Azure integration.
On the Azure integration page, click **Add Credentials**.
Add the **Azure AD Tenant ID**, **Service Principal App ID**, and **Service Principal Password** you previously obtained, then click **Connect Account**.
After clicking **Connect Account**, you will see the status of your integration change to **Importing** within the Vantage console. This status indicates that Vantage is actively importing your Azure cost data. See the [Integration Status](/vantage_account#integration-status) documentation for details on integration statuses.
## Optional Azure Reservations and Savings Plans
Regular Azure integrations can import cost data without any additional commitment-specific permissions. If you also want Azure Reservations and Azure Savings Plans to appear on the [Commitments](/commitments) page, complete the steps below to grant Vantage access to the Azure commitment APIs.
This guidance applies to [Standard Azure](/connecting_azure), [Azure MCA](/connecting_azure_mca), and [Azure EA](/connecting_azure_ea) integrations. It does **not** apply to [Azure CSP](/connecting_azure_csp), which uses a different integration flow.
Assign the following roles to the *vantage* service principal you created during the initial integration setup:
* **Reservations Reader** (tenant or reservation scope) so Vantage can call `Microsoft.Capacity/reservationOrders` and list reservations.
* **Savings Plan Reader** (tenant scope, e.g., `/providers/Microsoft.BillingBenefits`) so Vantage can call `Microsoft.BillingBenefits/savingsPlanOrders` and list savings plans.
Run the following commands using the Azure CLI. Replace `` with the Application (client) ID of the app registration you created for Vantage.
```bash theme={null}
az role assignment create --assignee --role "Reservations Reader" --scope "/providers/Microsoft.Capacity"
az role assignment create --assignee --role "Savings Plan Reader" --scope "/providers/Microsoft.BillingBenefits"
```
If these permissions are missing, your Azure costs can still appear in [Cost Reports](/cost_reports), but Azure commitments will not sync to [Commitments](/commitments). You may also see a banner on the Commitments page prompting you to add the missing scopes.
If your integration is already connected, add the missing permissions in Azure and wait for the next integration refresh. If commitments still do not appear after the integration returns to **Stable**, contact [support@vantage.sh](mailto:support@vantage.sh).
## Next Steps - Manage Workspace Access
Once the import is complete and the integration status changes to **Stable**, you can select which workspaces this integration is associated with. See the [Workspaces](/workspaces#manage-workspace-provider-integrations) documentation for information.
## Update Your Client Secret
If you need to update your Azure integration's client secret, you can do so from the individual Manage Connection integration page in Vantage.
Navigate to the [Azure Integrations page](https://console.vantage.sh/settings/azure).
Select your Azure integration to access the **Manage Connection** page.
At the top, click **Update Client Secret**.
Enter the new client secret value (not the client secret ID) and save your changes.
Contact [support@vantage.sh](mailto:support@vantage.sh) to request that your integration data be reimported with the new credentials.
## Data Refresh
See the [provider data refresh documentation](/provider_data_refresh) for information on when data for each provider refreshes in Vantage.
## Azure Amortization
Azure stores their actual and amortized billing data in separate tables. Vantage pulls in both tables for you to view either cost types within Cost Reports, with no additional integration steps required. To switch between actual and amortized costs, select **Settings** at the top of any Cost Report, and check or uncheck the **Enabled** checkbox in the Amortization section.
Azure does not show unused reservations within their amortized views. If performing charge back for Azure cost data, ensure you use either actual costs or use Custom Providers to add in unused reservation costs to your amortized Azure views.
## Azure Cost Recommendations
Vantage provides different [cost recommendations](/cost_recommendations) for Azure. Each recommendation includes a potential monthly savings value, which is something that is not shown in Azure Advisor. Savings estimates are displayed in USD.
## Kubernetes and AKS
Vantage supports Kubernetes cost allocation on Azure, including Kubernetes clusters running on VMs or through AKS. Vantage recommends using the [Vantage Kubernetes agent](/kubernetes_agent) to monitor and ingest Kubernetes costs from Azure.
## Troubleshooting
### Missing Subscriptions
If only some of your Azure subscriptions appear in Vantage, the service principal likely has permissions scoped to a single subscription rather than all subscriptions under your billing account.
To resolve this:
* **Use a billing account/billing scope integration (recommended)**: If your organization has a Microsoft Customer Agreement (MCA) or Enterprise Agreement (EA), connect at the billing account (billing scope/enrollment) level instead. This gives Vantage visibility into all subscriptions without managing per-subscription permissions. See [Choosing the Right Azure Integration](#choosing-the-right-azure-integration) below for details.
* **Add additional subscriptions**: For pay-as-you-go customers, repeat the `az role assignment create` command for each subscription you want to import. See [Step 2](#step-2---grant-the-service-principal-permissions) for the CLI command.
The billing account/billing scope visibility described above applies to **cost data only**. To populate the [Active Resources](/active_resources) tab and Azure recommendations, the service principal still needs the built-in **Reader** role at the subscription (or management group) scope, even with an MCA or EA integration. See the [Azure MCA](/connecting_azure_mca#step-6-grant-reader-access-for-active-resources-and-recommendations) and [Azure EA](/connecting_azure_ea#step-6-grant-reader-access-for-active-resources-and-recommendations) documentation for details.
After updating permissions or adding a new integration, navigate to **Settings > Integrations > Azure** in the Vantage console and verify that your integration status changes to **Stable**. New subscriptions may take up to 24 hours to appear after permissions are granted.
If you grant access to an additional subscription after your Azure integration is already connected and you need historical cost data for that subscription, contact [support@vantage.sh](mailto:support@vantage.sh) to request a reimport after the new permissions are in place.
### Integration in Error or Warning State
Azure integrations can occasionally enter an **Error** or **Warning** state. Common causes include:
| Cause | Resolution |
| ---------------------------------------------- | ----------------------------------------------------------------------------------------------------------------------------------------------------------------------------------------------------------------------------------------------------------------------------------- |
| Expired client secret | Generate a new client secret in Azure and update it in Vantage. See [Update Your Client Secret](#update-your-client-secret). |
| Service principal permissions revoked | Re-grant the service principal Reader access on the affected subscriptions. See the [CLI](#step-2---grant-the-service-principal-permissions) or [portal](#step-3---grant-the-service-principal-permissions) instructions. |
| Transient Azure API errors at month boundaries | These typically resolve within 24–48 hours without action. If the error persists beyond 48 hours, contact [support@vantage.sh](mailto:support@vantage.sh). |
| Subscription moved or deleted | Vantage automatically skips individual subscriptions that are no longer accessible. If the error persists, verify that the service principal still has access to at least one active subscription, or contact [support@vantage.sh](mailto:support@vantage.sh). |
| Pay-as-you-go subscription import failures | In rare instances, some pay-as-you-go subscriptions require a backend configuration change to import successfully. If your integration enters an error state after connecting a pay-as-you-go subscription, contact [support@vantage.sh](mailto:support@vantage.sh) for assistance. |
For a description of each status indicator, see the [Integration Status](/vantage_account#integration-status) documentation.
### Choosing the Right Azure Integration
Vantage supports four Azure integration types. Use the table below to determine which one to configure:
| Integration | Billing Model | Scope | Best For |
| ----------------------------------- | ---------------------------- | ------------------------ | ---------------------------------------------------- |
| [Standard Azure](/connecting_azure) | Pay-as-you-go, MOSP | Individual subscriptions | Most Azure customers without an enterprise agreement |
| [Azure MCA](/connecting_azure_mca) | Microsoft Customer Agreement | Billing account | Organizations with an MCA billing account |
| [Azure EA](/connecting_azure_ea) | Enterprise Agreement | Enrollment | Large enterprises with an EA |
| [Azure CSP](/connecting_azure_csp) | Cloud Solution Provider | Partner Center | MSPs in the Microsoft CSP Partner Program |
If you are unsure which billing model your organization uses, check the **Cost Management + Billing** section in the Azure portal. The billing account type is displayed on the overview page.
### Costs Displayed in Wrong Currency
If your Azure costs are billed in a non-USD currency (e.g., INR, EUR, GBP) but appear as USD amounts in Vantage, this is because Vantage displays all costs in USD by default. The underlying amounts are correct, but the currency symbol may not match your billing currency.
To display costs in your billing currency, enable **Currency Conversion** or a **Display Preference** on your workspace:
* **Display Preference**: If your costs are already billed in a non-USD currency, enable a Display Preference to show the correct currency symbol without converting amounts. This is ideal when you want costs to reflect the currency in which they are billed.
* **Currency Conversion**: Convert cost amounts to a different currency using exchange rates. You can choose between a daily rate or an end-of-billing-period rate.
To configure either option, navigate to **Settings > Workspaces**, select your workspace, and update the **Currency Settings** section. See the [Currency Conversion](/vantage_account#currency-conversion) documentation for details.
### Azure Reserved Instance Visibility
Azure Reserved Instance costs are available in Vantage through [Cost Reports](/cost_reports). Azure Reservations and Savings Plans can also appear on the [Commitments](/commitments) page after you add the permissions in [Optional Azure Reservations and Savings Plans](#optional-azure-reservations-and-savings-plans). To view Reserved Instance amortized costs, ensure amortization is enabled on your Cost Report (see [Azure Amortization](#azure-amortization) above).
Azure does not include unused reservations in their amortized billing views. If you need to account for unused reservation costs, use [Custom Providers](/connecting_custom_providers) to supplement your amortized Azure data.
For optimization recommendations based on your Reserved Instance usage, see [Azure Cost Recommendations](/cost_recommendations#azure-recommendations).
## Azure Reporting Dimensions
On Azure [Cost Reports](/cost_reports), you can filter across several dimensions:
* Resource Group (resource group name)
* Category (e.g., Virtual Network IP Addresses)
* Tag/Not Tagged (includes Azure tags and [virtual tags](/tagging) created in Vantage for this provider). In addition, the following provider tags are automatically created by Vantage from Azure data and are available for filtering and grouping:
* `azure:costCenter`: The cost center value from Azure billing data, allowing you to filter and group costs by cost center.
* `azure:resourceGroup`: The resource group name associated with the cost, allowing you to filter and group costs by resource group. Use the separate Resource Group dimension for the full name.
* `azure:InvoiceSectionId`: The invoice section ID when present in the source data, allowing you to filter and group costs by invoice section.
* `azure:InvoiceSectionName`: The invoice section name when present in the source data, allowing you to filter and group costs by invoice section.
* Subcategory (e.g., Virtual Network Standard IPv4 Static Public IP)
* Resource (resource ID)
* Region (e.g., Us East)
* Charge Type (e.g., Usage)
* Subscription (subscription name)
* Marketplace (Toggle to show only Marketplace purchases or excluded)
* Service (e.g., Virtual Machines)